Updated Recipes Issued For http://www.guaishushu1.com from 14 December to 26 January 2016

INTRODUCTION

I am sorry that I did not updated this old blog since i have the new blog http://www.guaishushu1.com. However, this blog is still alive.

Just an update, the 24 posts that I have issued in the last weeks are as follows. Please click on the title or picture to go to individual recipes in the new blog. If you are following my old blog www. https://kwgls.wordpress.com, I would appreciate if you can follow the new blog too..

Due to the transition to this new blog, I have in in fact missed out a lot of readers of the old blog (https://kwgls.wordpress.com) who are still not away of the new blog http://www.guaishushu1.com. I just hope that they have a chance to see this update and follow me to get new recipes. On and off, I will update this blog and some sections of the old blog will be closing soon after Chinese New Year.


SPECIAL COMPILATION OF 80 CHINESE NEW YEAR RECIPES–PART 1–Cookies, Snacks and Cakes ( 80 春节食谱汇编 1–糕点和曲奇)

compilation-cny-20162_thumb.jpg

Poon Choi aka Peng Cai or Basin Dish (盆菜)

IMG_5133_thumb.jpg

Red Bean Niangao (红豆年糕)

IMG_4876

Auspicious Koi Agar Agar (吉祥鲤鱼燕菜)

IMG_4238

Agar Agar Sweets (燕菜糖)

IMG_5424_thumb.jpg

Monkey Fortune Biscuits (猴王贺饼)

IMG_4026_thumb.jpg

Chickpeas cookies (马豆酥)

IMG_5205_thumb.jpg

Cashew Nut Cookies (腰豆酥饼)

IMG_3753_thumb.jpg

Coffee Cookies (咖啡曲奇)

IMG_4362

Chinese Almond Biscuits (杏仁酥饼)

IMG_3121

Oreo Milky Biscuits (Oreo 奶香饼干)

Oreo Milky Biscuits (Oreo 奶香饼干) 26

Traditional Flower Moulded Chinese New Year Snack–Honeycomb cookies, Kuih Loyang aka Kuih Ros (蜂巢饼或糖环)

IMG_3331_thumb.jpg

Kampar Chicken Biscuit (Kai Zai Paeng or 鸡仔饼)

IMG_4513_thumb.jpg

Lemon/Orange Meringue Kisses or Ice Cream Cookies (香橙蛋白霜饼/冰淇淋饼)

IMG_3848_thumb.jpg

Prune Lapis (黑枣千层蛋糕)

IMG_3220_thumb.jpg

Special Compilation On Egg White Recipes (蛋清食谱特别汇总)

PicMonkey-Collage2_thumb.jpg

Braised Egg Whites (卤蛋白)

IMG_3620_thumb.jpg

Classic Cottage or Shepherd Pie (牧羊人馅饼)

IMG_3483

Korean Ginseng Chicken Soup–Samgyetang (삼계탕 韩式人参鸡汤)

IMG_3050_thumb.jpg

Braised Sea Cucumber With Minced Meat (海参酿肉)

IMG_5111_thumb.jpg

Chinese Preserved Radish Steamed Fish (菜脯蒸鱼)

IMG_2876

Sambal Stingray (烧烤魔鬼鱼)

Sambal Stingray (烧烤魔鬼鱼) 36

Sichuan Style Dried Fried French Beans (干煸四季豆)

IMG_2060

Mixed Fruit Log Cake (杂果树桐蛋糕)

IMG_1773


Updated Recipes Issued For http://www.guaishushu1.com

i am sorry that I did not updated this blog since i have the new blog http://www.guaishushu1.com. However, this blog is still alive. Just an update, the posts that I have issued in the last weeks are as follows. Please click on the title or picture to go to individual recipes. If you are following my old blog www. https://kwgls.wordpress.com, I would appreciate if you can follow the new blog too..

Swine Stew Soup aka Pig Organ Soup (潮州猪杂汤)

IMG_6459

Lemon Mid Wings (柠檬鸡翅)

IMG_1257

Cranberry Biscuits (蔓梅饼干)

IMG_1194

Egg White Almond Crisp (蛋白杏仁瓦片)

IMG_1036

Apple Crumble Muffins (苹果小松饼)

IMG_0670

Chocolate Nestum Finger Biscuits (巧克力麦片手指饼干 Biskuit Jejari Nestum Coklat)

IMG_0854

Almond Barley Dessert (薏米杏仁糊)

IMG_0715

Traditional Shell Snacks?–Kuih Siput (螺旋饼)

IMG_0583

Oreo Muffins (Oreo 小松饼)

IMG_9898

INTRODUCTION

Oreo is a trendy cookie and it seems that any recipes that have Oreo cookies will receive great attention. It is definitely one of the most successful product that Nabisco has introduced.

IMG_9874

My kids loved to eat Oreo and since I have a packet at home, I thought I might as well churn into some Oreo muffins and share with readers. Since October 2014, I has only shared one muffin recipe  it is time to create some recipes.

IMG_9880

You will be surprised that readers who excel in the preparation of chiffon and ogura cakes failed terribly in the preparation of muffins. Again, for muffins, not to over mix the batter is critical.

IMG_9886

Essentially, muffin is just a mixing of dry and wet ingredients lightly and swiftly.. Unlike other cake batters that need to mix until well combined, always remember that lumpy batter is acceptable or recommended for muffins. If you stir too much, gluten will be formed and your muffin will become kuih like structure.

IMG_9890

Preparation of muffins is fast, baking is also fast and taste is good. It is very suitable for working mothers.

IMG_9888


WHAT IS REQUIRED

Servings: 6-7 medium muffins depend on size.

IMG_9856

  • 125 grams of butter (melted)
  • 125 grams of brown sugar or castor sugar
  • 120 grams of self raising flour
  • 100 grams of Oreo biscuits
  • 50 grams of fresh milk
  • 2 eggs
  • 1/8 teaspoon of baking soda (optional)
  • Extra 2-3 Oreo biscuits for toppings

IMG_9882


STEPS OF PREPARATION

  • Pre-heat the oven to 180 degree Celsius.

PicMonkey Collage1

  • Melt the butter in the microwave. Add the beaten eggs and milk , stir until well combined. Set aside.

  • In a food processor, blend Oreo biscuits until fine. If you do not have a food processor, you can always put in a plastic bag and use something hard to pound it .

PicMonkey Collage2

  • In a mixing bowl, put self raising flour, baking soda, brown (or castor) sugar , stir until well mixed.Make a well in the centre.  Gradually pour the egg and butter mixture. Use a fork or tablespoon to lightly and swiftly mix the batter. Note that lumpy batter is acceptable.

  • Transfer the batter to the muffin cups filling at least 80% full. Top with additional Oreo crumble if preferred.  Bake in the pre-heated oven of 180 degree Celsius for 15-20 minutes or when a skewer inserted into the centre comes out clean. Timing will depend on size of muffin and individual oven. Muffin taste better after one night of resting.

IMG_9892


CONCLUSION

All muffin recipes are simple and straight forward and do give it a try if you are an Oreo  fan.

IMG_9894

Hope you like the post today. Cheers and have a nice day.

IMG_9876


For more recipes, you can refer to my RECIPE INDEX (updated as at 13 March 2015)  here and you can follow me at PINTEREST or visit the blog’s FACEBOOK PAGE to keep abreast of my future posts. Also follow me at INSTAGRAM or TSU, a new social network for some more personal sharing other than recipes.

food bloggers[4]

Food paradize[8]

You can also join the FOOD BLOGGERS AND FOODIES UNITED FACEBOOK GROUP and FOOD PARADISE 美食天堂 to see more recipes. I am posting my daily home cooked food in the above Facebook Group daily. I would be more than happy if you can  post in the Group for the recipes that you tried from my blog.

pinterest[4]

If you are a Pinterest user and you are interested to have more recipes, you can join or follow this Pinterest Board set up by me  where there are more than 2600 recipes worldwide and pinned by various bloggers: FOOD BLOGGERS AND FOODIES UNITED PINTEREST BOARD.

IMG_9868

Matcha Cream Cheese Pineapple Rolls (绿茶奶酪凤梨卷)

IMG_9608

INTRODUCTION

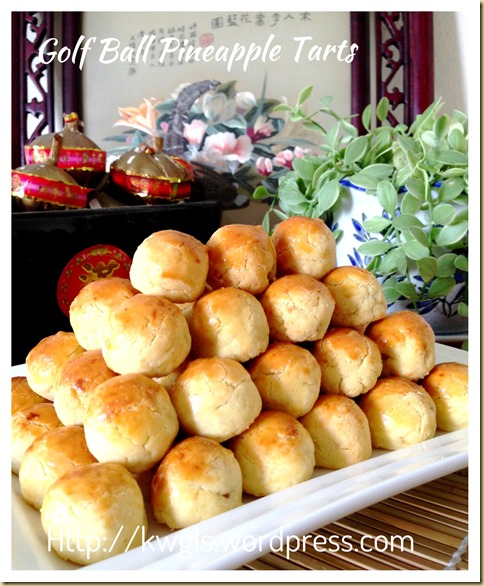
I have my popular Golf balls pineapple tarts in this post  Golf Ball Pineapple Tarts (凤梨酥)- Part 2

IMG_38481

I also have the open face traditional pineapple tarts in this post: Open Faced Pineapple Tarts (凤梨挞)

IMG_78811

In this year, I have issued the Taiwanese Pineapple Cakes in this recipe: Taiwanese Pineapple Cake (台式凤梨酥)

IMG_2954

But I am lacking another popular pineapple tarts recipe in the form of rolled dough or pineapple rolls.. So I thought this year I will share with readers this pineapple rolls to make my pineapple tarts recipes complete.

IMG_9591

I am rather unhappy with my new kitchen gadget, the special rolling pin for this pineapple rolls. I did not research before I bought this cheap gadget in a bakery shop.. When I tried to use, I found that it is not as easy as what I thought. In fact, it is quite tough as the dough is pressed and difficult to roll.

IMG_9622

Subsequently, I search in the internet and I found that there is another type of pump which will give a better shape for rolling. I would advise if you do not have any gadget and intend to buy, do buy those that come with a piston type.

IMG_9612

In the previous year, many readers are asking me if I have any cream cheese pineapple tarts dough recipe, so i have decided to incorporate this cream cheese and added a green tea flavouring. The taste is delicious and texture is nice but personally, I would prefer the traditional golf balls type of pastry which you can refer to the post above.. But if you are looking for a change, you can always tried this..

IMG_9626

I have a big Kenwood Chef mixer, and at time it becomes a burden for the preparation of a small quantity of dough or creaming with butter. Therefore, I have resorted to the use of a food processor in the preparation of dough. This is not a must, you can always use the traditional “rubbing method” or “creaming method” of creaming butter and sugar until light and fluffy. Feel free to use the method that are most suitable to your work flow.

IMG_34631

If you need quick and easy pineapple jam recipes, you can refer to this post: Quick and Easy 30 minutes Homemade Pineapple Jam (30 分钟简易凤梨酱)

IMG_9600


WHAT IS REQUIRED

Servings: About 30-40 rolls depending on size

IMG_95741

  • 400 grams of ready made pineapple jam (divided into 40 pineapple jam rolls of about 10 grams each)
  • 400 grams of cakes flour (10% or 25 grams can be substitute with corn flour or custard powder)
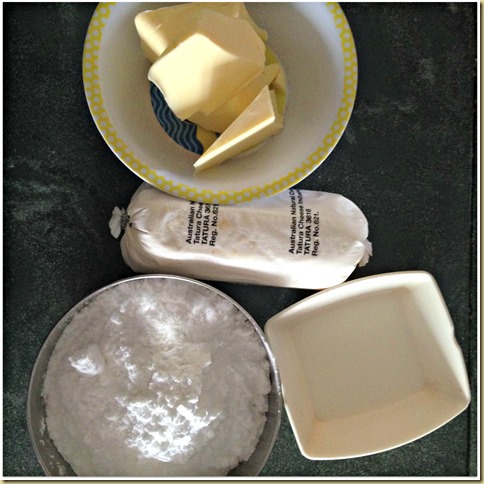
  • 125 grams of cold butter 
  • 125 grams of cold cream cheese
  • 30 grams of icing sugar
  • One egg (lightly beaten)
  • 1 teaspoon of matcha green tea powder

Note that this dough can also be used for golf ball pineapple tarts and open face pineapple tarts

IMG_9604


STEPS OF PREPARATION

PicMonkey Collage1

  • Shape the pineapple jam into an oblong shape of your desired size. In this illustration , it is about 2 cm long with 1 cm diameter.

  • In a food processor, place the butter, cream cheese, flour , icing sugar and green tea powder, pause blend for 1 minute until the flour and butter and cream cheese combined and become crumble form. Add the beaten eggs, pause blend again until it forms a pliable dough. If it is too dry, you can add milk tablespoon by tablespoon. If it is too wet, you can add flour tablespoon by tablespoon . Do not over blend as it may yields gluten that make the dough chewy. Normal creaming method of beating butter, cream cheese and sugar until light and fluffy can be used too.

  • Transfer the dough out to the work surface, if it is too soft, chill in the fridge for 15-30 minutes or  until it is easier to handle.

PicMonkey Collage2

  • Pre-heat the oven to 160 degree Celsius.

  • Take some portion of the chilled dough, place on top of a baking paper, put another piece of baking paper on top, roll it to about 3-4 mm thickness. Take away the top covering baking paper, use the special rolling pin to roll it once for the pattern to appear. Take one dough and roughly measure the size the required. Cut into required size using either a knife or pizza rolling knife.

PicMonkey Collage3

  • Carefully turn over the dough, put a pineapple jam on top on one part of the dough and it ensuring that all the jams are covered. Transfer the pineapple rolls to the baking tray, egg wash if preferred  and baked in the pre-heated oven of 160 degree Celsius for 12-15 minutes.

  • For egg washing, hand beaten 2 egg yolks and add 2 big tablespoons of water and 2 drops of oil. Sift before application.

IMG_9618


CONCLUSION

i  believed this must be one of my ugliest looking batches of pineapple tarts .. Though taste is good but I believed the look can be further improved. Do give it a try if you wanted a change this year.. It is still melt in the mouth with tint of green tea flavour in the dough. It does go well with the pineapple jam.

IMG_9620

Hope you like the post today. Cheers and have a nice day

IMG_9610


For more recipes, you can refer to my RECIPE INDEX (updated as at 13 March 2015)  here and you can follow me at PINTEREST or visit the blog’s FACEBOOK PAGE to keep abreast of my future posts. Also follow me at INSTAGRAM or TSU, a new social network for some more personal sharing other than recipes.

food bloggers[4]

Food paradize[8]

You can also join the FOOD BLOGGERS AND FOODIES UNITED FACEBOOK GROUP and FOOD PARADISE 美食天堂 to see more recipes. I am posting my daily home cooked food in the above Facebook Group daily. I would be more than happy if you can  post in the Group for the recipes that you tried from my blog.

pinterest[4]

If you are a Pinterest user and you are interested to have more recipes, you can join or follow this Pinterest Board set up by me  where there are more than 2600 recipes worldwide and pinned by various bloggers: FOOD BLOGGERS AND FOODIES UNITED PINTEREST BOARD.

IMG_9614


Miso Braised Saba (味增鲭鱼)

IMG_9428

INTRODUCTION

I have been cooking my fish using miso paste for at least a few years..

IMG_9424

There is once when I am running out of Chinese fermented soya beans or tau cheo in my kitchen, it suddenly cropped out from my mind to substitute these tau cheo with miso paste.. Yes, the taste blends very well with what I am cooking. In fact, I found that it is an extremely good substitute for miso since miso is in a paste form whereas we need to break the fermented soya beans for the flavour to develop in our cooking.

IMG_9422

Taste is slightly different from tau cheo but delicious. Out of my curiosity , I goggled “ Miso Saba” and apparently, Japan does have such a dish. After reading a few recipes, I have designed my own recipes which is much simpler but deliciousness will not be compromised.

IMG_9420

Preparation is as easy as ABC with very simple ingredients and some can be omitted if desired. Since Miso is already a full flavour agent, there is not much seasonings you need to add.. What I have added is a small quantity of sugar to negate the slight saltiness.

IMG_9416

This dish is great to go with rice and the sauce is especially tasty. Family members finished the dish in seconds.

IMG_9438


WHAT IS REQUIRED

Servings : 4-6 adult servings

IMG_93991

  • 2-3 Saba fillets
  • 1-1.5 tablespoon of miso paste
  • 1 tablespoon of Japanese rice wine , mirin (optional)
  • 1/2 tablespoon of white sugar (optional)
  • 3 cm of ginger, sliced
  • 3 cloves of garlics
  • About 2 cups of water
  • 2 stalks of spring onion

IMG_9436


STEPS OF PREPARATION

PicMonkey Collage1

  • This step is optional if you can eat fish with bones . Turn the fish fillet with the flesh facing you. Pluck out the bones at the middle of the fish fillets.

  • Put the miso paste with about  2 cups of water , stir until well combined. The volume will depends on the size of your frying pan. if your pan is big, you may need a bit more. The water should at least cover the fish .

  • In a pan, put one tablespoon of oil, pan fried the fish for 1-2 minutes until the fish meat has turned beige. Add in the ginger slices and garlic cloves, sauté for 1 more minute. Add the miso solution and bring to boil. Once it boils, turn the heat to medium and let it simmer for 3-4 minutes. Before off the heat, add the sugar and stir until the sugar dissolved. Off the heat and sprinkle with chopped spring onion before serving.

IMG_9430


CONCLUSION

The last 2 posts on Assam Fish and Stew Halibut received quite a favourable response. Members of Facebook Group are trying out the recipes. I have therefore decided to share this recipe too. I will not insist to use Saba in this recipe, but I would recommend the use of a deep sea fish where there are more omega fatty acids and smoother meat texture. Salmon is definitely a good choice and of course good fish like threadfin fillets can always be used.

IMG_9412

Hope you like the post today. Cheers and have a nice day.

IMG_9426


For more recipes, you can refer to my RECIPE INDEX (updated as at 13 March 2015)  here and you can follow me at PINTEREST or visit the blog’s FACEBOOK PAGE to keep abreast of my future posts. Also follow me at INSTAGRAM or TSU, a new social network for some more personal sharing other than recipes.

food bloggers[4]

Food paradize[8]

You can also join the FOOD BLOGGERS AND FOODIES UNITED FACEBOOK GROUP and FOOD PARADISE 美食天堂 to see more recipes. I am posting my daily home cooked food in the above Facebook Group daily. I would be more than happy if you can  post in the Group for the recipes that you tried from my blog.

pinterest[4]

If you are a Pinterest user and you are interested to have more recipes, you can join or follow this Pinterest Board set up by me  where there are more than 2600 recipes worldwide and pinned by various bloggers: FOOD BLOGGERS AND FOODIES UNITED PINTEREST BOARD.

IMG_9408

Hakka Savoury Tangyuan (客家咸汤圆)

IMG_9178

INTRODUCTION

There is no need to ask me when is Winter Solstice festival, it is always 3 days before Christmas , on 22nd December each year.  I am sharing this post earlier because I just want to fulfil my blogging agenda of sharing one tang yuan recipe per year.

IMG_9188

In the first year, I have shared the basic tangyuan recipe in this post: Time To Celebrate Winter Solstice–Chinese Tangyuan or Glutinous Rice Balls . In this post, i have also shared about the background of tangyuan.

IMG_45731

Last year in 2015, i have shared the an alternative to normal tangyuan , sweet pumpkin tangyuan in this post: Pumpkin Glutinous Rice Balls aka Pumpkin Tangyuan (南瓜汤圆)

IMG_32321

This year, I have decided to share a savoury tangyuan recipe which my late parents used to cook though the childhood version do not have any meat fillings.

IMG_9198

This is not my creative recipe, if you Google from the internet, this dish shall be classified under Hakka cuisines. Apparently, most hakka members in my Facebook Group do cook tangyuan in this manner. As per Chinese baike it was written clearly that:

IMG_9210

“客家咸汤圆是一道美味可口的汉族小吃。将材料1揉成糯米团,并分为15等份。将材料2及调味1搅拌均匀作成馅,再一一将糯米团捏成圆薄形,包入肉馅并捏合即可。用少许油加热将材料4爆香再倒入调味2料煮沸後放入咸汤圆,煮至咸汤圆熟为止。接著再放小汤圆,煮熟至浮出汤面就算完成了。吃的时候可以另外加入茼莴叶或菠菜青菜等,吃起来味道更好。” (Source: http://baike.baidu.com/view/244157.htm)

IMG_9208

If you are unsure how it tastes like, just imagine that the tangyuan is a substitute of noodles in kway tiao or bee hoon or noodle soups. It is just like Fuzhou fish balls except that it is not as springy and fishy as the fish balls .

IMG_9180


WHAT IS REQUIRED

Servings: About 15 big tangyuan and some small tangyuan

IMG_91341

Tangyuan

  • 200 grams of glutinous rice flour
  • About 80-100 grams of plain water
  • 100 grams of minced meat
  • 1 teaspoon of dark or light soya sauce
  • 1 teaspoon of Chinese cooking wine
  • pinches of salt
  • sugar to taste
  • 2 teaspoons of sesame oil
  • 2 sprigs of spring onion, chopped

IMG_91591

Soup Ingredients

  • 1 stalk of vegetable greens (lettuce, caixin, tangO, some napa cabbage)
  • 1 teaspoon of dried shrimps
  • 1 teaspoon of minced garlic
  • 5-6 dried scallops
  • 2 shitake mushrooms, soaked and sliced into small pieces
  • 1 tomato, cut into wedges (optional)
  • Pinches of salt
  • Dashes of white pepper
  • Sugar to taste

IMG_9184


STEPS OF PREPARATION

PicMonkey Collage1

  • Put the minced meat, chopped spring onion  and the seasonings (salt, white pepper, sugar, dark or light soya sauce, sesame oil, Chinese cooking wine) in a bowl, use a chopstick to stir in one direction until well mixed. If preferred, you can add in 1/2 tablespoon of corn starch to enhance the binding . Marinate the meat for at least 1/2 hour.

  • Take out about 2 tablespoons of glutinous rice flour, put 1 –1.5 tablespoons of water, stir and knead until it form a soft dough. Flatten the dough and put in a pot of hot boiling water. Once it floats up , drained.

PicMonkey Collage2

  • While it is hot, transfer the cooked dough to the remaining flour in the mixing bowl. Gradually add in the remaining cold water and use hand to knead until it forms a pliable dough. Shape the dough into a long stripes and cut the dough into 1.5 cm cube size.

  • Take a dough, shape round, flatten it and put a teaspoon of minced meat in the centre, seal the edges, shape round and put in a tray lightly dusted with some glutinous rice flour. Perform the same for the other 14 portions.

PicMonkey Collage3

  • This step is optional. If there are left over dough, you can add some red colouring, knead until the colour is consistent and shape into smaller round balls.

Note:

  • Please ensure that the tangyuans do not touch each other and if there is a lot, you may want to cover both the dough and the completed tangyuan with a piece of wet cloth .

PicMonkey Collage4

  • In a pot, put 1 tablespoon of oil and sauté the garlic, dried shrimps and shitake mushroom until fragrant. Add about 1 litre of water or meat broth  add the minced meat and scallops. Bring to boil and once it boils, lower the heat to medium and let it simmer for 15-20 minutes. Add the tangyuan and once the tangyuan floats up, add the seasonings (salt, white pepper and sugar), tomato and your preferred greens. Simmer for o1-2 minutes and off the heat.

  • The tangyuan is best served hot immediately after it was prepared.


CONCLUSION

If you have never eaten this type of tangyuan before, do give it a try. It is tasty and there are many options in the soup. Feel free to add the ingredients that suits your taste buds.

IMG_9202

Hope you like the post today. Cheers and have a nice day.

IMG_9182


For more recipes, you can refer to my RECIPE INDEX (updated as at 13 March 2015)  here and you can follow me at PINTEREST or visit the blog’s FACEBOOK PAGE to keep abreast of my future posts. Also follow me at INSTAGRAM or TSU, a new social network for some more personal sharing other than recipes.

food bloggers[4]

Food paradize[8]

You can also join the FOOD BLOGGERS AND FOODIES UNITED FACEBOOK GROUP and FOOD PARADISE 美食天堂 to see more recipes. I am posting my daily home cooked food in the above Facebook Group daily. I would be more than happy if you can  post in the Group for the recipes that you tried from my blog.

pinterest[4]

If you are a Pinterest user and you are interested to have more recipes, you can join or follow this Pinterest Board set up by me  where there are more than 2600 recipes worldwide and pinned by various bloggers: FOOD BLOGGERS AND FOODIES UNITED PINTEREST BOARD.


IMG_9192

Stewed Halibut With Fermented Soya Beans (豆瓣酱半煎煮比目鱼)

IMG_9078

INTRODUCTION

I have to be frank when I was young, there are not many cooking methods for fishes in my house. Beside pan frying, braised fish with soya sauce, assam fish, fish steaming and another one is this old classic of braising fish with fermented soya beans.

IMG_9082

Well, I do not know how to properly translate the term for this cooking and in Chawan dialect and Mandarin, it was called “半煎煮“ or “pua jian zhu”. Basically it means that the fish is pan fried first until the exterior is hardened. It is then braised in a gravy of ginger and fermented soya beans.

IMG_9094

It is a comfort dish that goes well with rice or porridge and most Chinese granny should be able to prepare this dish.. The gravy is especially nice to eat with the rice and like my wife, she likes the shredded ginger very much ..

IMG_9084

For today’s illustration, i have used halibut fillet. i bought a piece from the supermarket and the first thing that come to my mind is to cook it this way. I am unsure if halibut is the same as the sole fish that I ate when I was young. i know that they both  came from the same flatfish family but the one i knew is a whole fish and apparently is much smaller and unable to get such a big piece of fillet. This fish has a fishy smell, and one of the best ways of cooking the fish is braising in this strong aromatic soup to get rid of the fishy smell.

IMG_9090

Unsure what are the reasons behind, we always used this type of cooking for fish fillets and not really whole fish. Better fishes such as threadfin can also be used but we never used in smaller fish with lots of bones like ikan selar or ikan kembong..

IMG_9096


WHAT IS REQUIRED

Servings : 3-4 adult

IMG_90681

  • One piece of fish fillet (about 500 grams)
  • 1 tablespoon of fermented soya beans (tau cheo)
  • 5 cm long ginger , shredded
  • 2 cloves of garlic, small slices (optional)
  • 1 teaspoon of sugar
  • Dashes of white pepper (optional)

IMG_9100


STEPS OF PREPARATION

PicMonkey Collage

  • Shred the ginger and cut the garlic into small pieces.

  • Pat dry the fish and coat the fish with some corn flour . However, the coating is optional.

  • In a pan, put 1-2 tablespoons of oil, pan fried the fish until both sides are golden brown. Push the fish to one side of the pan, sauté the ginger and garlic using the cooking oil until aromatic, add the fermented soya beans. Stir fry for additional 1-2 minutes. Add adequate water to cover the fish and reduce the heat to medium. Let it simmer for another 10-15 minutes. Before off the heat, add the sugar and dashes of white pepper . If preferred, starches can be added by mixing 1 tablespoon of corn starch with 3 tablespoons of plain water.

IMG_9088

Note:

  • When pan frying fishes, do not turn the fish for the first 3-4 minutes, otherwise, the skin will break.

  • No salt shall be added to dishes cooked with fermented soya beans as it is already very salty . In the event if it is too salty, add more sugar to neutralize the saltiness.

IMG_9102


CONCLUSION

I have been sharing this type of simple home cooked dishes as I was rather shocked that a lot of new house chefs do not know how to cook this type of simple dishes. They knew the dish, they missed it, they did not have a chance to learn from their mother and I hope my sharing will benefit this group of readers. Having said that, if you still have people to refer to , I would encourage reader to learn from them these simple dishes from them  as you know it definitely will suit your taste bud.

IMG_9098

Hope you like the post today. Cheers and have a nice day.

IMG_9092


For more recipes, you can refer to my RECIPE INDEX (updated as at 13 March 2015)  here and you can follow me at PINTEREST or visit the blog’s FACEBOOK PAGE to keep abreast of my future posts. Also follow me at INSTAGRAM or TSU, a new social network for some more personal sharing other than recipes.

food bloggers[4]

Food paradize[8]

You can also join the FOOD BLOGGERS AND FOODIES UNITED FACEBOOK GROUP and FOOD PARADISE 美食天堂 to see more recipes. I am posting my daily home cooked food in the above Facebook Group daily. I would be more than happy if you can  post in the Group for the recipes that you tried from my blog.

pinterest[4]

If you are a Pinterest user and you are interested to have more recipes, you can join or follow this Pinterest Board set up by me  where there are more than 2600 recipes worldwide and pinned by various bloggers: FOOD BLOGGERS AND FOODIES UNITED PINTEREST BOARD.

IMG_9080

Shredded Ginger Sesame Oil Chicken (姜丝麻油鸡)

IMG_6908

INTRODUCTION

My kids called this dish Zombie Chicken and I said her late grandmother surely will scold them if she had the chance to hear this .. This is because the Chinese words shredded ginger (姜丝) has the same pronunciation as zombie (僵尸)。

IMG_6904

This is another dish that I need no reference to other recipes. it is such a common dish in our household. My late mum always cooked this dish when I was young, at times 2-3 days a week, be it chicken or pork.. So to me this dish is a dish that brought fond memories and I have never get tired of this dish until today ..

IMG_6906

I blogged this recipe in honour of my late mum and as a record of my meat recipes. This is a common household dish that need no further elaboration and I believed every granny will have her very own recipe for the comfort dish. Of course what I am sharing is my mum’s version and it is a quick and fast recipe.

IMG_0869

Cooking this dish is not difficult. The only point to highlight is there must be adequate ginger and the shredded ginger should be sautéed until aromatic. All the procedures that follow are as simple as ABC and nothing much to shout about.

IMG_0845


WHAT IS REQUIRED

Servings: 4-5 adults

IMG_08291

  • 10 drumsticks ,de-skinned and cut into big chunks
  • 5 cm long ginger, de-skinned
  • 2 tablespoons of dark soya sauce
  • 2 tablespoons of Chinese cooking wine
  • 1 tablespoons of sesame oil
  • Sugar to taste
  • Pinches of salt

IMG_8993


STEPS OF PREPARATION

PicMonkey Collage1

  • De-skinned the chicken if preferred. Keep the skin.

  • In a hot pan, pan fry the skin until all the chicken fats are excreted, throw away the skin and use the chicken fats and the sesame oil to sauté the ginger under medium heat until aromatic. If you do not like to reuse the  chicken skin or you do not have the habit of de-skinned the chicken , use a tablespoon of cooking oil and sesame oil  to sauté the ginger.

  • Add the chicken chunks, pan fried until the chickens exterior turn beige. Add the dark soya sauce and stir fry until well combined. Add some water adequate to cover 1/2 the height of the chicken and bring to boil. Once it boils, lower the heat to medium and let it simmer until the chickens are soft. If the water dries up too fast, add more water. Once the chickens are soft, add the seasonings (sugar to taste and pinches of salt) and the cooking wine. Stir until well combined, off the heat and best served with some steaming white rice.

IMG_0855


CONCLUSION

This recipe will be captured under simple household dishes series. If you do not have a chance to learn from your family elders , you may want to give this recipe a try..  Lastly, if you are looking for those mixed vegetable style of ginger chicken, they have added starches to thicken the sauce. You can easily preparing that by mixing 1 tablespoon of corn starch mixed with 3 tablespoon of water.

IMG_8989

Hope you like the post today. Cheers and have a nice day.

IMG_0863


For more recipes, you can refer to my RECIPE INDEX (updated as at 13 March 2015)  here and you can follow me at PINTEREST or visit the blog’s FACEBOOK PAGE to keep abreast of my future posts. Also follow me at INSTAGRAM or TSU, a new social network for some more personal sharing other than recipes.

food bloggers[4]

Food paradize[8]

You can also join the FOOD BLOGGERS AND FOODIES UNITED FACEBOOK GROUP and FOOD PARADISE 美食天堂 to see more recipes. I am posting my daily home cooked food in the above Facebook Group daily. I would be more than happy if you can  post in the Group for the recipes that you tried from my blog.

pinterest[4]

If you are a Pinterest user and you are interested to have more recipes, you can join or follow this Pinterest Board set up by me  where there are more than 2600 recipes worldwide and pinned by various bloggers: FOOD BLOGGERS AND FOODIES UNITED PINTEREST BOARD.

IMG_0873


Classic Carrot Cake With Cream Cheese Frosting (红萝卜蛋糕)

IMG_8577

INTRODUCTION

I have prepared this carrot cake twice using two different recipes..

IMG_8561

The first recipe is from the net and it has the shape but i did not like the texture and I do not think my readers will like this type of dense texture.. It was very dense possibly because golden syrup was used and it took very long hours to bake and hence the crust is rather thick. Having said that, my family members still finished all possibly because of the delicious cream cheese frosting.

IMG_8565

Two days later that is today, i have decided to design a recipe of my own based on my carrot muffin recipe. In my humble opinion, it tastes much better and is very suitable for the cake. The only thing that can be further be improve is the doom shape of the cake. That possibly is due to my smaller pan used and I have to cut off the doom to level it. The cake is fluffier and overall, it just suits my taste buds,

IMG_8773

Therefore in this post, there are two sets of images but what I am sharing is my newer and better recipe. For traditional cake, I have opt to  use traditional rugged style of decoration and I never believed that it must be decorated with carrots made from fondant icing or butter cream.. By the same logic, is it not a sponge cake needs to be decorated using eggs or chocolate cake must be decorated with pieces of chocolate? Well, it is up to reader to decide but I have used some chopped pecan nuts for the topping which in my humble opinion is elegant and goes well with the cake.

IMG_8765


WHAT IS REQUIRED

Servings: Prepare an 8” diameter cake

IMG_87291

  • 150 grams of melted butter or cooking cooking oil
  • 150 grams of carrots (shredded)
  • 150 grams of brown sugar
  • 100 grams of self raising flour
  • 100 grams of plain flour
  • 100 grams of chopped walnuts or pecan nuts
  • 50 grams of fresh milk
  • 1/2 teaspoon of baking soda
  • 1 teaspoon of mixed spice or cinnamon powder (optional)
  • 3 eggs

IMG_0924

  • 250 grams of cream cheese, at room temperature
  • 50 grams of butter, at room temperature
  • 250 grams of icing sugar
  • 2 teaspoons of milk
  • 1/2 teaspoons of lemon juice

  • Additional 1/2 cups of chopped pecan nuts or walnuts for decoration
  • Some additional mixed spices for decoration

IMG_8763


STEPS OF PREPARATION

  • Pre-heat the oven to 170 degree Celsius and lightly grease a 8” diameter round baking tin.

PicMonkey Collage1

  • Shred the carrots until fine and blend the pecan/walnuts until coarsely. Set aside.

  • In the bowl with shredded carrots, add the milk and lightly beaten eggs. Stir until well mixed. Add the brown sugar , stir until well combined.

PicMonkey Collage2

  • Sift in the dry ingredients (self raising flour, plain flour, cinnamon powder or mixed spices) into the wet ingredients bowl in three stages. Use a fork to swiftly and quickly fold it until well mixed. Transfer the batter to the lightly greased tin, level and bake in the pre-heat oven of 170 degree Celsius for about 45 minutes or when a skewer inserted comes out clean. Cool the cake completely before proceeding to the next step.

IMG_0929

  • Beat the cream cheese until light and fluffy. Add softened butter, beat until well combined. Add icing sugar follow by the milk and lemon juice. Beat for 2-3 minutes until well mixed.

PicMonkey Collage3

  • Take out the cake and cut into two equal halves. If there is a doom on the cake, slice it off if preferred. Apply generously the cream cheese frosting on top and the side of the cake. Sprinkle some additional mixed spices and chopped pecans/walnuts before serving. If the frosting is too soft, chill in the fridge for 15 minutes before application.

IMG_8567


CONCLUSION

This is a much simpler recipe that yields better taste and texture than the first recipe that I try. If you are looking for a carrot cake recipe, you may want to consider this simple recipe.

IMG_8563

Hope you like the post today. Cheers and have a nice day.

IMG_8767


For more recipes, you can refer to my RECIPE INDEX (updated as at 13 March 2015)  here and you can follow me at PINTEREST or visit the blog’s FACEBOOK PAGE to keep abreast of my future posts. Also follow me at INSTAGRAM or TSU, a new social network for some more personal sharing other than recipes.

food bloggers[4]

Food paradize[8]

You can also join the FOOD BLOGGERS AND FOODIES UNITED FACEBOOK GROUP and FOOD PARADISE 美食天堂 to see more recipes. I am posting my daily home cooked food in the above Facebook Group daily. I would be more than happy if you can  post in the Group for the recipes that you tried from my blog.

pinterest[4]

If you are a Pinterest user and you are interested to have more recipes, you can join or follow this Pinterest Board set up by me  where there are more than 2600 recipes worldwide and pinned by various bloggers: FOOD BLOGGERS AND FOODIES UNITED PINTEREST BOARD.

IMG_8575


Assam Fish (阿叁鱼)

IMG_8703

INTRODUCTION

This is a recipe that I need no reference from other website. It is a common household dish that was cooked by my late mum since we are very young.

IMG_8705

When I started blogging, I have rejected sharing this type of simple home cooked dishes for fear that readers will not accept such recipes. Apparently, lots of blogger are blogging the dish and since i am cooking today, I will also share this recipe too.

IMG_8717

This is a recipe that can be as elaborate as you want in terms of herbs used. It can also be as simple liked what is cooked by my late mum. Being hailed from Sarawak where practically there are very few Peranakan community, most Chinese households also knew how to cook this dish . What is different from the West Malaysian version is the use of herbs that are not common in Sarawak such as Bunga kentan or daun kesom etc.. Whether these herbs add to the deliciousness of the dish in my humble opinion is a personal reference. I have a hard time to get use to these two herbs when I stayed in Kuala Lumpur and Singapore but are able to accept it now.

IMG_8709

Another reasons that I have excluded these herbs in today’s recipe because I found that a recipe that is overloaded with ingredients will deter readers from trying. Buying a pack of bunga kentan or laksa leaves and using only 10% of it obviously is wasting money .. But if readers insist that this is compulsory in the recipe, you can always add it to suit your taste buds.

IMG_8707

The picture in this post may not be as attractive as it should be . The main reasons is the fish used. In this illustration, ikan selar was used and that is what my mum used to cook ..Usually fish selection will based on fish that are fishy in nature after cooking and the concoction of herbs were used to musk such fishiness. Another common fish that we used to cook is ikan bawal hitam or black pomfret.

IMG_8713

Better fish such as threadfin, garoupa, batang or tenggiri all can be used but to me it is a waste to use these type of fishes to cook this dish. These better fishes can be steamed or grilled or pan fried to enjoy its freshness and sweetness without the need to use lots of herbs. Well, in my opinion, any fishes can be used and I will leave it for readers to decide.

IMG_8719


WHAT IS REQUIRED

Servings: About 3-4 adult servings

IMG_86851

  • 4 ikan kembong or ikan selar
  • 2 tablespoons of tamarind paste or assam mixed with 6 tablespoons of water and extract juices
  • 2 tablespoons of sugar
  • Pinches of salt

Rempah or spice mix ingredients

  • 2 small onions
  • 5 cloves of garlic
  • 1 tablespoon of chilli powder (or 3-4 fresh chilli)
  • 1 tablespoon of belachan or shrimp paste
  • 1 stalk of lemon grass
  • 2 small turmeric roots (or 1 tablespoon of turmeric powder)
  • 2 small tomatoes (optional)

Optional ingredients – blended to rempah above

  • 1/2 bunga ketan or laksa flower
  • Some laksa leaves or daum kesom

IMG_8699


STEPS OF PREPARATION

PicMonkey Collage1

  • Put all the rempah or spice mix ingredients in a blender (except powder form), add adequate water just to cover 1/2 the height of the ingredients, blend until as fine as possible. Alternatively, you can pound these ingredients using traditional mortal and pastel.

  • In a wok, put about 2-3 tablespoons of cooking oil, sauté the rempah or spice mix under medium heat until fragrant and until oil starts to separate out from the ingredients.  In this process, you will witness the colour of the rempah darkens and getting drier and drier. It took me about 15 minutes to get what I wanted.

PicMonkey Collage2

  • Mix 2 tablespoons of tamarind paste with 6 tablespoons of water and extract juices. Pour the assam juices into the rempah, stir until well combined. Add the fish and follow by the sugar, bring to boil and let it simmer for 5 minutes. Off the heat and let the fish rest in the assam gravy for at least 1/2 hour before serving. Timing will depend on type and size of fish, in general 5-10 minutes of simmering should be adequate. It is advisable to prepare this dish in the early afternoon and served for dinner to let the flavour develops for a few hours.

IMG_8701


CONCLUSION

I am unsure if this assam fish of mine do appeal to you but I have to clarify that this type of thick gravy assam fish will not have any vegetables. There is another type of assam fish which is more soupy and with lots of vegetable. That is very sour but this recipe is supposed to be sour and sweet  and it is an enjoyment to have white rice served with this delicious gravy.

IMG_8715

Hope you like the post today. Cheers and have a nice day.

IMG_8711


For more recipes, you can refer to my RECIPE INDEX (updated as at 13 March 2015)  here and you can follow me at PINTEREST or visit the blog’s FACEBOOK PAGE to keep abreast of my future posts. Also follow me at INSTAGRAM or TSU, a new social network for some more personal sharing other than recipes.

food bloggers[4]

Food paradize[8]

You can also join the FOOD BLOGGERS AND FOODIES UNITED FACEBOOK GROUP and FOOD PARADISE 美食天堂 to see more recipes. I am posting my daily home cooked food in the above Facebook Group daily. I would be more than happy if you can  post in the Group for the recipes that you tried from my blog.

pinterest[4]

If you are a Pinterest user and you are interested to have more recipes, you can join or follow this Pinterest Board set up by me  where there are more than 2600 recipes worldwide and pinned by various bloggers: FOOD BLOGGERS AND FOODIES UNITED PINTEREST BOARD.


IMG_8723