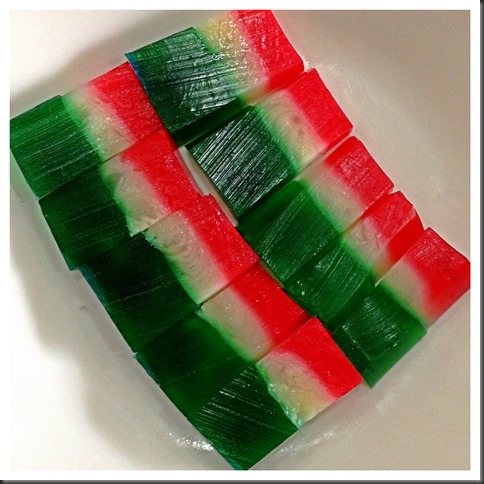
Agar Agar is not the same as Agak Agak… Agar Agar is Red Algae !!

IMG_5342 

INTRODUCTION

Agar Agar is a Malay word for red algae, apparently it has been accepted as an English word. It is hard for a lay man like me to explain agar agar, so  as usual, I will quote Wikipedia’s explanation of agar agar for reader’s understanding.

Per Wikipedia:

“The word “agar” comes from agar-agar, the Malay name for red algae (Gigartina, Gracilaria) from which the jelly is produced. It is also known as kanten, China grass, Japanese isinglass, Ceylon moss or Jaffna moss. 

Agar-agar is a natural vegetable gelatin counterpart. White and semi-translucent, it is sold in packages as washed and dried strips or in powdered form. It can be used to make jellies, puddings, and custards. For making jelly, it is boiled in water until the solids dissolve. Sweetener, flavouring, colouring, fruit or vegetables are then added and the liquid is poured into moulds to be served as desserts and vegetable aspics, or incorporated with other desserts, such as a jelly layer in a cake. “ (Source: http://en.wikipedia.org/wiki/Agar)

IMG_5320

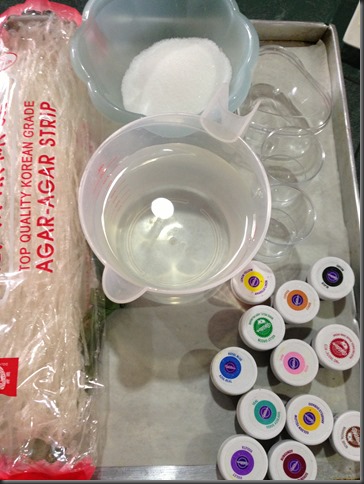
Agar agar is one type of traditional dessert commonly found in Singapore and Malaysia. It is easy to prepare and is a common item being served during Chinese New Year and other festivals. To make it requires no complicated kitchen utensils, just need to boil and mould. Traditionally, households used dried agar agar as shown in this illustration as the raw ingredient. However, in recent years, most households have started to use agar agar powder instead of dried agar agar.

IMG_5355

Traditionally, due to the lack of weighing scales, sophisticated kitchen utensils and written recipes, housewives usually prepare agar agar based on words of mouth using common kitchen items such as cups as the unit of measurement.

I was told that previously, the recipe is 1 cup of soaked agar agar will requires 1 cup of sugar and 1 cup of water. I liked this type of simple ratio recipe, however, when I tried out, it just turned out to be extremely sweet and tough.

Well, that type of recipe may not be acceptable nowadays since we have so many resources available. In olden days, the challenge to make a good agar agar is to get hold of the correct ratio of water to agar agar. The end product shall be slightly chewy and not to soft like the current jelly. In order to achieve such texture, housewives some times dried their agar agar under the sun. They believed that the less water content in the agar agar, the better it is. In fact, some house hold cut it into one bite size, dried it under the sun until it is very chewy, store in a container and eat it as a snacks or sweets!

IMG_5328

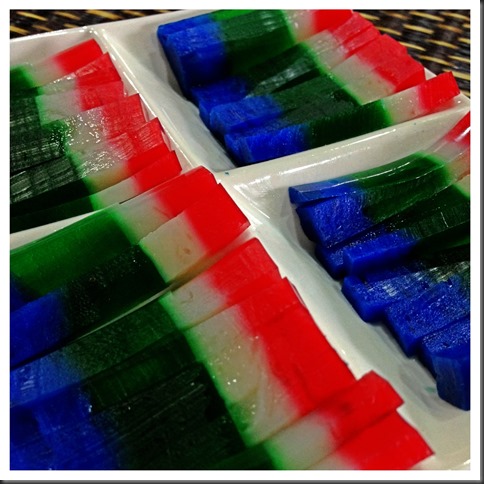
In recent years. preparation of agar agar is not entirely based on texture since all ingredients can be measure rather accurately. It is rather easy but the challenge had shifted to the colour combination and moulding. If you have the relevant mould, you can create your own design based on your creativities. One of the most trendy agar agar moulding will be agar agar moon cake where the agar agar were mould into a moon cake shape. Inside the agar agar moon cake, there is a yellow colour balls resembling the egg yolk.

Again that is deal with planning, making and moulding. It can be rather stressful if there are no prior planning on the colour selection and mould selection. Of course, it can be as simple as just a single colour one flat piece of agar agar. The taste will definitely be the same but of course it is less impressive to your guest.

This illustration will only provide you with the simplest layered agar agar procedures. You can chose your own colour and shape of your mould. I have use some heart shape mould and the colour is purely selected for this illustration only. At home, we will not go until this extent and usually have one to two colours plus 2-3 layers of agar agars.

IMG_5363


NATURAL COLOUR SELECTION

There are a lot of natural colour available and you can totally throw away the artificial colouring, if you wish. Suggested colours are:

  • White and milky – condense milk, coconut milk, fresh milk
  • Chocolate – instant coffee paste, chocolate  paste or powder
  • Red colour – red colour dragon fruits paste
  • Yellow – mango paste
  • Green – pandanus paste
  • Violet or blue – pea flowers
  • Purple –black currant drink
  • Red – strawberry paste
  • Dots in the agar agar –  dragon fruits

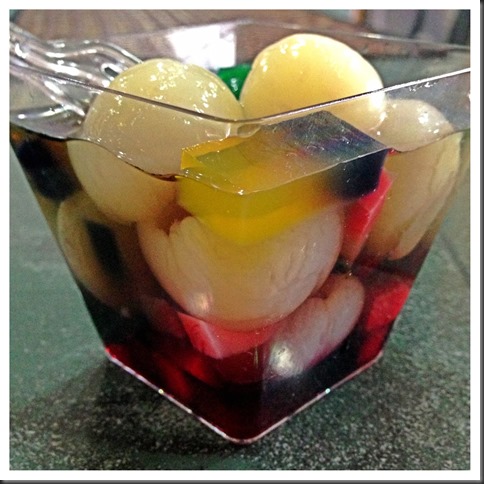
Besides the above colours, many varieties of cut fruits can also be included. For example, yam cubes with coconut milk is a good combination. Coffee with milk is another welcoming combination to make into agar agar. Canned Longan or lychee with black currant flavoured agar agar is also a presentable dessert. All this is very much depend on reader’s creativities to prepare one that is acceptable to the guest or family members.

IMG_5353


WHAT IS REQUIRED

IMG_5301

I have intentionally left out the quantities as it is best that you follow the instruction on the the package of agar agar that you bought. Be it dried agar agar strips as shown above or agar agar powders, they will have detail instructions on the quantity of water required. It is best that you follow these instruction as every brands of agar agar will requires different liquid to reach the desired textures.

  • 1 package of agar agar strip (about 38g)
  • Some water (refer package)

  • Some sugar (refer package)

  • Some permitted food colouring of your choice or the type of natural colouring ingredients as mentioned above.

  • Some moulds of your preference

  • Few leaves of Pandanus leaves – bundled (optional)

IMG_5346


STEPS OF PREPARATION

IMG_5371

  • Wash the dried agar agar by soaking in clean water for 1-2 minutes.

  • In a pot, put in the water as stated in the package and add dried agar agar. Use medium heat to bring the water to boil. Continue stirring until all the agar agar are dissolved.

  • Add in the required sugar into the agar agar solution and stirred until dissolve. Turn the heat to the minimal. You just need the heat to prevent the agar agar from solidifying while you do the layering. Alternatively, you can put your agar agar in a big basin of hot water.

IMG_5372

  • Take out some container of your choice, add in your preferred colouring and  pour into the mould.

  • Once done, put it in the freezer or chiller or under the fan and once it is set on the top, you can pour the second layer. How long will it take will depends on your room temperature, the concentration of your agar agar and the types of you container. For my today’s illustration, it is rather fast because the container is very small and my agar agar is quite concentrated.

  • Repeat the same for different layers until all the agar agar were used up.

  • Put in the fridge for another 10-15 minutes.
  • Remove from the mould, cut into your desired size and shape and put in your preferred serving plate.
  • Best served cold as a dessert.

IMG_5361


CONCLUSIONS

This is extremely simple. It is best that you based on what is stated in the package label to prepare the agar agar. Different brands will have different instructions.

Though this illustration is using traditional dried agar agar, you can use agar agar powder instead. The price for both dried agar agar and agar agar powder is rather economical and in my humble opinion, it is still a good choice of snacks or desserts. Variations are many and you have full flexibility to choose your desired flavour, colour and moulding. You guest will surely be impressed by your creativities.

Try this traditional Asian dessert and I am sure you wouldn’t regret preparing it. Hope you like the post today. Have a nice day and cheers.

IMG_5348

Re-Creating My Homesick Snack–Citrus Zested Kite Mooncake (风吹饼,风筝饼, 烘吹饼)

IMG_3304

UPDATED POST – on 14 August 2014

Last year, I have prepared this mooncake but I cut it in square shape and I have put sesame seeds in the crust. It doesn’t look that authentic and this year, I have decided to prepare again in the traditional shape which is round and without any sesame seeds. The recipe is in the post proper itself.

IMG_3292

This is how it was being packaged and sold in Kuching Teochew Cake House. Picture courtesy from Mr. Tan Sia Hong who take the trouble and go around taking picture for me.

IMG_3285

IMG_3314


ORIGINAL POST


INTRODUCTION

I am a rather sentimental person. I am always homesick of the snacks that I have eaten when I was young.I have a detailed post on the unique Sarawak Butter Buns (砂朥越牛油面包) (http://wp.me/p3u8jH-vg) and a fusion of famous Sarawak Tomato Noodles with West Malaysia Yee Min on (茄汁伊面)(http://wp.me/p3u8jH-ud)。

IMG_3306

Mid-autumn festival is approaching and I am now homesick of this special pancake (and some dialects group) treat it as moon cake. I am not really fancy about current type snow skin moon cake or the traditional Cantonese moon cake but I have the inclination to like the Teochew style of moon cakes with the flaky skins. I never fancy lotus paste (should be the most expensive) filling and I usually opt for the white mung bean filling (白豆沙)。But this just suddenly came across my mind that it is another type of moon cake that I missed.

IMG_5075


CITRUS ZEST CHINESE PANCAKE

This special pancake can be found in East Malaysia rather easily. I have to be very frankly I do not know how to translate this traditional Chinese delicacy. Literally, it was translated as the Kite Pancake. The origins have yet to be traced but I seriously believed that it is a type of Zhaoan or Teochew sweets. This is because I can get it in Singapore during moon cake festivals from the famous Teochew cake house called “Yang Hua Teochew Cake House) (荣华饼家).

Apparently, there are not many bloggers who blog about this special sweets and in fact you will have a hard time to search for a recipe on the net. I managed to get a recipe from HERE and immediately I just bookmarked it and today, I have recreated it but modified to include sesame seeds. This blogger is also from the State of Sarawak, Malaysia.

IMG_3308

As I did not manage to get Maltose (麦芽糖), I have substituted with home made golden syrup . Overall, the results are satisfactory especially for those who craved for this snacks. As there are very limited or only one recipe available, I have difficulty to compare between recipes but overall, I will think that it is 90% resemble those who sold in Kuching market and definitely something that I would do in the near future.

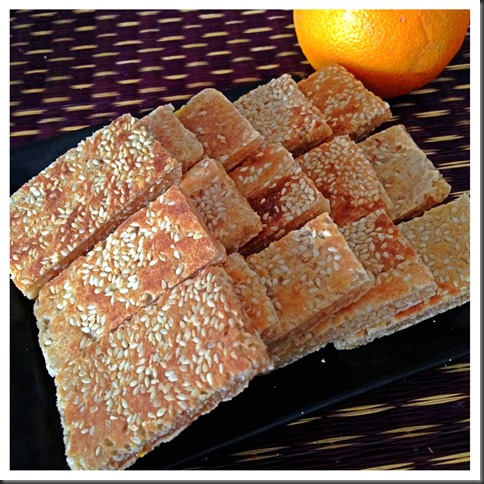
I have purposely do it a rectangular shape because it is easier for me to cut for serving.

The snack shall be a bit crunchy on the crust and the inside a bit chewy and sticky full of citrus flavours.I missed this pancake.   It goes well with a cup of hot tea or coffee.

IMG_3296

The preparation of the pancake will involve:

Part A – “Crystalizing” the Sugar

Part B – Preparing the Skins

Part C – Preparing the Fillings

Part D – Wrapping, Rolling and Pan Frying

IMG_3312


PART A – “CRYSTALIZING” (反沙)THE SUGAR

IMG_5079

What is required

  • 300 gram of castor sugar

  • 50 gram of water

Steps of preparation

  • Have a sauce pan, add water and sugar.

  • Heat the sugar and water over “MEDIUM HEAT” and constantly stir it until it melts.

  • Let it boil until it re-crystalized.

Special notes required

  • Please avoid using non stick pan as I have a hard time to get it crystallized.

  • If you use high heat, instead of re-crystalizing, your sugar will become caramelized and you will have a hard time to “break” the sugar.

IMG_3288


PART B – PREPARING THE SKINS

What is required

  • 300 grams of plain flour

  • 100 grams of vegetable shortening

  • 100 grams of hot water

  • 1 big tablespoons of icing sugar

  • 1 big tablespoons of maltose/golden syrup

Steps of preparation

  • In a big mixing bowl, add vegetable shortening, plain flour, golden syrup/maltose, icing sugar and hot water.
  • Slightly mix using a tablespoon. Knead until it form a soft dough. Set aside of later use.

IMG_5077


PART C –  PREPARING THE FILLINGS

Photo is loading

What is required

  • 1 big table spoon of orange zests or dried Chinese Oranges (桔饼)

  • 20-30 grams of candied winter melon (冬瓜条) – diced in very small pieces (optional)

  • 75 grams of cooked glutinous rice powder (糕粉)

  • 150 grams of plain flour (普通面粉)

  • 300 grams of crystalized sugar (as from PART A)

  • 100 grams of sesame seeds (optional)

  • 1 big tablespoons of golden syrup or maltose (maltose preferred)

IMG_5046

  • In a bowl, put golden syrups/maltose together with crystalized sugar. Add 50 grams of water and let it slightly dissolve.

  • In a big mixing bowl, add plain flour, cooked glutinous rice flours, orange zests.

  • Make a hole in the centre of the flour mixture, pour the liquid mixture and knead until smooth.

IMG_3298


PART D – WRAPPING, ROLLING AND PAN FRYING

IMG_5081

  • Divide the dough and the fillings into 4 equal portions.

  • Slightly flatten the rough dough and wrapped the fillings with the dough.

  • Use a roller pin to roll it in a round shape with a height of about 5mm thick.

  • Sprinkles additional sesame seeds on both side and pan fry using the lowest heat until the dough is cooked and turned golden brown in colour.

IMG_5088

  • For servings, cut into your desired shapes and sizes.

IMG_3300


CONCLUSIONS

I have tried to re-create pancake based on the only recipe that I have. I have decided to post in the blog as I want to introduce this to my international readers.  Do give it a try and see if it suit your taste bud.

IMG_3290


Hope you like the post today and cheers.

IMG_3310


  • For more recipes, you can refer to my RECIPE INDEX (updated as at 28 July 2014)  here and you can follow me at PINTEREST or visit the blog’s FACEBOOK PAGE to keep abreast of my future posts.  

IMG_3318

Yoghurt + Condensed Milk + Cream + Grapefruit = Grapefruit Yoghurt Ice Cream

IMG_4079

INTRODUCTION

I seldom followed recipe closely. But this time, I followed exactly this simple recipe with the slightest modifications.

Too bad, I can’t trace the recipe source link address but I knew it is definitely from http://www.coombemill.com. I have joined one of the events in #recipeoftheweek in August 2013 and I remembered I get the recipe from one of the linking blogs there. Immediately, when I spotted the recipe, I use One Note to cut and send it to my notes and this is the original recipe that is in my notes. I have to apologize to Coombermill for not able to directly linked the recipe to their website. (Subsequent to issuing of this post, I have managed to find the link:http://www.coombemill.com/blog/post/2013/08/19/Fig-and-Banana-Cake.aspx)

image

As you can see from the above screen clippings, the ingredients are not many and steps are simple and that were the reasons that attract my attention. As said in my previous posts, I bought many grapefruits last week and I have used it to make Grapefruit Chiffon Cake and Grapefruit Cognac Pound Cake. Since I have some left over grapefruits, I thought Grapefruit ice creams will definitely not a bad idea. However, you can just substitute with other fruits like figs, pears (as above) or oranges or other soft fruits of your choice.

IMG_4083

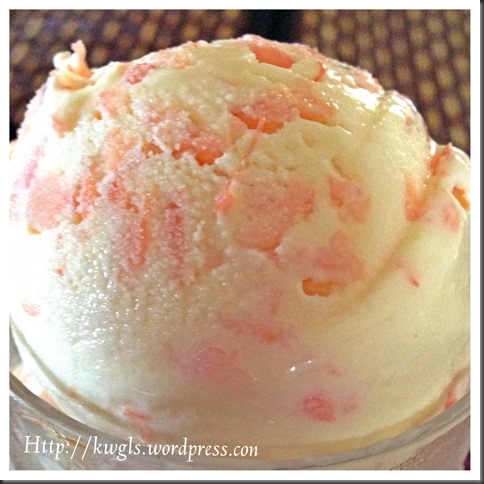
Besides simple ingredients and simple steps, what amazed me is the relatively small amount of creams used and  instead it was mostly substituted by yoghurt and condensed milk. Based on these ingredients, I would think that this ice-cream is relatively healthier than the others whereby it was packed with double creams. It utilized only 200 ml of heavy cream and the final ice cream is about 800 g therefore representing about 25% of the total volume.


WHAT IS REQUIRED

IMG_3886

  • 200 ml of double cream and fresh cream for whipping

  • 200 ml of natural yoghurt

  • 1 tin (about 385 g) of condensed milk or sweeten beverage creamer.

  • 300 g of grapefruit flesh. (The grapefruit flesh can be substituted with orange flesh if you desired)

Note that you have to ensure only the flesh are free of any white dividing tissues between the grapefruit globes and white sponge liked tissues near the skin. Only flesh shall be used. Otherwise, your ice cream will be very bitter.

IMG_4081


STEPS OF PREPARATION

IMG_3894

  • In a big mixing bowl, put yoghurt, condensed milk and heavy cream. Beat until well combine and smooth.

  • Add in grapefruit flesh and continue to “beat” using slowest speed until well combined. “Beat” here is just a simple mixing action. It is good to use the mixer to do this mixing because it will help you “separate” the grapefruit fleshes. In addition, if your grapefruit have the white dividing tissues, it may stuck to the egg beater and you can easily pick it up.

IMG_3900

  • Transfer to a plastic container and freeze overnight in the freezer. (Note: Possibly because of the hot weather in Singapore, I can’t follow the original recipe of freezing 3 –4 hours. I have to freeze overnight before it can be hardened).

IMG_4080

CONCLUSION

This recipe is definitely my choice of making future ice creams. I will try with other fruits and colour combination. What comes into my mind now will be kiwi fruit, durian, strawberries, custard apples or even papayas..If I do not want the plain yoghurt, I can used some ready made yoghurt such as mango yoghurt with mango flesh!  For me, I believed it is definitely a healthier choice.

Hope you like it and take a move to make a simple healthier ice cream for your family this weekend! Have a nice day and cheers.

For more recipes, you can refer to my RECIPE INDEX here and you can follow me at PINTEREST or visit this blog’s FACEBOOK PAGE .

group-board-picture72222222222222222[1][2][2]


If you are a Pinterest user and you are interested to have more recipes, you can join or follow this Pinterest Board set up by me  where there are more than 1000 recipes worldwide and pinned by various bloggers: FOOD BLOGGERS AND FOODIES UNITED PINTEREST BOARD. You can also join the Food Bloggers and Foodies United Group Facebook Group to see more recipes.

IMG_4085

I am also submitting this to #recipeoftheweek and CoombieMill and Welcome to all My Bloggy Friends