
UPDATED POST ON 11-10-2014
Craving for the buns that I can get hold in Singapore, and I have decided to prepare these buns to surprise my wife. We usually bought back from Sarawak if we visited our home town. There is no change in the recipe but I have decided to use the BASIC BREAD DOUGH RECIPE instead of the tangzhong dough recipe here. Please refer here for the BASIC BREAD DOUGH RECIPE. I find that the basic dough is much faster without compromise quality of the buns.


INTRODUCTION
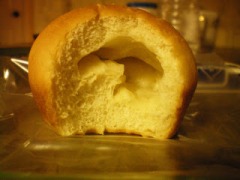
This is a rather simple basic bun of which I am yet to trace the history. The uniqueness of this bun is its filling. The filling is made of butter, sugar and flour. Throughout my years overseas, I have yet to find buns that have this filling. The nearest that I have came across is butter milk buns where milk powder is used used instead of pure butter.

I came from Sarawak, Malaysia. Sarawak is located in the island of Borneo. Since young, I have been eating these buns for breakfasts and snacks.
I missed the buns. The fillings are aromatic. It is sweet and buttery in flavour. When I made the first batch 2 days ago, I posted my pictures in the Google plus certain baking communities and my Facebook timeline, I was surprised that there are a number of readers and my friends are requesting for the recipe. What shocked me is that most of them in Google plus communities have never seen or eaten the buns before. Apparently, they are either curious about the fillings based on my descriptions.

As for the first batch, I did not take any measurements, I have decided to do the second batch so as to share the recipe with the readers.

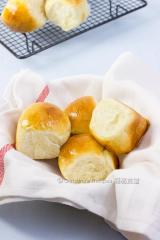
SARAWAK STYLE BUTTER BUNS
Sarawak style butter buns shall not be confused with the butter soft buns that are mentioned in other recipe books. The so called butter buns in recipe books are mostly refer to buns with no filling. It shall also not to be confused with the Hong Kong cocktail buns where the fillings are shredded coconuts and butters. In addition, they are also different from the so called “butter buns” whereby a butter cube is wrapped by the dough and when baked, the butter melts into the bread. Since there are possibilities of misunderstanding, I shall call these special buns as “Sarawak Style Butter Buns”.
 |
Butter Buns – Normal buttery buns with no filling. (pic courtesy: http://en.christinesrecipes.com) |
|
|
Hong Kong Cocktail Buns – Fillings are shredded coconut and butter http://cornercafe.wordpress.com |
|
|
Buttery Buns – Butter in the centre of the bun and melted when baked. This is also the type of buns commonly found in the famous Malaysian chain store called “Rotiboy” .http://thenewartofbaking.blogspot.sg |
|
|
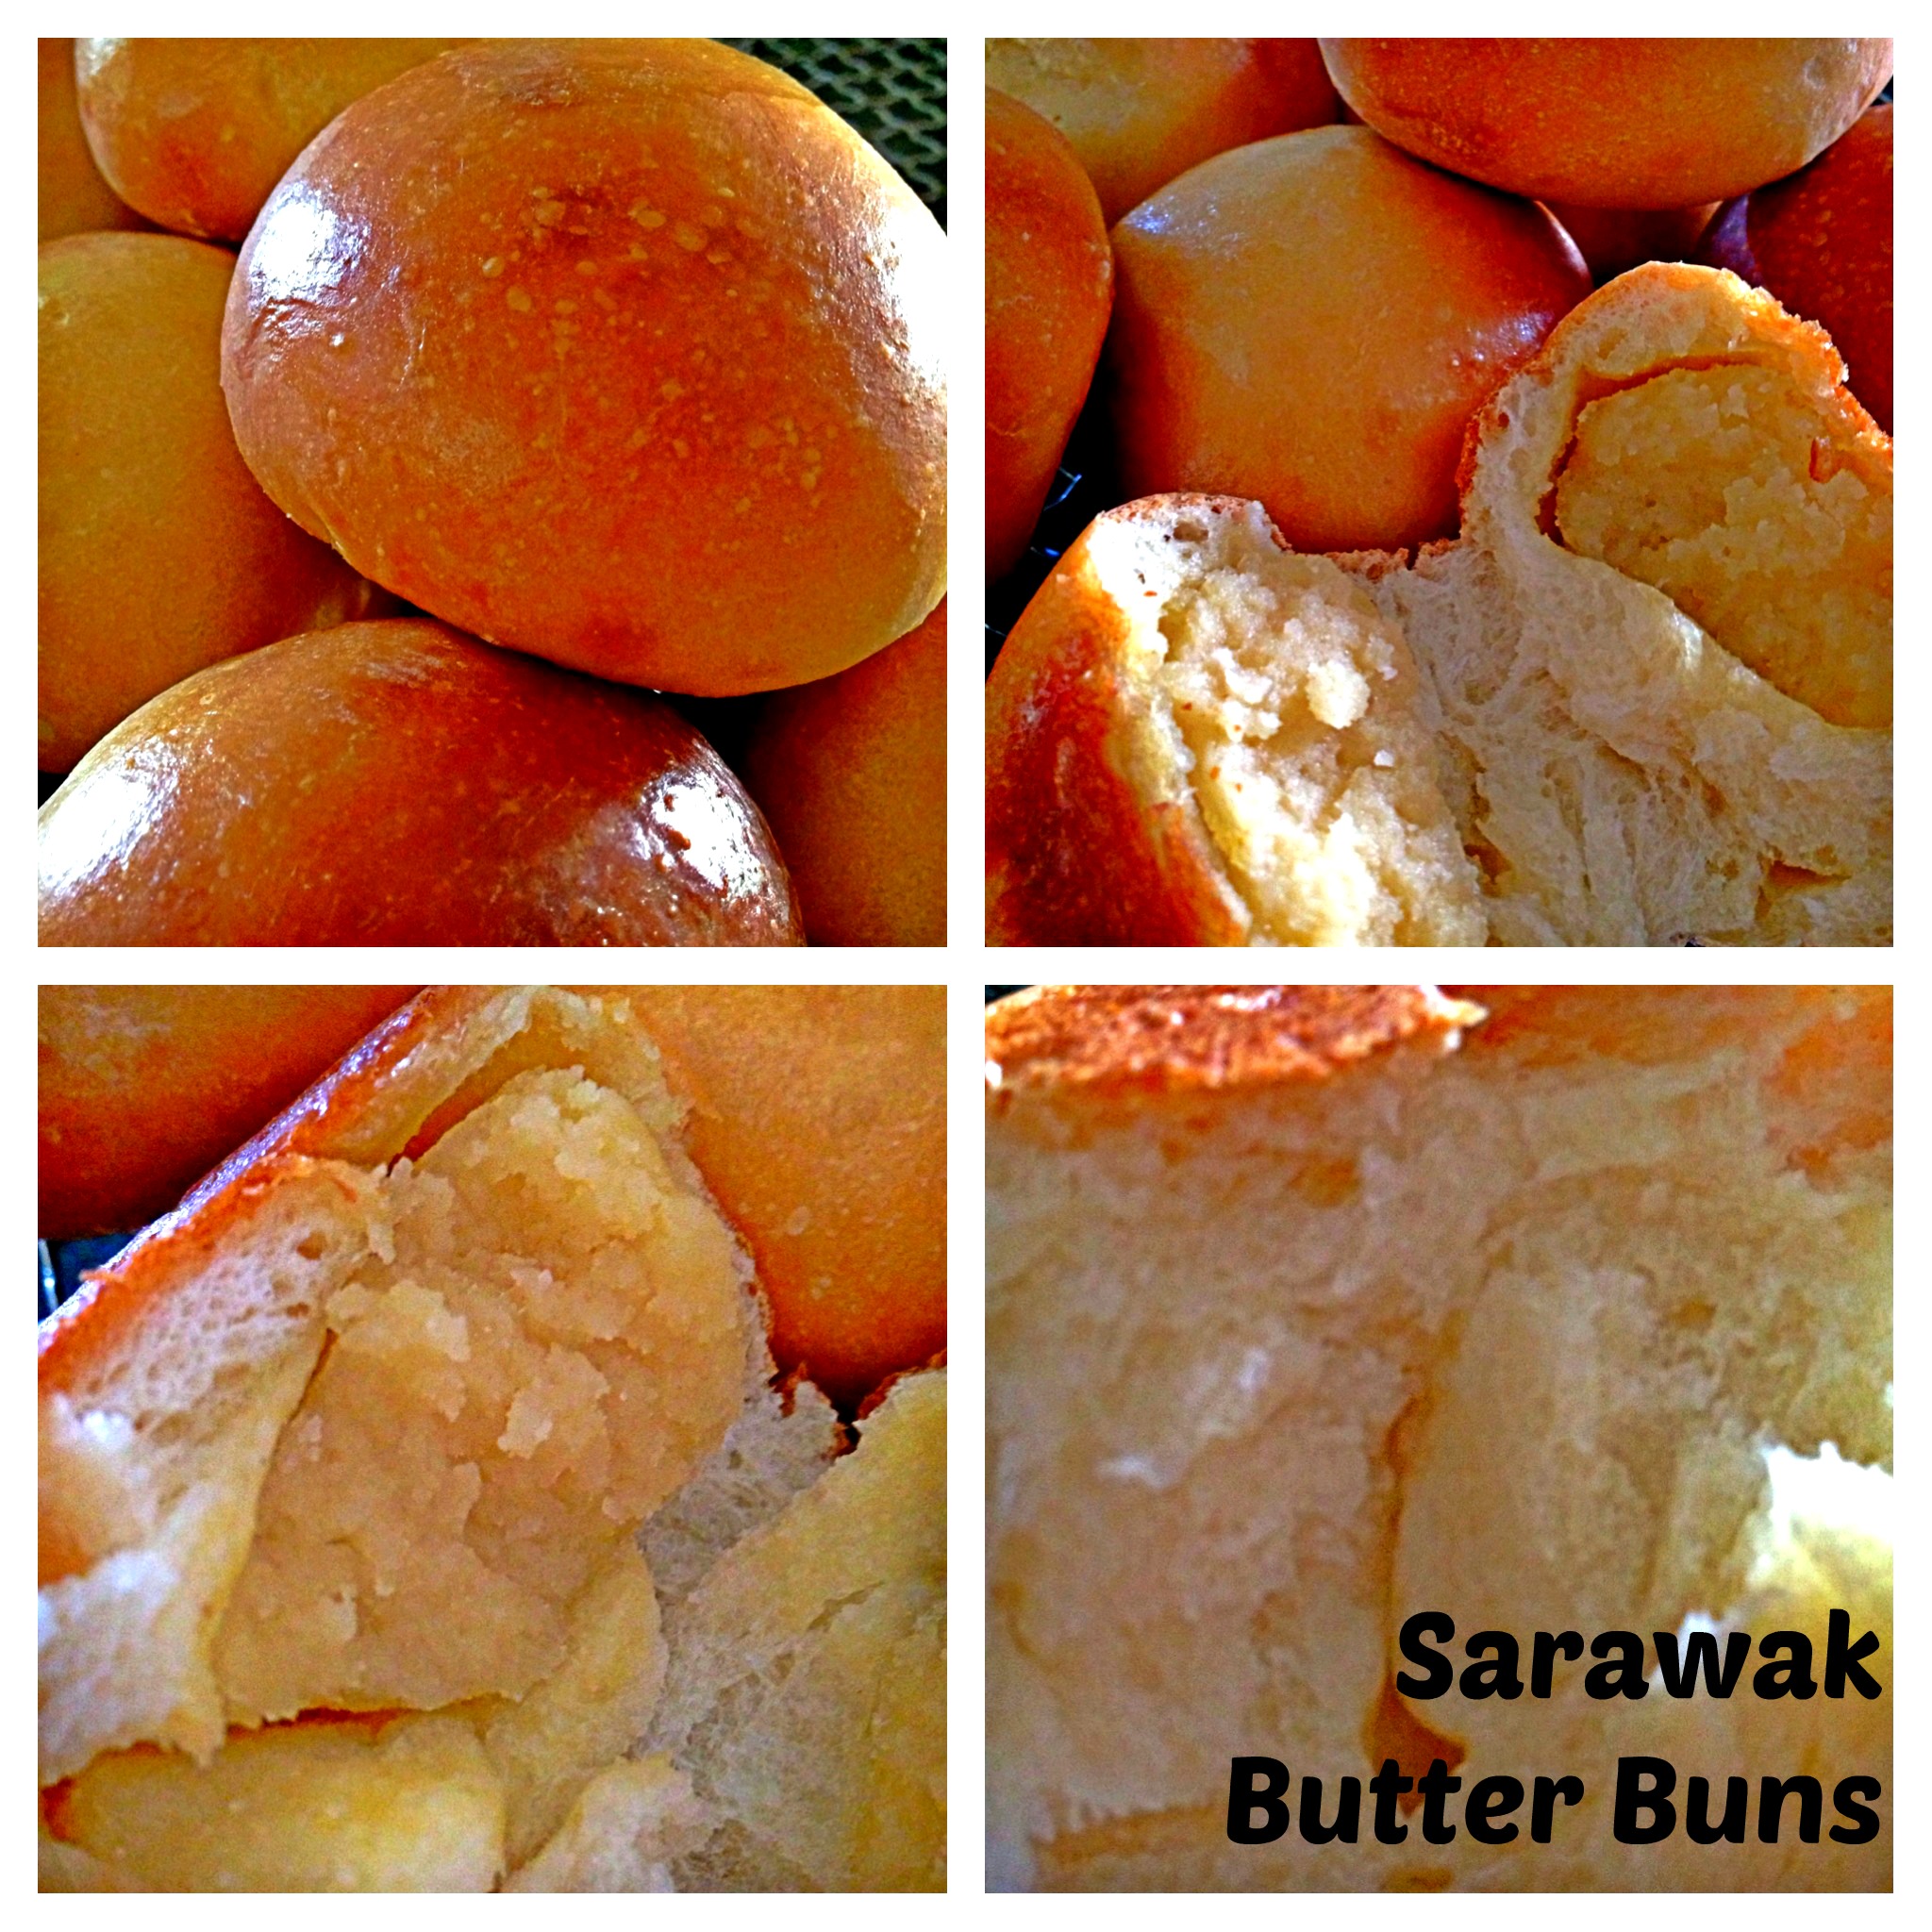
Sarawak Style Butter Buns – Butter fillings. Found in Sarawak only. |


THE PROCESS OF MAKING SARAWAK STYLE BUTTER BUNS
This illustration will use the Tangzhong method of bread making and it involved 5 stages in the following orders:
Part 1 – Making the Tanzhong (Water Roux) ..– Best to prepare the night before
Part 2 – Preparing the Dough for the 1st Proofing
Part 3 – Preparing the Butter Fillings
Part 4 – Preparing the Dough – Wrapping the Fillings and 2nd Proofing
Part 5 – The Baking Process

TANZHONG METHOD OF BREAD MAKING
Tangzhong (汤种)is a relatively new method of bread making and the main advantages of it is because bread made using tangzhong were usually soft and fluffy and able to keep longer. Previously, bread improver were used to make the bread softer for a longer period of time. However, this method have used all natural ingredients without any chemicals to get the same effect.
According to Cookipedia:
“Tang zhong (also known as a ‘water roux‘) is a method used in bread making to create soft and fluffy bread which was originated by the Japanese. However, it was popularised throughout south-east Asia in the 1990s by a Chinese woman called Yvonne Chen who wrote a book called The 65° Bread Doctor. Using this method also allows bread to stay fresh for longer without needing to use artificial preservatives.
To make the tang zhong, you mix together one part flour with five parts liquid (by weight) to make a smooth paste. This is usually water, but can be milk or a mixture of both. The mixture is then heated in a saucepan until it reaches exactly 65°C (149°F), removed from the hob, covered and left to cool until it is down to room temperature, when it will be ready to use. It would be useful have a digital thermometer with a probe when making this as other types of thermometer tend to be too large. If you are not making your bread immediately, the tang zhong will keep in the fridge for a couple of days, but will need to be brought up to room temperature before use. The tang zhong is added to the main flour with the liquid and mixed in and kneaded as normal.
The amount of tang zhong used should be about 35% of the weight of the main flour. It is best to make a little extra, because the liquid will evaporate slightly during heating. To make a loaf weighing about 1kg, I would suggest using 480g flour, 200g liquid and 170g tang zhong (made with 30g flour and 150g liquid), which will give a hydration of about 68%. You can of course adjust the amount of liquid either side of the 200g, but the tang zhong proportions should not be adjusted. “
You will note that my recipe for Tang zhong (that are detailed below) are different from what is mentioned above. You can either use my recipe or the recipe as mentioned above.

PROCESS OF MAKING THE SARAWAK STYLE BUTTER BUNS
PART 1 – MAKING THE TANG ZHONG (WATER ROUX) …..
What is required
- 50g bread flour
- 50g boiling water (water should be boiling hot, otherwise you have to put it over the stove to cook it)
Steps of preparation

- Get ready the bread flour in a mixing bowl. Pour the boiling hot water into the flour, mixed well and shaped into a ball.
- Let the ball cooled down at room temperature. Once cooled, covered bowl with a cling wrap and keep it in the fridge overnight.
- This recipe will make about 90 g of tanzhong. If you cannot finish tanzhong, you can put it in a container and keep it in the fridge for future use.
Update:
The picture below is from my second batch whereby I have used the method specified in the Cookipedia above and is append here for your reference.

What is required
- 25 g of bread flour
- 125 g of cold water
Steps of preparation
- In a metal mixing bowl, mixed the water with the cold water. Stirred until well mixed.
- Place the flour mixture under medium to low heat until the mixture boils.
- Continue to stir until it resembles some types of glue or when the mixtures start to dissociate itself from the wall of the bowl. Cool and keep it in the refrigerator for the portion that was not used.
PART 2 – PREPARING THE DOUGH – 1st Proofing
What is required

- 180 g of bread flour (you can substitute 5 g of bread flour with milk powder, in that case you need only 175 g of bread flour)
- 30 g of sugar
- 4 g of instant dry yeast
- Pinches of Salt
- 35 g of beaten egg (the above picture is for illustration. 35 g of eggs is equivalent to about 1 egg)

- 55 ml of fresh milk
- 20 g of butter – soften
- 45 g of tangzhong, refer to recipe above (about half of the tangzhong made above)
Steps of preparation (dough)

- Mix all ingredients except softened butter and beat at slow speed for about 5 minutes.
- Add the softened butter and continue kneading at medium high-speed for about 20-30 minutes or when the dough did not stick to the wall of your mixing bowl and do not break when you pull the dough.
- In the flat surface dusted with normal or bread flour, take out the dough from the mixing bowl and slightly knead it using hand for 1-2 minutes and shape it into a ball.
- lightly oil you mixing bowl and place the ball in the bowl. Cover with damp cloth or cling wrap (to prevent moisture loss).

- Leave it to proof until almost double in size. This should be about 30-45 minutes depending on the day’s temperature.
- If you are using a metal mixing bowl which are slightly cold when touched, put it in your oven at temperature of about 30 degree Celsius for about 10 minutes or when your bowl feel warm when touched.
PART 3 – PREPARING THE BUTTER FILLINGS

What is required
- 150 g of butter
- 150 g of sugar
- 180 g of flour
Steps of preparation
-
Melt the butter in the microwavable bowl (1 minute). Alternatively, you can also melt it over the smallest heat directly under the fire.
-
Add the sugar to the hot melted butter, stirred until dissolved.
-
Add in the sifted flour gradually and used a spoon to stir until well mixed.
-
Let the flour mixture cooled down and let it rest for at least 5-10 minutes (note that the flour need sometime to absorb the liquid and don’t worry if it is too watery. After 5 minutes, the flour will also expand and you can see a slight increase in volume.
-
Once cool, shaped it into 10 small balls of about 40 g each. Set aside for later use.
PART 4 – PREPARING THE DOUGH – Wrapping the fillings and 2nd Proofing

- Take the dough out, punch into the dough to let any trapped air escaped. Knead for one minute and divide into 10 equal size round ball.

- Wrap the dough around the butter filling ball as even as possible. Put it in a baking tray and cover with the same damp cloth.
- Let it proof for another 30 minutes or when balls were almost double in size.
PART 5 – THE BAKING PROCESS

- Set the oven to temperature 190 degree Celsius.
- Put in the oven and bake at 10-15 minutes. After 10 minutes of baking, egg wash (please see below) the buns quickly and continue baking for about 5 minutes or when the top start to turn slightly golden brown. Alternatively, you can egg wash first before you send into the oven. I prefer to egg wash at the latter stage as I can control the colour better.
- Egg wash – Crack one egg and mixed with 3 teaspoons of water and 2 drops of oil, slightly beat and sift into a small box, use the brush to brush on top of the surface. The purpose is to let the buns looks shinny and golden brown.

- Take out from the oven and transfer to a rack for cooling.

MODIFICATIONS AND VARIATIONS
- For the butter fillings, you can add 1-2 tablespoons of milk powder to the flour. Personally, I do not prefer to have milk powder added since it will negate the butter aroma. However, commercially, they do add milk powder to this and in fact, my kids loved the fillings that have milk powder.
- For the dough, you can add 1 teaspoon of milk powder as well. However, both this modification are not traditional methods of preparation.
CONCLUSIONS
-
This is a traditional bun that is very popular among the Sarawakians. The history has yet to be traced. However, this bun is usually prepared by Hainanese “kopitiam” (coffee shops) and most of the good bakers are Hainanese. Hainanese are the descendants of immigrants from the Island of Hainan in People’s Republic of China. It is also a Chinese dialect group and they are very good chefs and pastry chiefs. This is because they arrived South East Asia later than other Chinese dialect groups (like Cantonese, Hokkien, Foochow) and they were employed as chefs in the then British families and well to do local and nonya families. They were trained by the British in baking and when the colonial era ceased, they started to set up coffee shops cater for the Chinese immigrants in from China. The consumption and usage of butter in pastry were mostly influenced by the British administration. Though unconfirmed, however , it appeared to be logical because Chinese traditional cooking did not use its butter in its delicacies.
-
The Sarawak Style butter buns have a nice buttery fragrance and taken a bit resembles taking a teaspoon of butter and sugar in the mouth….It is divine especially eaten with a cup of tea or coffee. It is ideal as a breakfast item or afternoon snacks.
-
The use of tanzhong in this recipe made the bread softer even after a day or two. This newly developed baking method is widely used by bakers in the Asian region and that is one of the reasons that sweet buns and soft buns were popular in Asian region. The texture will definitely different from the traditional method of bread baking.

Hope you take a move in trying out this new recipe. For my readers who are in other countries and never tasted this bun, just take a bowl, add equal amounts of melted butter, sugar and flours, stirred and put in the microwave for 2 minutes. Have a small scoop of filling and tell me if this is your cup of teas.
Thanks for reading and have a nice day. Cheers.

-
For more recipes, you can refer to my RECIPE INDEX (updated as at 8 June 2014) here and you can follow me at PINTEREST or visit the blog’s FACEBOOK PAGE to keep abreast of my future posts.
-
If you are a Pinterest user and you are interested to have more recipes, you can join or follow this Pinterest Board set up by me where there are more than 2600 recipes worldwide and pinned by various bloggers: FOOD BLOGGERS AND FOODIES UNITED PINTEREST BOARD.


 (Source:


 (
(


![group-board-picture72222222222222222[1]](https://kwgls.files.wordpress.com/2013/12/group-board-picture7222222222222222212.jpg?w=490&h=249 "group-board-picture72222222222222222[1]")
