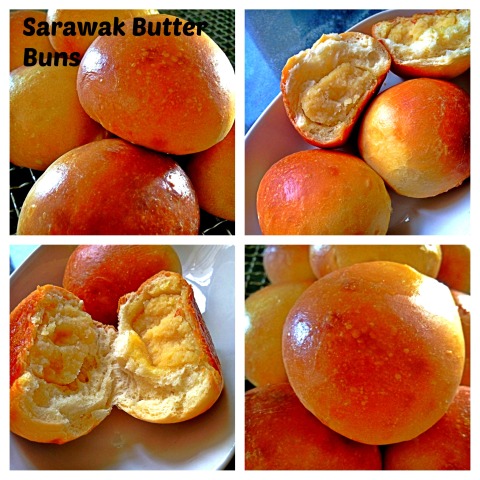
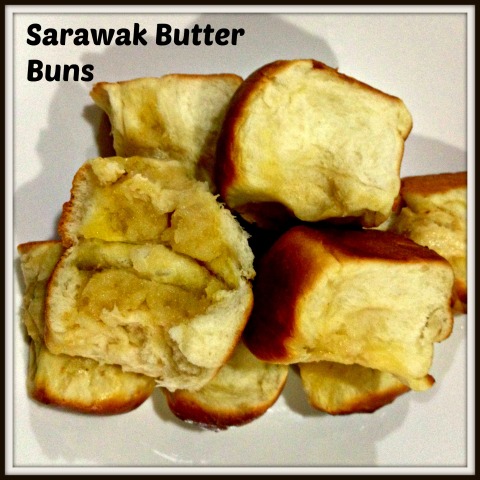
Homesick Buns? Yes, I am homesick of Sarawak Style Butter Buns..

IMG_8512 

UPDATED POST ON 11-10-2014

Craving for the buns that I can get hold in Singapore, and I have decided to prepare these buns to surprise my wife. We usually bought back from Sarawak if we visited our home town. There is no change in the recipe but I have decided to use the BASIC BREAD DOUGH RECIPE instead of the tangzhong dough recipe here.  Please refer here for the BASIC BREAD DOUGH RECIPE. I find that the basic dough is much faster without compromise quality of the buns.

IMG_8519


 IMG_0613

INTRODUCTION

This is a rather simple basic bun of which I am yet to trace the history. The uniqueness of this bun is its filling. The filling is made of butter, sugar and flour. Throughout my years overseas, I have yet to find buns that have this filling. The nearest that I have came across is butter milk buns where milk powder is used used instead of pure butter.

IMG_06101

I came from Sarawak, Malaysia. Sarawak is located in the island of Borneo. Since young, I have been eating these buns for breakfasts and snacks.

I missed the buns. The fillings are aromatic. It is sweet and buttery in flavour. When I made the first batch 2 days ago, I posted my pictures in the Google plus certain baking communities and my Facebook timeline, I was surprised that there are a number of readers and my friends are requesting for the recipe. What shocked me is that most of them in Google plus communities have never seen or eaten the buns before. Apparently, they are either curious about the fillings based on my descriptions.

IMG_8521

As for the first batch, I did not take any measurements, I have decided to do the second batch so as to share the recipe with the readers.

IMG_06591


SARAWAK STYLE BUTTER BUNS

Sarawak style butter buns shall not be confused with the butter soft buns that are mentioned in other recipe books. The so called butter buns in recipe books are mostly refer to buns with no filling. It shall also not to be confused with the Hong Kong cocktail buns where the fillings are shredded coconuts and butters. In addition, they are also different from the so called “butter buns” whereby a butter cube is wrapped by the dough and when baked, the butter melts into the bread. Since there are possibilities of misunderstanding, I shall call these special buns as “Sarawak Style Butter Buns”.
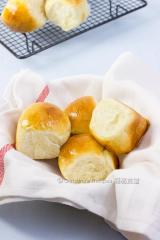
Butter Buns – Normal buttery buns with no filling. (pic courtesy:  http://en.christinesrecipes.com)

Hong Kong Cocktail Buns – Fillings are shredded coconut and butter http://cornercafe.wordpress.com

Buttery Buns – Butter in the centre of the bun and melted when baked. This is also the type of buns commonly found in the famous Malaysian chain store called “Rotiboy” .http://thenewartofbaking.blogspot.sg

IMG_0487

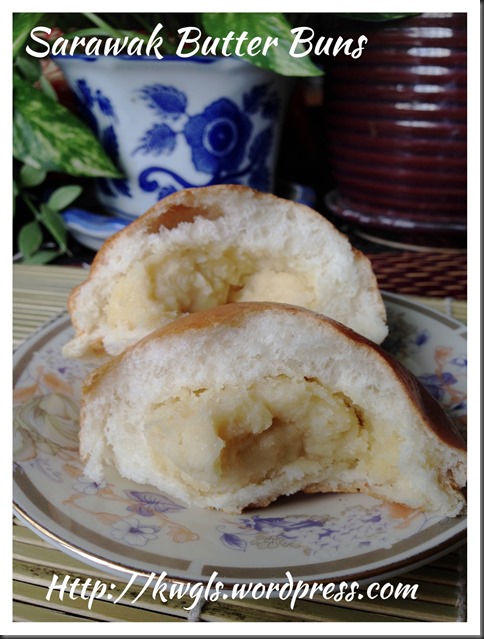
Sarawak Style Butter Buns – Butter fillings. Found in Sarawak only.


THE PROCESS OF MAKING SARAWAK STYLE BUTTER BUNS

This illustration will use the Tangzhong method of bread making and it involved 5 stages in the following orders:

Part 1 – Making the Tanzhong (Water Roux) ..– Best to prepare the night before

Part 2 – Preparing the Dough for the 1st Proofing

Part 3 – Preparing the Butter Fillings

Part 4 – Preparing the Dough – Wrapping the Fillings and 2nd Proofing

Part 5 – The Baking Process

IMG_8523


TANZHONG METHOD OF BREAD MAKING

Tangzhong (汤种)is a relatively new method of bread making and the main advantages of it is because bread made using tangzhong were usually soft and fluffy and  able to keep longer. Previously, bread improver were used to make the bread softer for a longer period of time. However, this method have used all natural ingredients without any chemicals  to get the same effect.

According to Cookipedia:

“Tang zhong (also known as a ‘water roux‘) is a method used in bread making to create soft and fluffy bread which was originated by the Japanese. However, it was popularised throughout south-east Asia in the 1990s by a Chinese woman called Yvonne Chen who wrote a book called The 65° Bread Doctor. Using this method also allows bread to stay fresh for longer without needing to use artificial preservatives.

To make the tang zhong, you mix together one part flour with five parts liquid (by weight) to make a smooth paste. This is usually water, but can be milk or a mixture of both. The mixture is then heated in a saucepan until it reaches exactly 65°C (149°F), removed from the hob, covered and left to cool until it is down to room temperature, when it will be ready to use. It would be useful have a digital thermometer with a probe when making this as other types of thermometer tend to be too large. If you are not making your bread immediately, the tang zhong will keep in the fridge for a couple of days, but will need to be brought up to room temperature before use. The tang zhong is added to the main flour with the liquid and mixed in and kneaded as normal.

The amount of tang zhong used should be about 35% of the weight of the main flour. It is best to make a little extra, because the liquid will evaporate slightly during heating. To make a loaf weighing about 1kg, I would suggest using 480g flour, 200g liquid and 170g tang zhong (made with 30g flour and 150g liquid), which will give a hydration of about 68%. You can of course adjust the amount of liquid either side of the 200g, but the tang zhong proportions should not be adjusted. “

(http://www.cookipedia.co.uk/recipes_wiki/Tang_zhong)

You will note that my recipe for Tang zhong (that are detailed below) are different from what is mentioned above. You can either use my recipe or the recipe as mentioned above.

 IMG_8508


PROCESS OF MAKING THE SARAWAK STYLE BUTTER BUNS

PART 1 – MAKING THE TANG ZHONG (WATER ROUX) …..

What is required

  • 50g bread flour
  • 50g boiling water (water should be boiling hot, otherwise you have to put it over the stove to cook it)

Steps of preparation

IMG_6793

  • Get ready the bread flour in a mixing bowl. Pour the boiling hot water into the flour, mixed well and shaped into a ball.
  • Let the ball cooled down at room temperature. Once cooled, covered bowl with a cling wrap and keep it in the fridge overnight.
  • This recipe will make about 90 g of tanzhong. If you cannot finish tanzhong, you can put it in a container and keep it in the fridge for future use.

Update:

The picture below is from my second batch whereby I have used the method specified in the Cookipedia above and is append here for your reference.

IMG_0665

What is required

  • 25 g of bread flour
  • 125 g of cold water

Steps of preparation

  • In a metal mixing bowl, mixed the water with the cold water. Stirred until well mixed.
  • Place the flour mixture under medium to low heat until the mixture boils.
  • Continue to stir until it resembles some types of glue or when the mixtures start to dissociate itself from the wall of the bowl. Cool and keep it in the refrigerator for the portion that was not used.

PART 2 – PREPARING THE DOUGH – 1st Proofing

What is required

IMG_0636

  • 180 g of bread flour (you can substitute 5 g of bread flour with milk powder, in that case you need only 175 g of bread flour)
  • 30 g of sugar
  • 4 g of instant dry yeast
  • Pinches of Salt
  • 35 g of beaten egg (the above picture is for illustration. 35 g of eggs is equivalent to about 1 egg)

IMG_0637

  • 55 ml of fresh milk
  • 20 g of butter – soften
  • 45 g of tangzhong, refer to recipe above (about half of the tangzhong made above)


Steps of preparation (dough)

 IMG_0638

  • Mix all ingredients except softened butter and beat at slow speed for about 5 minutes.
  • Add the softened butter and continue kneading at medium high-speed for about 20-30 minutes or when the dough did not stick to the wall of your mixing bowl and do not break when you pull the dough.
  • In the flat surface dusted with normal or bread flour, take out the dough from the mixing bowl and slightly knead it using hand for 1-2 minutes and shape it into a ball.
  • lightly oil you mixing bowl and place the ball in the bowl. Cover with damp cloth or cling wrap (to prevent moisture loss).

IMG_0639

  • Leave it to proof until almost double in size. This should be about 30-45 minutes depending on the day’s temperature.
  • If you are using a metal mixing bowl which are slightly cold when touched, put it in your oven at temperature of about 30 degree Celsius for about 10 minutes or when your bowl feel warm when touched.


PART 3 – PREPARING THE BUTTER FILLINGS

IMG_0616

What is required

  • 150 g of butter
  • 150 g of sugar
  • 180 g of flour

Steps of preparation

  • Melt the butter in the microwavable bowl (1 minute). Alternatively, you can also melt it over the smallest heat directly under the fire.
  • Add the sugar to the hot melted butter, stirred until dissolved.
  • Add in the sifted flour gradually and used a spoon to stir until well mixed.
  • Let the flour mixture cooled down and let it rest for at least 5-10 minutes (note that the flour need sometime to absorb the liquid and don’t worry if it is too watery. After 5 minutes, the flour will also expand and you can see a slight increase in volume.
  • Once cool, shaped it into 10 small balls of about 40 g each. Set aside for later use.


PART 4 – PREPARING THE DOUGH – Wrapping the fillings and 2nd Proofing

IMG_0606

  • Take the dough out, punch into the dough to let any trapped air escaped. Knead for one minute and divide into 10 equal size round ball.

IMG_0607

  • Wrap the dough around the butter filling ball as even as possible. Put it in a baking tray and cover with the same damp cloth.
  • Let it proof for another 30 minutes or when balls were almost double in size.


PART 5 – THE BAKING PROCESS

IMG_0608

  • Set the oven to temperature 190 degree Celsius.
  • Put  in the oven and bake at 10-15 minutes. After 10 minutes of baking, egg wash (please see below) the buns quickly and continue baking for about 5 minutes or when the top start to turn slightly golden brown. Alternatively, you can egg wash first before you send into the oven. I prefer to egg wash at the latter stage as I can control the colour better.
  • Egg wash – Crack one egg and mixed with 3 teaspoons of water and 2 drops of oil, slightly beat and sift into a small box, use the brush to brush on top of the surface. The purpose is to let the buns looks shinny and golden brown. 

IMG_0609

  • Take out from the oven and transfer to a rack for cooling.

IMG_8510


MODIFICATIONS AND VARIATIONS

  • For the butter fillings, you can add 1-2 tablespoons of milk powder to the flour. Personally, I do not prefer to have milk powder added since it will negate the butter aroma. However, commercially, they do add milk powder to this and in fact, my kids loved the fillings that have milk powder.
  • For the dough, you can add 1 teaspoon of milk powder as well. However, both this modification are not traditional methods of preparation.

IMG_06141


CONCLUSIONS

  • This is a traditional bun that is very popular among the Sarawakians.  The history has yet to be traced. However, this bun is usually prepared by Hainanese “kopitiam” (coffee shops) and most of the good bakers are Hainanese. Hainanese are the descendants of immigrants from the Island of Hainan in People’s Republic of China. It is also a Chinese dialect group and they are very good chefs and pastry chiefs. This is because they arrived South East Asia later than other Chinese dialect groups (like Cantonese, Hokkien, Foochow) and they were employed as chefs in the then British families and well to do local and nonya families. They were trained by the British in baking and when the colonial era ceased, they started to set up coffee shops cater for the Chinese immigrants in from China. The consumption and usage of butter in pastry were mostly influenced by the British administration. Though unconfirmed, however , it appeared to be logical because Chinese traditional cooking did not use its butter in its delicacies.
  • The Sarawak Style butter buns have a nice buttery fragrance and taken a bit resembles taking a teaspoon of butter and sugar in the mouth….It is divine especially eaten with a cup of tea or coffee. It is ideal as a breakfast item or afternoon snacks.
  • The use of tanzhong in this recipe made the bread softer even after a day or two. This newly developed baking method is widely used by bakers in the Asian region and that is one of the reasons that sweet buns and soft buns were popular in Asian region. The texture will definitely different from the traditional method of bread baking.

IMG_8517

Hope you take a move in trying out this new recipe. For my readers who are in other countries and never tasted this bun, just take a bowl, add equal amounts of melted butter, sugar and flours, stirred and put in the microwave for 2 minutes. Have a small scoop of filling and tell me if this is your cup of teas.

Thanks for reading and have a nice day. Cheers. 

IMG_06621


  • For more recipes, you can refer to my RECIPE INDEX (updated as at 8 June 2014)  here and you can follow me at PINTEREST or visit the blog’s FACEBOOK PAGE to keep abreast of my future posts.  

IMG_8514

A Quick And Easy Dish–Tuna Kiwi Salad

IMG_8145

INTRODUCTION

Today is Saturday and I have done my marketing earlier in the morning when my kids are sleeping and the crowds in the supermarket were lesser. I have just completed my marketing, cleaned my seafood and put back to the fridge and is time to issue my post today.

IMG_8111

Some of my close friends were asking me why am I having  a daily post.. Frankly speaking, I am tired of taking pictures, cooked, taking pictures again, compile, blog and publish. I do not have any worries about of what I am going to blog about as I have to cook at least one meal a day and there are many household recipes that I can blog. However, it is my intention to build up my readership number and my recipe database within a year.. That explained the reasons of my daily posting and  I will alternate between household savoury dishes and pastry items..I am sorry to take up your time to hear an old “grumbling”……

IMG_8141

Putting that aside, today I am going to share a very simple salad recipe that I have prepared yesterday. It should be one of the healthiest cuisines that I have blogged about as the fats involved is minimal and the ingredients are packed with proteins, vitamins and minerals. This is my own creation and I do not have recipe for you to refer. It is really a refreshing alternative after a few post of meat dishes such as Dongpo Meat and Chinese Barbecue Pork.

IMG_8104

I have named this salad as “TUNA KIWI SALAD” though the major ingredients were tomatoes. I will also share a number of presentations that you can consider how to serve this delicious salad.

IMG_8147


WHAT IS REQUIRED

Servings: About 6-8 persons

As it is a salad, therefore, I am rather reluctant to give an exact quantity. The quantity and types of ingredients are for reference only.

IMG_8071

Must haves

  • 3-4 large tomatoes

  • 1 small canned tuna (either in oil, with brine or with mayonnaise)

  • 2 tablespoons of olive oil (if canned tuna is in brine is used)

  • 2 kiwi fruits de-skinned and cut into small cubes.

  • Pinches of salt

  • Some shredded cheddar cheeses

Optional and substitutable

  • Pinches of black pepper

  • Some chopped coriander leaves or basil or Italian herbs preferred

  • 2 boiled eggs – cut into small pieces

  • Some pine nuts (not in picture)

  • Some cherry tomatoes (not in picture)

  • Some Chinese lettuces

IMG_8121


STEPS OF PREPARATION

IMG_8076

  • Cut the tomatoes into half. Use a spoon to take away the centre. Chop the centre into small pieces. You can either keep the seeds or throw away the seeds depending on how moist is your overall salad. However, it is advisable to throw away the seeds and juices but keep the centre. This illustration included the seeds and hence the salad was a bit moist.

IMG_8080

  • Cut the kiwi, boiled eggs, tomatoes and tuna into small pieces or chunks.

IMG_8085

  • Put all in a big mixing bowl. Add either chopped coriander leaves or dry Italian herbs, black pepper, pinches of salt and shredded cheddar cheeses. Stir until well mixed. Note: You have to be careful about the addition of pinches of salt.

IMG_8089

If your tuna is soaked in brine when you purchased it, there is no need to add salt but you may need to add in olive oil. If your tuna is soaked in oil when you purchased it, there is no need to add olive oil but you have to add it pinches of salt. If you prefer, you can add in some lemon juices.

IMG_8159

  • Scoop out the salad in the tomato cups or fresh lettuce leaves. Dust with additional cheeses or black pepper if desired.

IMG_8151


CONCLUSION

Personally, I liked this tuna salad very much. It is very healthy and easy to prepare. Try and see if you like the salad or not.

IMG_8093

Hope you like the post today and cheers.

IMG_8155

 For more recipes, you can refer to my RECIPE INDEX here and you can follow me at PINTEREST or visit this blog’s Facebook Page.

An International Pie That Will Suit Everybody’s Taste Buds–Japanese Curry Flavoured Potato Pie

IMG_7392

INTRODUCTION 

As a Malaysian, I loved curry but I can’t cook curry that is spicy because I have to consider the palate of my kids. Beside curry, I loved curry puffs but I do not really like the filo type of pastry or pastry that requires deep frying… and… I like the type of pastry that is usually used to make apple pies or chicken pies.  Therefore, I have decided to make “curry pie” using Japanese curry cubes. 

When I first travelled  overseas donkey years back, I always craved for Malay or Nonya curries. However, most restaurants overseas did not sell these curries. The more popular curries was the Japanese curries. Initially, I never like Japanese curries because it was sweet and not spicy hot.

IMG_7346

I did not “touch” these curries for many years until very recently because of my kids. My kids liked curries but they can’t take the spiciness. When we cooked curry, they will fight for the potatoes. When they know there was a curry dish, before their meals, they would take a cup of cold water with them. During the meal, they would dip the curried potatoes in the cold water and ate them. At times, they would run around the dining table because the washed curried potatoes were still too spicy hot for them.

IMG_7379

Two three month’s ago, my kind neighbour gave us some Japanese curries that she cooked and I am very happy to see that my kids were eating happily and requesting for more. Since then, it was quite common for us to cook Japanese curries at home and personally, I have get used to the taste and fell in love with it. Bear with me, the next post will also be another Japanese curry post and I am sure you will like it.

IMG_7395

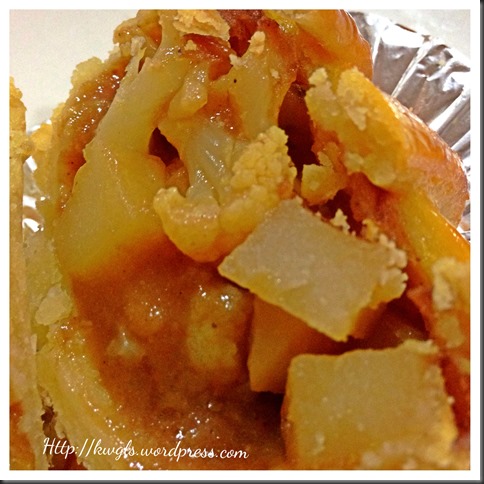
This recipe incorporated both the Western and Asian cuisines ingredients. It is a normal pie crust and you have full flexibility to shape the pie crust topping to your desired pattern. It is cooked with Japanese curry cubes which was not spicy such that it will be more acceptable to Western readers. To make it creamier like Western pie, I have added fresh cream and some parmesan cheeses. The potatoes and curry should be well liked by the Asian readers as it is very common that potatoes are used curry cuisines.

IMG_7348


WHAT IS REQURIED

For Potatoes Fillings (Make 8 tarts)

IMG_7316

  • 3-4 potatoes (boiled and cut into cubes)

  • 100 grams of cauliflowers

  • 60 grams of Japanese curry cubes (about 3 curry cubes depending on brand)

  • 1/4 cups of parmesan cheese (optional)

  • 1/2 cups of double cream or whipping creams (optional)

  • Pinches of salt and sugar

  • 1 1/2 cups of water

IMG_7357


For Pie Pastry

IMG_7393

  • 50 grams egg yolks (lightly beaten)

  • 250 grams plain flour (sifted)

  • 20 grams of icing sugar (optional)

  • 125 grams of chilled butter cut into cubes

  • 50 grams of icy cold water

  • 1 egg yolk for egg washing

IMG_7351


STEPS OF PREPARTION

Preparation of Potato Filling

IMG_7321

  • In a pot, put the water and curry cubes and bring to boil under high heat. Once boiled, turn to medium heat. Add cauliflowers and let it boil for 1-2 minutes. Add in potatoes cubes and boil for 2-3 minutes. Add in cream, salt, sugar and parmesan cheese. Boil for another one minute before off the heat. Let it cool and set aside for later use.

  • It is wise that you take some cooked curried potatoes and taste whether the fillings suits your taste buds. It have to be slightly high handed with your seasonings because this pie crust is not very sweet.

IMG_7367


Preparation of Pie Pastry and Baking The Pastry

  • Preheat your to 180 degree Celsius.

  • Beat together one egg yolk, few drops of cooking oil and 2 tablespoon of water. Stir well and sift into a container. Set aside for later egg washing.

IMG_7396

  • In a big mixing bowl, put butter cubes and sifted plain flour together. Use the finger tips to rub the butter cubes and flours together until it become crumby. Add in sifted icing sugars and continue to rub until well mix. Add lightly beaten eggs and water, mix slowly until it become a dough.

IMG_7326

  • Have a clinging wrap on the table, place the dough on top of the clinging wrap. Put another clinging wrap on top of the dough. Use a rolling pin to roll it into a flat sheet with about 0.5 cm thickness. Transfer the dough to the pie tin and use your hand to press the dough against the sides and make it as even as possible.

  • Roll the remaining pie pastry into a flat piece, cut to small strips and set aside for later use.

  • Fill the pie tins with the curried potatoes. Place the dough strips on top of the curried potatoes in your desired pattern. (Initially, as I am unsure whether I have adequate dough to made a net pattern, therefore I have started the pie with this pattern. Subsequently, since I have some dough left, I have put additional strips to make it into a net pattern.)

IMG_7331

  • Use a brush to brush pie crust evenly and baked in the oven for 15 minutes .

IMG_7337

  • Take the pie out and perform the second egg washing. Wash thoroughly and bake for another 5 minutes.  Note that this step is optional but I like to do this for all my pastries. Should the pie have signs of burnt, lower the temperature by about 20 degrees and continue baking.

  • Transfer to the wire rack for cooling. Let it cool completely before take the pies out from the pie tins. 

IMG_7372


CONCLUSION

If you like curry puff, you will like this. The pies were prepared after taking into consideration the needs of both Asian and Westerner’s taste buds. Of course, if you like to make the curried potatoes using the local curry paste, it is definitely acceptable. If you like it spicy hot, add in some chilli paste… But I preferred the sweet Japanese curried potatoes with a mild taste of cheeses and creams.

IMG_7385

Hope you like the post today and cheers.

For more recipes, you can refer to my RECIPE INDEX here and you can follow me at PINTEREST or visit this blog’s FACEBOOK PAGE .

group-board-picture72222222222222222[1]


If you are a Pinterest user and you are interested to have more recipes, you can join or follow this Pinterest Board set up by me  where there are more than 1000 recipes worldwide and pinned by various bloggers: FOOD BLOGGERS AND FOODIES UNITED PINTEREST BOARD. You can also join the Food Bloggers and Foodies United Group Facebook Group to see more recipes.

IMG_7375

I Am Short Of Time And Craved For A Cookie.. So I Made..–Microwave Cookies

IMG_7265

INTRODUCTION

Previously, I have a post on Microwave Mug Cake and yesterday when I browsed through the internet, a recipe in this Facebook Page – I love showing my personality in my cooking, caught my attention. I have always loved this Facebook Page because of its simple, unusual and daring recipes. In his/her post FOR THOSE DAYS WHEN YOU JUST WANT TO MAKE ONE COOKIE!, the Page owner was using microwave to prepare some cookies. Analysing at the ingredients, I was amazed how simple were the ingredients. Looking at the number of Likes in the post, at that time, there were 110 Likes and 736 re-shares. I thought I might as well give it a try.

IMG_7301

This morning, I am toying with his/her recipes. I started to try the original recipe and followed by additional recipes modified by me including 2 eggless recipes. Prior to this, I do know there are some eggless cookies recipes and I thought I might as well try to make these eggless cookies using microwave. My previous post of Eggless, Butter Less and Milk Less Cup Cakes was quite well received and I believed there will be some readers who are interested in microwave eggless cookies too.

Altogether, I have prepared 5 cookies:

  1. Butter Cookies with Caramel Chocolate Chips – As per the original recipe except substitute chocolate chips with caramel chocolate chips;
  2. Chocolate Cookies with Almond Chunks
  3. Eggless Strawberry Cookies with Strawberry Slices
  4. Eggless Blueberry Cookies with Fresh blueberries
  5. Strawberry Cookies with Strawberry Slices

IMG_7272

For eggless cookies, the eggs were substituted with equivalent volumes of strawberry milks or fresh milks. For this post, I will only list out the recipe of the  first cookie and highlight the changes in ingredients for the other cookies.


WHAT IS REQUIRED

Recipe adapted from: FOR THOSE DAYS WHEN YOU JUST WANT TO MAKE ONE COOKIE by I love showing my personality in my cooking

IMG_7234

  • 1/4 cup of plain flour

  • 1 tablespoon of butter (melted)

  • 1 tablespoon of white sugar

  • 1 tablespoon of brown sugar

  • 2 tablespoons of caramel chocolate chips (optional)

  • 1 egg yolk

  • 1/2 teaspoon of vanilla essence

  • Pinches of salt

STEPS OF PREPARATION

IMG_7240
 

  • In a bowl with melted butter, add in white and brown sugars, stir until well mixed. Add in egg yolks and followed by plain flour. Stir until combined and followed by addition of caramel chocolate chips.

IMG_7245

  • Place the cookie batter in the lightly greased  microwavable plate or bowl. Microwave 45-60 seconds or until the centre of the batter is set.

NOTE:

Just like ovens, every microwave oven will have some differences in terms of heat released. Like the microwave oven I have in my house, it is a very simple basic microwave oven with no function to adjust the heat. As such, you can start using medium heat (if there is any) and see how is the result. If at the end of 60 seconds, the cookie still does not look set, add additional 10-20 seconds to the cooking time. It is considered as cooked when the centre of the cookie is set or not runny.

IMG_7304


CHANGES IN OTHER COOKIES’ RECIPES

For other cookies, the changes are as follows:

  • Chocolate Cookies with Almond Chunks – Addition of 1 teaspoon of chocolate powder to the batter and replace chocolate chips with almond chunks; 
  • Eggless Strawberry Cookies with Strawberry Slices – Replacement of egg yolk with 20 grams of strawberry milks and substituting chocolate chips with one fresh strawberry (cut in slices)

  • Eggless Blueberry Cookies with Fresh blueberries – Replacement of egg yolk with 20 grams of  fresh milks and replacing chocolate chips with 10 fresh blueberries (mashed)

  • Strawberry Cookies with Strawberry Slices – Replacement of almond chunks with one fresh strawberries (cut in slices).


OUTCOME OF THE EXPERIMENTS

Butter Cookies with Caramel Chocolate Chips 

IMG_7254

The texture of the cookie is definitely satisfactory. It is rather light and a chewy type of cookie. It is quite fragile and if you view the original website, you will see that the Page Owner is using a fork to eat the cookie. However, given adequate time to cool, the cookie can be cut into neat pieces and definitely worth a try.

IMG_7276


Chocolate Cookies with Almond Chunks

IMG_7256

As expected, since it is a change of dry ingredients (from chocolate chips to almond chunks) and addition of chocolate powder, the texture is the same as the first cookie. Definitely recommendable even though it is not as crispy as the traditional cookie.

IMG_7280


Eggless Strawberry Cookies with Strawberry Slices

IMG_7260

Well, for this cookie, there was a rather major modification to the ingredients. So, what is the impact of the substitution of egg yolk with strawberry milks and the addition of freshly cut strawberry slices to the cookie? As expected, as there is no egg, it become a very dense “cookie” or “cake” if you  want to call it.

As I have explained earlier in my Eggless, Butter Less and Milk Less Cup Cakes post, eggs have the role to support the structure of any baked products. Without eggs, the rise of any baked products (cookies included) will have to be solely depend on the leavening agents (baking soda or baking powders).

Since we are using plain flour (without any baking soda or baking powders), will the cookies rise? The answer is quite certain, NO.

How about if we substitute the plain flour with self raising flours? It may or may not since the milk have much more moisture content than the eggs and it may not be able to support the flours.

Taste wise, it is acceptable. It is moist and full of strawberry flavour. Having one full cookie with some strawberry ice cream will definitely be welcomed by your guest…For Asian taste, this resembles a steamed dense cake..

IMG_7282


Eggless Blueberry Cookies with Fresh blueberries


IMG_7262

I then continued my adventure with the blueberry cookie by substituting the yolk with fresh milk and addition of blueberries. The outcome is the same as the eggless strawberry cookie, dense but chewy and edible.

IMG_7291


Strawberry Cookies with Strawberry Slices 

IMG_7258

Looking at the dense eggless “cookie” that I have made, I have decided to revert back to the usage of yolk in the cookies. For this cookie,  I have only substituted the chocolate chips with one strawberry fresh slices.

The texture is slightly better than the eggless cookies but it is too moist. The reason was simple, the juices from the fresh strawberry slices have negate part of the structure supporting effects of eggs  in the cookie.  If strawberry is to be added, I personally think that some baking powder and more flour will be needed to make it less dense.

IMG_7289


CONCLUSION

Depending on individual tastes, I would strongly recommended making the first two cookies (butter cookie with caramel chocolate chips and chocolate cookie with almond chunks). These two cookies are very delicious and light. However, if you do not mind to have dense “cookies”, you can try eggless strawberries and blueberries cookies. It was moist and very tasty.

IMG_7269

Hope you like my adventure today and do take a step out to prepare this one minute cookie for yourself or share with your family members. Is it not baking and cooking is fun with endless possibilities to try?

Have a nice day and cheers.

IMG_7295

My Daddy Made This Cake–Strawberry Mille Crepe Cake

IMG_7147

INTRODUCTION

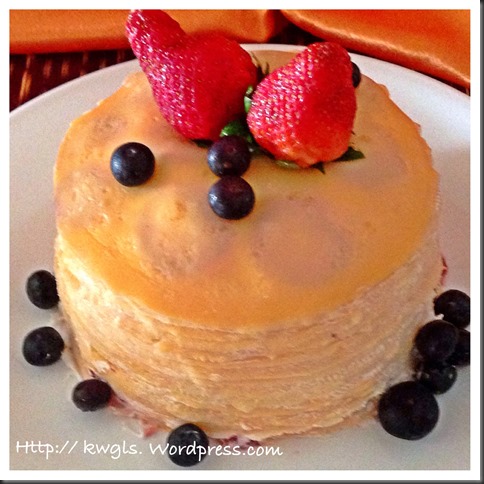
Firstly, I have to tell readers that the appearance of this mille crepe is not really what I have expected. The mille crepe cake should have more creams in between the layers but somehow for health conscious reasons, I have reduced the usage of cream and to make it “worst”(?), I have substituted part of the cream with strawberry non fat yogurt. As yogurt is not cream, it is harder to even the layers, the yoghurt in between the layers can leak out making the crepe cake to slide and with thinner layers. However, if you like fresh cream, go ahead to use it and you will be able to get a nicer mille crepe cake…

Though less creamy, the taste of course will not be compromised and the mille crepe cake was full of strawberry fragrance.  The crepes were made from strawberry milk; in between the crepes there were strawberry yogurt and fresh slices of strawberries, the sauces used was ready made strawberries sauces. In addition, it was served with additional fresh strawberries.  

IMG_7132

Both mille and crepe are in fact French words. “Mille” basically means million and “crepe” is a type of thin pancakes originated from France. As usual, lets learn something about this cake from Wikipedia:

“A crêpe or crepe is a type of very thin pancake, usually made from wheat flour (crêpes de Froment) or buckwheat flour (galettes). The word is of French origin, deriving from the Latin crispa, meaning “curled”. While crêpes are often associated with Brittany, a region in the northwest of France, their consumption is widespread in France, Belgium and Quebec. Crêpes are served with a variety of fillings, from the most simple with only sugar to flambéed crêpes Suzette or elaborate savoury galettes.

Mille crêpe is a French cake made of many crêpe layers. The word mille means “a thousand”, implying the many layers of crêpe. “ (Source: http://en.wikipedia.org/wiki/Cr%C3%AApe)

IMG_7142

I have decided to make this mille crepe after I read another daddy blogger in Malaysia who make a mille crepe for his family. In my Google Plus timeline, I have written:

“There are not many daddy who cooks. This daddy prepared some fabulous crepe cake and I think I will be the copy cat. Thanks +Tan Kuan Yoon for sharing”

Inspired by this daddy, I have prepared my mille crepe cake yesterday. However, I have modified from a recipe from another Japanese blogger who lived in New York since when I Google mille crepe cake, his recipe tops the others. His post is very detail and offers a lot of tips and advises on the preparation of crepes including caramelizing the top layer of mille crepe cake that is popular in New York. However, this was not cover in my post here.

IMG_7185

My intention of the post is to prepare a STRAWBERRY MILLE CREPE CAKE. Therefore, most of the cake decorations and ingredients will have strawberries in it. But readers should be aware that mille crepe cake can easily be tailored to suit your family’s taste buds. The fillings can have full flexibility. If you like peanut butter, you can use it. You can even have chocolate cream or pandanus coconut jam (“kaya”) to replace cream in between the crepes.

IMG_7192


WHAT IS REQUIRED

Recipe Adapted From: Marc Masumoto’s Mille Crepe Cake (Make about 20 six inches diameter crepes)

For crêpes

IMG_7096

  • 80 grams of unsalted butter, melted, cooled and set aside

  • 150 grams of plain flour

  • 250 grams of strawberry milk

  • 80 grams of honey or maple syrup

  • 250 grams of eggs

  • 1/4 teaspoon of salt

IMG_7151


For Creams

IMG_7111

  • 150 gram of strawberry yogurt (optional)

  • 10 large strawberries cut in slices (optional)

  • 1 cup of whipping cream (whipped and set aside)

IMG_7202


STEPS OF PREPARATION

Preparing the crepes

IMG_7102

  • In a machine mixing bowl, put melted butters and eggs together. Use the machine whisk to whisk the eggs and butter until the eggs and butter start to emulsify. Sifted in the flours, strawberry milk and honey (or maple syrup) and use the whisk to whisk until well mixed.  You can also use manual whisking if you prefer.

IMG_7107

  • Chilled in the refrigerator for at least 1-2 hours. If you do not have the time to chill, put it in the freezer for at least 30 minutes. Some recipes will call for overnight chilling. However, I personally found that there is no such a need. The chilling is to make the batter slightly harder (stickier) so that when you put in your frying pan, it is easier to shape it evenly.

  • After chilling, take the batter out from the refrigerator.

  • Heat a 6” non stick frying pan using medium heat. Pour 1/8 cups of the batter into the pan. Try to spread it as even as possible by taking up the pan and swirling it one or two times. Cook for 1-2 minutes or until the bottom of the batter is not runny.

  • You should be able to tell if the crepe is ready when you sight the edges start to curl up. Use a spoon to lift up the edge and take the crepe out quickly and put the other side back to the pan, Cooked for about 30 seconds – 1 minute. Continue to do the same for the rest of the batters. (I have managed to make 20 crepes from this recipe). Let the crepe cool and set aside.

IMG_7225


Preparing the cream and assembly of the cake,

IMG_7222

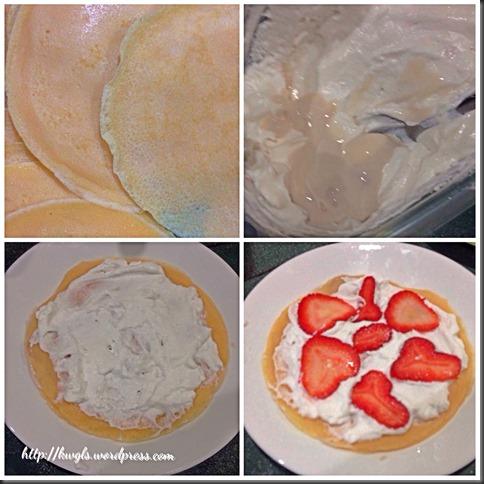
  • Beat the cream until firm peak. Fold in strawberries yoghurt and ensure that it is well mixed. If the cream is too watery, put the cream in the refrigerator for about 10-15 minutes before proceed to assemble the cake.

IMG_7224

  • In a serving plate, place a piece of crepe. Put 1-2 tablespoon of strawberry yoghurt cream, spread as evenly possible. Put in a few slices of sliced strawberry. Place another new piece of crepe on top. Repeat the same procedures until all the crepes are used up.

  • Chilled in the refrigerator for about half an hour before serving or cutting. This is because the cream may melt in Singapore hot environment and some chilling will help to keep the cake in shape.

IMG_7134

Notes

Note that you will not need to put slice strawberries for all the levels, otherwise, your mille crepe cake will be very high and difficult to balance. You can consider to have strawberries in say crepe 1, crepe 3, crepe 6, crepe 9…. In between the crepes, just fill in with the cream.

 IMG_7149

  • Top with additional strawberries, strawberries sauces or whipped cream if desired.

IMG_7190


CONCLUSION

This mille crepe cake is not that difficult to prepare. This is a strawberry version that I have created. Similarly, readers can always create your very own version. How about chocolate mille crepe cake prepared using chocolate milk and with Ferraro Rocher chocolates bits? Or durian mille crepe cake with fresh durian flesh in between the crepes? The possibilities are endless and you should try to explore and come out with one unique mille crepe cake that will definitely impress your guest.

IMG_7181

Hope you like the post today. Cheers and have a nice day.

IMG_7157

I Thought It Was A Chinese Fritter..–Vietnamese Hollow Donut or Hollow Bread (Bánh Tiêu)

IMG_6949 

INTRODUCTION

When I first saw the picture in a Vietnam recipe site, I didn’t realize that Chinese do not have this fried fitter. In fact, I thought it was some sort of fritters that was commonly sold together with You Tiao and Butterfly You Tiao (a type of Chinese deep fried dough fritters). However, after I prepared this, I asked my friends about this fritter, apparently most have not been able to give a name. However, they are kind enough to provide me the names of a few Chinese fritters that were very close to the one I have prepared.

IMG_6962

My friends was asking if there was any fillings inside. I said none, it is just hollow. They told me the one with red bean fillings is called Red Bean Fritters (“豆沙油饼“)。Another want is asking if there was any 5 spice powder, I told them no and this I know, the type with 5 spice powder is called Salty Fritters (“咸简饼“)。 At the end, I have decided to give up researching any further and follow the Vietnamese name of Hollow Donuts (Bánh Tiêu).

IMG_6955

Though the name is Vietnamese, however, the taste is exactly like the the other Chinese fried dough fritters as the ingredients are basically the same. I do not have a lot of picture for these fritters as it is our snack and it had been “snatched” away before I have time to take my picture.

IMG_6960


WHAT IS REQUIRED

Recipe adopted from: http://www.vietnamesefood.com.vn

IMG_6921

  • 400 grams of plain flour (or bread flour which I believed will produce better results)

  • 80 grams of sugar

  • 200 ml of water

  • 1 tablespoon of cooking oil or vegetable shortenings

  • 1 teaspoon of baking powder

  • 1 teaspoon of instant yeasts

  • 1/2 teaspoon of salt

  • Adequate sesame seeds for coating

IMG_6967


STEPS OF PREPARATION

IMG_6926

  • Mix the yeast and 1 teaspoon of sugar in the lukewarm water. Set aside for 10 minutes and see if there are some bubbles (froths) formation. If there are no froth formation, it means the yeast is death and you have to change the yeast.

  • In a machine mixing bowl, place plain flour, remaining sugar and baking powder. Slightly stir and make a well in the centre. Add in the yeast solution and use the spoon to slightly stir it.

IMG_6931

  • Use a the machine’s dough hook and use slow speed to mix the the dough for the first 2-3 minutes and continue to use medium speed to beat for 5 minutes. Add in vegetable shortening or cooking oil. Use high speed to beat until the dough is smooth which will take approximately 15 minutes.   (note that you can use hand to knead the dough also if you prefer not to use the machine)

  • Take out and knead it for 1-2 minutes and shape it like a ball and let it proof for at least 45 minutes or when the size doubled.

IMG_6962


IMG_6940

  • Take out the proofed dough, punch to let the air escape. Lightly knead for 1-2 minutes and divide into 10-20 equal balls. Coat with sesame seeds and let the balls proof for about 20-30 minutes. (Note that in this illustration, I have opt to make it into 10 balls which is slightly bigger than the one sold in the stalls, therefore, I would suggest to divide it into 15-20 balls).

IMG_6946

  • Heat up about 5 cm high of oil in a frying pan. Take a small piece of dough and drop to the hot oil and see if the dough starts to expand and float. If yes, the oil is ready.

  • Use your hand to flatten the dough to about 0.5 cm thick and put it into the hot oil.  Use a chopstick to flip it continuously and you should start to see the dough puffing up. Continuing doing so until the fritters are golden brown in colour. Place on a rack and let the fritters cool down.

  • Best serve immediately after it is cool.

IMG_6972

Note that the puff may become flat after it cooled. This is common as the dough do not have anything such as eggs to support its structure. Depending on your shaping, you should have a hole in the fried fritters. If your shaping is not perfect or do not have adequate time to proof, they may be no hole but the taste is equally fabulous like the sweet “butterfly fritters” you purchase in the stores.

IMG_6953


CONCLUSION

Vietnam is the neighbouring country of People’s of China. Obviously, Vietnamese cuisines will be influenced by Chinese cuisines and vice versa. This hollow donuts or hollow breads (as some Vietnamese called it) are definitely worth a try. In my humble opinion, it had no difference with the Chinese salted fritters “ham chim peng” except it is sweeter and do not have 5 spice powders. Do try to prepare and let me know if this suits your family’s taste buds.

IMG_6974

Lastly, I have pleased to share with readers the new “RECIPE INDEX” which have more than 150 over cuisines since I started the blog on 30 April 2013. This index have incorporated all the recipes that are either in this blog or in Guaishushu’s Facebook Page. You may want to take a look. It will be constantly upgraded and bookmark it for your future reference. Thanks for your kind support.  Cheers and have a nice day.

IMG_6964

Light Yet Sophisticated And Delicious Mango Puddings

 IMG_67491

INTRODUCTION

I remembered I first have my mango pudding when I stayed in Hong Kong in 1995. It was rather popular be it in the hotel restaurants or in the fast food chains. For commercially packed mango puddings, it can be easily bought in the supermarkets. The dessert is light and can be served with a variety of regional fresh fruits. It is especially soothing and comforting after a heavy meal of oily or spicy foods. I loved its rich and creamy texture.

IMG_6754


MANGO PUDDINGS DEFINED

As per Wikipedia:

“Mango pudding is a Chinese dessert usually served cold. It is very popular in Hong Kong, where pudding is eaten as a traditional British food. Mango pudding originated in India and the recipe was introduced from the British in the 19th century. There is very little variation between the regional mango pudding’s preparation. The dessert is also found in Singapore, Malaysia, Thailand, Macau and is often served as dim sum in Chinese restaurants.” (Source: http://en.wikipedia.org/wiki/Mango_pudding)

IMG_67371


WHAT IS REQUIRED

Make 6 desserts cups

IMG_6713

  • 200 ml of coconut milks

  • 200 ml of full cream evaporated milks

  • 250 ml of fresh milks

  • 1 egg yolk

  • 150 grams of sugar

  • 1 large mango (pitted and pureed)

  • 9 gelatine sheets (about 1.5 tablespoon gelatine powder)

As for the liquids, you can change between coconut milks, evaporated milks and fresh milks  but ensure that the total volumes add up to 750 ml. This means that you can use 750 ml of fresh coconut milks if you prefer. I usually like to dilute my coconut milk as I do not want the dessert to be overly creamy and for health conscious reasons.

Note that the colour of the final mango puddings will vary depends on the types of mango that you have. If evaporated milk were added, the colour will be creamy colour.

IMG_6762


STEPS OF PREPARATION

Preparing the mango purees

IMG_6718

  • De-skin and pitted (stoned) one large mango. Put the mango flesh in a food processor, blend it until puree form and set aside for later use.

IMG_6756


Preparing the puddings

IMG_6723

  • In a sauce pan, place all the liquids and sugar and heat it under medium heat until it boils. Once boiled, turn to lowest heat available.

  • Soak your gelatine sheets for 1 minutes and place the sheets into the sauce pan. Keep stirring until all the gelatine are dissolved. Off the heat but put on top of the stove to minimize the heat loss.

IMG_6728

  • In a big mixing bowl, use a whisk to whisk you egg yolk until light. Add the mango puree and whisk until well mixed. Sift the hot milk onto the mango puree and stir until well mixed.

  • Spoon the mixture into lightly oil pudding moulds or dessert cups and leave to cool. Chill the mango puddings in the refrigerator for at least 6 hours (or until set), preferably overnight.

IMG_67521


CONCLUSION

Easy to do and tasty desserts. Classic yet sophisticated. You can serve with fresh fruits or on its own. Additions of extra evaporated milks will make it creamier. Best to present to your guest after a heavy, oily and spicy meal.

IMG_6747

Hope you like the post today. Cheers.

IMG_67431

Auspicious Day With Auspicious Porridge–Eight Treasure Porridge (八宝粥)

IMG_6607

INTRODUCTION

It is such an auspicious day that I am writing this post. I swear it is not pre-planned. Today is Mid Autumn Festival aka Moon Cake Festival, it is a festival that is celebrated by all Chinese worldwide. As request by one of the Google communities, I have written a brief write up on Mid Autumn Festivals HERE which you may want to have some casual reading.

IMG_6599

The cuisine that I am going to post today is a vegetarian dish called 8 treasure porridge (八宝粥). There are so many versions of this one pot dish in the internet but the recipe that I am going to share is from my kind neighbour. She liked to cook this porridge and after I tried it for the very first time, immediately I fell in love with it. Since then, I had liked to cook this dish in important festivals such as Chinese New Year Day where the whole family were supposed to be on vegetarian diet for one day.

I have cooked this yesterday not because of the festival, but because I craved for the porridge since I am still on my vegetarian diet. I gave two boxes of the porridge to my daughter’s schoolmates mother, she immediately asked for the recipe when she reached home. She commented that the taste of the porridge was totally different from what she had tasted in the vegetarian stalls.

IMG_6594

I did not know where my neighbour get the recipe but I found that there are certain ingredients that we used were not found in other 8 treasure porridges sold by the vegetarian stores. Both the ingredients were mock meat acceptable to all vegetarians and without these two ingredients, the taste will definitely be different.

As this was our dinner last night, I did not have much chances to take pictures and the poor lighting make the picture a bit disappointed. But trust me, this is a very different 8 treasure porridge and it is definitely good for casual dining or a presentable dish in important Buddhist religious occasions.

IMG_6605


WHAT IS REQUIRED

Though the name is 8 treasure porridge, however, we tend to have more than 8 ingredients and I do not think all my ingredients are in the picture.  I should have used 11-12 ingredients here. Most of the ingredients are nuts and a few ingredients and some mock meat.

IMG_65571

  • 1 cup of uncooked rice – not in picture (白米)

  • 1 cup of jujube (红枣)

  • 1 cup of peanuts (花生)- soaked

  • 1 cup of cashew nuts (腰豆)

  • 1 cup of lotus seeds (莲子)- soaked

  • 1 cup of gingko nuts  (白果)- soaked

  • 1 cup of red carrots (cut into cubes) (红萝卜)

  • 1 cup of dried mushrooms (soaked and cut into cubes) – not in picture (冬菇)

  • 1 cup of mock duck (must have) – (素鸭)

  • 1 small packet of “fat Choy” or “black moss” (发菜)

  • 1 packet of about 2 sheets of mock goose (素鹅)(must have)

  • 6-8 cups of plain water (if not adequate, you can add in water later)

IMG_6543 Mock Duck

IMG_6556 Mock Goose

Please do not ask me why they were called mock duck or mock goose, frankly, I do not know. While the shape is difference, the taste is nothing like duck of goose. Both are made of wheat gluten, oil, soya sauce, sugar, salt and packed with proteins. They do have their distinct flavour but I can’t describe exactly what is the flavour. They can generally found in Chinese grocery stores that sell vegetarian supplies. These two items are the two most important ingredients in this porridge and without it, the taste will be different.

 IMG_6561 “Fat Choy” or “ Black Moss”

This a type of moss now commercially cultivated in the Gobi dessert and Chinese Government do place a restriction in harvesting the moss. The meaning of having these mosses signifies prosperous since the syllables in Chinese name is the same of both “Fat Choy” and “Black Moss”. I hereby quote what Wikipedia had explained about this moss.

“Fat Choy (Nostoc flagelliforme), also known as faat Choy, fa cai, black moss, hair moss or hair weed is a terrestrial cyanobacterium (a type of photosyntheticbacteria) that is used as a vegetable in Chinese cuisine. When dried, the product has the appearance of black hair. For that reason, its name in Chinese means “hair vegetable.” When soaked, this vegetable has a very soft texture which is like very fine vermicelli.” (Source:  http://en.wikipedia.org/wiki/Fat_choy)

IMG_6584


STEPS OF PREPARATION

Preparing all other ingredients

  • Clean all ingredients (except mock duck and mock goose) and you may want to soak the peanuts and lotus seeds (if you buy the dry type). Cut into almost the same size as the peanuts and set aside for the later use.


Frying the mock goose

IMG_6644

  • In a frying pan, have some cooking oil under high heat, fry the mock goose until crispy. When cooled, cut into thumb size pieces and set aside for the later use. (Note: While it is good to have minimum oil in the cooking, however, without performing this step, the fragrance will not be there. However, you can try using “air fryer” but I am unsure whether the taste will be the same.)

  • Depending on your preference, you can use the same oil to stir fry the mock duck, gingko, lotus seeds, mushrooms, carrots etc. for a few minutes such that the mock goose and mushroom aromas blends with the other ingredients. Set aside for later use. This illustration bypassed this step to minimize the usage of cooking oil in the porridge and the taste will not be compromised much.

IMG_6645

  • Clean your rice and place in the rice cooker. Add in all other ingredients except “fat Choy”. Select porridge function for cooking the porridge.

IMG_6646

  • Just a few minutes before the porridge function was done, add in fat Choy and seasonings. Suggested seasonings are light soya sauce, salt, sugar or other flavour enhancers. Note that some of the ingredients already have some seasonings, please take some porridge out for tasting before you put the condiments.

Note that you can also use pressure cooker but remember to select the porridge function if it have. Alternatively, I have ever cooked the porridge over the stove and in this way it is easier for you to monitor the desire texture of your porridge though the cooking time may be longer. As long as all ingredients are soft, the porridge is considered as done.

 IMG_6603

  • Best served hot with “you tiao” – a type of Chinese plain dough fritters or additional crispy “mock goose”. Both these are optional.

IMG_65921


CONCLUSION

As I have said earlier, I fell in love with this special porridge when I have my first bowl years back. I  am confident you will like it too. Bookmark this page for your future usage. You may want to cook it during Chinese New Year like me!

Hope you like the post today. Cheers

IMG_66011

If you are looking for more CHINESE NEW YEAR COOKIES,  you may want to visit this post summarizing all relevant Chinese New Year Cuisines.

Chinese New Year Cookies21


For more recipes, you can refer to my RECIPE INDEX here and you can follow me at PINTEREST or visit this blog’s FACEBOOK PAGE .


group-board-picture72222222222222222


If you are a Pinterest user and you are interested to have more recipes, you can join or follow this Pinterest Board set up by me  where there are more than 1000 recipes worldwide and pinned by various bloggers: FOOD BLOGGERS AND FOODIES UNITED PINTEREST BOARD. You can also join the Food Bloggers and Foodies United Group Facebook Group to see more recipes.
IMG_65991

How About An Eggless, Butter Less, Milk Less Chocolate Almond Cup Cakes?

IMG_0496

UPDATED POST ON 5-11-2014

I will include in this post another recipe that I have developed this morning, it is gluten free, dairy free, egg less and fatless. It is a rather healthy moist and aromatic snack.  I hope this post will benefit those who are on a certain diet.

IMG_0508

It is the same recipe for both cookies and cupcakes. For cookies just make it in smaller size and bake slightly longer.. It can be crispy or chewy. It will not be as crispy as those using flour.

IMG_0504

Taste wise is satisfactory. You can imagine taking some almond meal, add some cocoa powder, water and sugar.. It is definitely acceptable to most. Please scroll down for the second recipe.

IMG_0494


IMG_6487

INTRODUCTION

Seriously, when I looked at the recipe, I was curious how it would turn out to be. When I prepared the batter and baking, I am even more doubtful about its outcome.. I did not have any picture to compare and I did not know whether what I have prepared and baked was correct or not. Not until I took the first bite this morning that I am confident to issue this post…

This is an eggless, butter less and milk less cup cake that I have adapted from a 2003 recipe. I have printed out this recipe as early as year 2005 when I just started to have interest in doing some baking. Then, I have been cracking my head to look for recipes that were suitable for niche markets like health conscious people or people that are less fortunate like diabetes . While flipping my recipe file yesterday, I saw this piece of printed paper and I thought I might wanted to give it a try.

IMG_6515

While I am writing this post, I try searching this recipe in All Recipes Cake Recipes website, I am rather happy that the recipe is still there but with no picture, that proves that it is a very old recipe. The recipe was submitted by Ms. Kathy Thurston and some body named Ms. Bernadette Beaupre had gave some explanation of this cake:

“This cake comes in handy when all you have left in the cupboard is the tin soups just before shopping day. It really was a treat served warm when we came in from the cold. And it was c-o-l-l-l-d-d-d, North of 53′. Sprinkle brown sugar or dust confectioner’s sugar over the top.” — Bernadette Beaupre (Source: All Recipes Cake Recipes website,)
Since it is an eggless, butter less and milk less, what should be the structure liked. If you looked at the recipe in detail in later part of the post, you will note that there are some shortening and water. Butter less can be substituted with cooking oil or vegetable shortening (as in this recipe) and milk less can be substituted with any liquids (be it eggs or water). Therefore, the crucial element that determine the outcome of the cup cake will be eggs.

IMG_6498

Eggs have the role of supporting the structure of the cup cake or in general any baked products. They are binder which help to hold the ingredients together. In addition, it contributed to the liquid component in a cake recipe. Therefore, it is expected that without eggs, the cake will be dense and the rising of the cake will depend entirely with the leavening agents such as baking powder and baking soda. 

IMG_6466

I am worry about whether the dense cake will be dry and difficult to swallow. The conclusion is not, as the recipe have minimal vegetable shortenings and some liquids which is adequate to make the cake moist.

In this recipe, I have increased the amount of water, addition of cocoa powder and some almonds chunks. The final baked products were well beyond my expectations and I concurred it was some form of good snacks. As I was experimenting with this recipe, I have reduced the volumes and managed to make 4 small cup cakes. As with any other cakes, serving with additional sauces and whipped cream will heighten the palate to another level.

IMG_6493


WHAT IS REQUIRED

Recipes adapted from: Eggless, Butter less and Milk less Recipe by Kathy Thurston (make 8 cup cakes)

IMG_6570

  • 2 cups plain four

  • 1 cup white sugar

  • 1 cup almond chunks

  • 2 cups water

  • 2 tablespoons vegetable shortening

  • 2 tablespoons cocoa powder

  • 1 teaspoon baking soda

  • 1 teaspoon of baking powder

IMG_6506


STEPS OF PREPARATION

  • Preheat the oven to 180 degree Celsius and get ready some cup cake moulds.

IMG_6571

  • In a sauce pan under medium heat, bring  the vegetable shortenings, water and sugar to boil and continue boiling for about 2 minutes.

  • Sift the flour, cocoa powder, baking powder and baking soda together into the liquid.

IMG_6572

  • Use a spatula to stir the batter until it is well mixed.

IMG_6573

  • Stir in the almond chunks and ensure it is well mixed.

  • Scoop into the paper cups for cup cakes and baked in the oven for about 20 minutes or when the skewer inserted come out clean.

IMG_6574


CONCLUSION

This is a rather unusual cake. So who should prepare this? In fact this cake is very suitable for people who are vegetarian in accordance with Buddhist principles.

In my circle of friends, I have a few friends who are vegetarians. However, though all are  vegetarians, there are certain ingredients that fell into “grey area” and subject to arguments.

IMG_6506

One of the ingredients is eggs. Some of my vegetarian friends do not eat eggs as they believed there may be an embryo attached to the eggs. However, other Buddhist vegetarians believed that current eggs are commercially “produced”, therefore , it is impossible to have any embryos in the eggs.  Even if you hatch the eggs, no chicks will be born,

Another two special ingredients are two diary products, milks and butters. Some vegetarian will not touch any food “produced” by an animals, therefore milks and butters were excluded in their diets. Whereas some choose to believe that as there is no need to kill a cow to get milks and butters, therefore, these can be included in the vegetarian diets.

IMG_6490

These belies have an impact in pastry terms. Every year, when I baked my pineapple tarts for my relatives and friends, I will have to bake two types, the normal with milk, eggs and butter and another version, which is rather hard to prepare that is eggless, milk less and butter less! Of course the onus will lie on me to find relevant substitute for the ingredients.

Hope you like this rather strange post today. But, I have to admit that looking at the picture, you may not be convinced until you take a bite of it. Have a nice day and cheers.

IMG_6513


RECIPE 2 – GLUTEN FREE, DAIRY FREE, EGG LESS AND FATLESS CHOCOLATE CUPCAKE AND COOKIES

 IMG_0498

WHAT IS REQUIRED

  • 1 cup of almond meal or almond flour
  • 3/4 cup of water
  • 1/3 cup of sugar
  • 2 tablespoons of cocoa powder

IMG_0500

STEPS OF PREPARATION

  • Pre-heat the oven to 160 degree Celsius
  • Mix all the ingredients above until well combined
  • Transfer to cup cakes cup .
  • Baked in the pre-heated oven at 160 degree Celsius for about 15 minutes or until a skewer inserted comes out clean

IMG_0502

  • For cookies, add about 1/8 teaspoon of baking powder to the batter, bake at 160 degree Celsius for about 20 minutes. Let it sit in the tray for 5 minutes before transfer to the rack for cooling. If you want it to be crispier, can extend baking time by another 5-10 minutes.

IMG_0506


  • For more recipes, you can refer to my RECIPE INDEX (updated as at 15 October 2014)  here and you can follow me at PINTEREST or visit the blog’s FACEBOOK PAGE to keep abreast of my future posts.  

IMG_0492


Peanut Butter Cream Cheese Ice Cream–Another Crazy Adventure

IMG_5985

INTRODUCTION

I swore do not know there is such type of ice cream in advance. It just another crazy adventure of Guaishushu.

I have prepared a few cheesecakes (Ferrero Rocher Oreo cheesecakes and durian cheesecakes) and I have ever froze those cheesecakes in the freezer since we can’t finish the cheesecake that few days. What I have discovered is that though frozen, there were not much changes to the texture of the cheesecake if it were defrosted at the room temperature. That make me wanted to try making ice creams using cream cheese.

IMG_5974

Today, based on this belief, I toyed with 250 grams of cream cheese to make the ice creams. Only after I have made the ice creams, I searched for the recipes and realized there are quite a number of cream cheese ice creams recipes. However, this ice cream is made using my lazy theory of one number baking ratio (of course there is no baking but all ingredients were in the same ratio). In the event that there is any recipe on the net that is the same as this recipe, it is pure a coincidence.

This is an extremely easy recipe and there is only one sentence to describe how to make the ice cream! If you like cheesy peanut butter flavour, you will not regret making this.

IMG_5975


WHAT IS NEEDED

IMG_5990

  • 250 grams of cream cheese (at room temperature)

  • 250 grams of peanut butter (at room temperature) (either chunky or smooth type of peanut butter)

  • 250 grams of icing sugar

  • 250 grams of double cream or normal cream.

IMG_5976


STEPS OF PREPARATION

IMG_5987

  • In a big mixing bowl, place all ingredients together, used a mixer to beat until well mixed,

IMG_5988

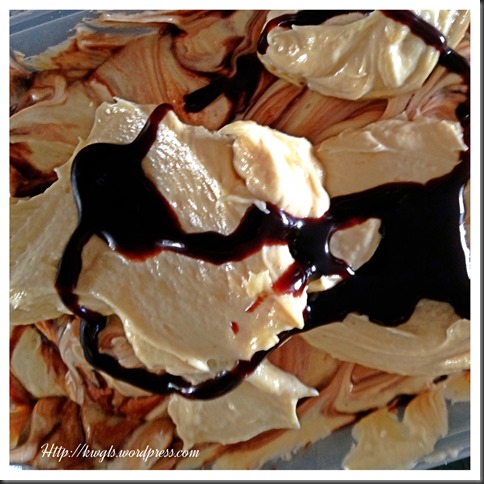
  • Scoop the ice cream into a box and freeze for at least 3-4 hours. You may consider adding chocolate sauce in between the “stacking” of ice creams.

IMG_5989

  • Alternatively, you can use some dessert cups to serve the ice cream.

IMG_5991


CONCLUSION

I really did not have much more to share about this ice cream.

It is rich, tasty and tasty. Drizzle with chocolate sauces and topped with some almonds or brazil nuts will heighten your palate and bring the diner to another level of enjoyment.

IMG_5983

Pardon me to say that “ you never try, you will never know”! Do not lose confidence for its simplicity in preparation. A single scoop may not be enough for one… it will lead to another…

IMG_5969

Variations are many. With the same logic, I can’t see why strawberry and other fruits cannot be added.. Use your own creativity and create one that suits your family’s taste buds.

Hope you like the post and cheers.

IMG_5980

9VwhltV