Common Chinese Dishes For New House Chefs

Vegetable collage 

INTRODUCTION

This is a compilation of common Chinese household vegetable dishes targeted as new house chefs. Including in one post is the technique of vegetable blanching and the common sides ingredients to go with the vegetable dishes.  The list is endless and it will constantly be updated.

For recipes, click on the picture or title and go to the relevant link. If the link goes to Facebook Pages, click on individual picture, all the recipes and instructions were stated in the relevant picture.


BLANCHING VEGETABLE AS A HEALTHIER ALTERNATIVE

Vegetables_1


VEGETABLE DISHES

Braised luffa with egg 蛋汁炆丝瓜

1001847_508826269188458_1598866455_n1

Foochow Preserved Mustard Fried With Minced Meat (福州糟菜炒肉碎)

 994206_511823292222089_547264078_n1

Fried Winged Beans With Minced Meat (肉碎四棱豆)

1016378_522608357810249_1328985347_n1

Blanched Kailan With Prawn (芥兰虾球)

1016249_512426902161728_1279207442_n1

Blanch Romaine lettuce with miso sauce (味真酱罗明旦)

993934_10201793676706448_1810259799_n1

Manchurian Wild Rice Fried With Chicken Strips (鸡丝炒茭白笋)

1208824_542508392486912_1417209003_n1

Hairy Gourd Fried With Minced Meat and Glass Noodles (毛瓜肉碎炒冬粉)

1186319_530276603710091_1350167083_n1

Braised Bitter Gourd With Chinese Mustard (苦瓜焖芥菜) 

1001230_528285057242579_537158963_n1

Salted Vegetable Fried With Pork Strips (咸菜炒肉丝)  

1375823_551424474928637_11647081557_n

Spicy and Sour Shredded Potatoes (酸辣土豆丝)

1157575_532288513508900_758575896_n

Blanched Tri-Colour Capsicum With Prawns With Chicken Breast (虾仁鸡柳拌三色甜椒)

946052_570786789659072_611669176_n


Chrysanthemum Green With Chinese Black Vinegar (春菊拌浙醋)

IMG_50681

Seven Vegetable Auspicious Day For Chinese New Year (七色菜-人日)

img_80441_thumb

Hope you like the post today. Cheers.


For more recipes, you can refer to my RECIPE INDEX (updated as at 10th February 2014)  here and you can follow me at PINTEREST or visit this blog’s FACEBOOK PAGE .  

group-board-picture72222222222222222[1][2]

If you are a Pinterest user and you are interested to have more recipes, you can join or follow this Pinterest Board set up by me  where there are more than 1500 recipes worldwide and pinned by various bloggers: FOOD BLOGGERS AND FOODIES UNITED PINTEREST BOARD. You can also join the Food Bloggers and Foodies United Group Facebook Group to see more recipes.


vegetable 2

Agar Agar is not the same as Agak Agak… Agar Agar is Red Algae !!

IMG_5342 

INTRODUCTION

Agar Agar is a Malay word for red algae, apparently it has been accepted as an English word. It is hard for a lay man like me to explain agar agar, so  as usual, I will quote Wikipedia’s explanation of agar agar for reader’s understanding.

Per Wikipedia:

“The word “agar” comes from agar-agar, the Malay name for red algae (Gigartina, Gracilaria) from which the jelly is produced. It is also known as kanten, China grass, Japanese isinglass, Ceylon moss or Jaffna moss. 

Agar-agar is a natural vegetable gelatin counterpart. White and semi-translucent, it is sold in packages as washed and dried strips or in powdered form. It can be used to make jellies, puddings, and custards. For making jelly, it is boiled in water until the solids dissolve. Sweetener, flavouring, colouring, fruit or vegetables are then added and the liquid is poured into moulds to be served as desserts and vegetable aspics, or incorporated with other desserts, such as a jelly layer in a cake. “ (Source: http://en.wikipedia.org/wiki/Agar)

IMG_5320

Agar agar is one type of traditional dessert commonly found in Singapore and Malaysia. It is easy to prepare and is a common item being served during Chinese New Year and other festivals. To make it requires no complicated kitchen utensils, just need to boil and mould. Traditionally, households used dried agar agar as shown in this illustration as the raw ingredient. However, in recent years, most households have started to use agar agar powder instead of dried agar agar.

IMG_5355

Traditionally, due to the lack of weighing scales, sophisticated kitchen utensils and written recipes, housewives usually prepare agar agar based on words of mouth using common kitchen items such as cups as the unit of measurement.

I was told that previously, the recipe is 1 cup of soaked agar agar will requires 1 cup of sugar and 1 cup of water. I liked this type of simple ratio recipe, however, when I tried out, it just turned out to be extremely sweet and tough.

Well, that type of recipe may not be acceptable nowadays since we have so many resources available. In olden days, the challenge to make a good agar agar is to get hold of the correct ratio of water to agar agar. The end product shall be slightly chewy and not to soft like the current jelly. In order to achieve such texture, housewives some times dried their agar agar under the sun. They believed that the less water content in the agar agar, the better it is. In fact, some house hold cut it into one bite size, dried it under the sun until it is very chewy, store in a container and eat it as a snacks or sweets!

IMG_5328

In recent years. preparation of agar agar is not entirely based on texture since all ingredients can be measure rather accurately. It is rather easy but the challenge had shifted to the colour combination and moulding. If you have the relevant mould, you can create your own design based on your creativities. One of the most trendy agar agar moulding will be agar agar moon cake where the agar agar were mould into a moon cake shape. Inside the agar agar moon cake, there is a yellow colour balls resembling the egg yolk.

Again that is deal with planning, making and moulding. It can be rather stressful if there are no prior planning on the colour selection and mould selection. Of course, it can be as simple as just a single colour one flat piece of agar agar. The taste will definitely be the same but of course it is less impressive to your guest.

This illustration will only provide you with the simplest layered agar agar procedures. You can chose your own colour and shape of your mould. I have use some heart shape mould and the colour is purely selected for this illustration only. At home, we will not go until this extent and usually have one to two colours plus 2-3 layers of agar agars.

IMG_5363


NATURAL COLOUR SELECTION

There are a lot of natural colour available and you can totally throw away the artificial colouring, if you wish. Suggested colours are:

  • White and milky – condense milk, coconut milk, fresh milk
  • Chocolate – instant coffee paste, chocolate  paste or powder
  • Red colour – red colour dragon fruits paste
  • Yellow – mango paste
  • Green – pandanus paste
  • Violet or blue – pea flowers
  • Purple –black currant drink
  • Red – strawberry paste
  • Dots in the agar agar –  dragon fruits

Besides the above colours, many varieties of cut fruits can also be included. For example, yam cubes with coconut milk is a good combination. Coffee with milk is another welcoming combination to make into agar agar. Canned Longan or lychee with black currant flavoured agar agar is also a presentable dessert. All this is very much depend on reader’s creativities to prepare one that is acceptable to the guest or family members.

IMG_5353


WHAT IS REQUIRED

IMG_5301

I have intentionally left out the quantities as it is best that you follow the instruction on the the package of agar agar that you bought. Be it dried agar agar strips as shown above or agar agar powders, they will have detail instructions on the quantity of water required. It is best that you follow these instruction as every brands of agar agar will requires different liquid to reach the desired textures.

  • 1 package of agar agar strip (about 38g)
  • Some water (refer package)

  • Some sugar (refer package)

  • Some permitted food colouring of your choice or the type of natural colouring ingredients as mentioned above.

  • Some moulds of your preference

  • Few leaves of Pandanus leaves – bundled (optional)

IMG_5346


STEPS OF PREPARATION

IMG_5371

  • Wash the dried agar agar by soaking in clean water for 1-2 minutes.

  • In a pot, put in the water as stated in the package and add dried agar agar. Use medium heat to bring the water to boil. Continue stirring until all the agar agar are dissolved.

  • Add in the required sugar into the agar agar solution and stirred until dissolve. Turn the heat to the minimal. You just need the heat to prevent the agar agar from solidifying while you do the layering. Alternatively, you can put your agar agar in a big basin of hot water.

IMG_5372

  • Take out some container of your choice, add in your preferred colouring and  pour into the mould.

  • Once done, put it in the freezer or chiller or under the fan and once it is set on the top, you can pour the second layer. How long will it take will depends on your room temperature, the concentration of your agar agar and the types of you container. For my today’s illustration, it is rather fast because the container is very small and my agar agar is quite concentrated.

  • Repeat the same for different layers until all the agar agar were used up.

  • Put in the fridge for another 10-15 minutes.
  • Remove from the mould, cut into your desired size and shape and put in your preferred serving plate.
  • Best served cold as a dessert.

IMG_5361


CONCLUSIONS

This is extremely simple. It is best that you based on what is stated in the package label to prepare the agar agar. Different brands will have different instructions.

Though this illustration is using traditional dried agar agar, you can use agar agar powder instead. The price for both dried agar agar and agar agar powder is rather economical and in my humble opinion, it is still a good choice of snacks or desserts. Variations are many and you have full flexibility to choose your desired flavour, colour and moulding. You guest will surely be impressed by your creativities.

Try this traditional Asian dessert and I am sure you wouldn’t regret preparing it. Hope you like the post today. Have a nice day and cheers.

IMG_5348

How I Wish This World Is As Colourful As A Rainbow–Cranberries Raisins Rainbow Loaf

IMG_3651.JPG (2)

INTRODUCTION

Guaishushu told himself, once in a while playing with colouring is okay since he did not have a chance to colour since after schooling.

Two months ago, he “accidentally’ brought a full set of colouring intended for icing decoration for about SGD 30 and he thought that it’s only SGD3. By hook and by crook, he wanted to use up some of his colouring and he knew that the only colour that he really needed and always used is the red colour for the preparation of red eggs during his kids’ Lunar calendar birthday celebration. Besides making the red eggs, he really don’t know what to do with these colourings!

IMG_3667.JPG (2)

One day, when he was browsing his Flipboard application in iPhone, he saw some rainbow loaf which is extremely beautiful but he is hesitant whether or not he should proceed to prepare this since it will need a lot of colourings.

Though it is generally not encouraged to consume too much food with colouring, but there should be government regulations that governed the import of permitted food colourings. If it is hazardous to health, he shouldn’t be able to get it in this “efficiently administered” country, Singapore. He searched the manufacturer Wilton LLC, apparently, it is an USA well established company set up in 1929. He told himself he is just a commoner, if this company had been established for so many years, their products must have been used by many people in the world and he should not casting doubt on its product reliability! In this thinking process, he gradually convinced himself that it is acceptable for him to prepare the bread!

IMG_3691

He knew that if he bake the bread, he will have nothing to worry about the “marketability” of his rainbow loaf as his kids will definitely fight for the bread. While he was struggling to make a decision, he certainly thought of a blog “Bake for Happy Kids” by Ms. Zoe. Her blog title is correct, he should bake to make his kids happy!

This post is about rainbow raisin and cranberry loaf. Guaishushu aims are to share about the making of rainbow loaf and raisin loaf. Therefore if readers are not fond of making the rainbow loaf, he can just make the raisin loaf instead.


WHAT IS REQUIRED

This recipe was adopted from the Sarawak buns recipe here and some of the picture are in the above mentioned post.

IMG_3689

  • 360 g of bread flour (you can substitute 10 g of bread flour with milk powder, in that case you need only 350 g of bread flour)

  • 70 g of beaten egg

  • 60 g of sugar

  • 40 g of butter – soften

  • 90 g of tangzhong (refer below)

  • 110 ml of fresh milk

  • 11 g of instant dry yeast ( 1 package)

  • 7 different types of colour gel or colouring (refer below)

  • 100 g of raisins and/or cranberry soaked in water/rum.

  • Pinches of salt

IMG_3673


THE PROCESS OF MAKING RAISIN AND CRANBERRY RAINBOW LOAF

This illustration will use the Tangzhong method of bread making and it involved 4 stages in the following orders:

Part 1 – Making the Tanzhong (Water Roux)

Part 2 – Preparing and Colouring the Dough for the 1st Proofing

Part 3 – Wrapping of Cranberries and Raisins and 2nd Proofing

Part 4 – The Baking Process


Part 1 – Making the Tanzhong (Water Roux)

PLEASE REFER TO THIS POST for the making of Tanzhong and reasons and history of Tanzhong.


Part 2 – Preparing and Colouring the Dough for the 1st Proofing

IMG_3679

  • Mix all ingredients except softened butter and beat at slow speed for about 5 minutes.
  • Add the softened butter and continue kneading at medium high-speed for about 20-30 minutes or when the dough did not stick to the wall of your mixing bowl and do not break when you pull the dough.

IMG_3680

  • In a flat surface dusted with normal or bread flour, take out the dough from the mixing bowl and slightly knead it using hand for 1-2 minutes and shape it into a ball.
  • Weigh the ball and divide into 7 equal portions.

IMG_3681

  • Take one dough and place some colour gel and knead until all the colour are even. Keep in a lightly greased bowl and covered with lightly greased cling wrap to prevent moisture loss.
  • Do the same for the remaining 6 dough with your desired colours.
  • Leave it to proof until almost double in size. This should be about 30-45 minutes depending on the day’s weather.

Colour Selection

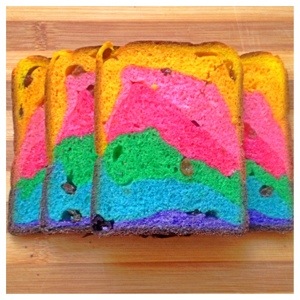
For this pictorial illustration, the colours that I have selected was in this order (from left to right and eventually from the top level to the bottom level):

Lemon YellowGolden yellowPink”No-taste” RedKelly GreenRoyal BlueViolet

IMG_3609


Part 3 – Wrapping of Cranberries and Raisins and 2nd Proofing

IMG_3682

  • Lightly grease a loaf tin with a cover.

  • Get ready a small bowl of water and the raisins and/or cranberries to be wrapped in the dough.

IMG_3683

  • Start with the lowest layer, take out the violet dough and use a roller to roll into roughly the size of the loaf tin.

  • Brush slightly with some water on the surface and place your raisins/cranberries.

  • Get the royal blue dough (second bottom layer) and use the roller to roll into roughly the size of the loaf tin.

  • Place the royal blue dough on top of the violet dough. Press the sides and ensure that the royal blue dough and the violet dough stick together.

  • Brush slightly with some water on the surface and place some raisins and/or cranberries.

IMG_3684

  • Get the Kelly green dough (third bottom layer) and use the roller to roll into roughly the size of the loaf tin.

  • Place the Kelly green dough on top of the royal blue dough. Press the sides and ensure that the Kelly green dough and the royal blue dough stick together on the sides.

  • Repeat the same for all the other layers and finished with the lemon yellow dough on the top.


Part 4 – The Baking Process

IMG_3685

  • Place the dough into the lightly greased loaf tin and let it proof until it is double in size. How long it will take depend very much on the weather and today, it took me another 45 minutes to reach the desired size I want.

  • Set the oven temperature to 200 degree Celsius

  • When the second proofing is done, i.e when the dough have double the size, bake in the oven for 30 –45 minutes..

IMG_3686

  • At about 35 minutes or when you start to smell the aroma of the bread, use an oven thermometer and insert into the bread and see if the temperature inside the loaf is more than 90 degrees Celsius. If it is less than 90 degrees Celsius, your bread will not be cooked and it is likely that when you take out the thermometer, there will be some wet dough stick with your thermometer. In this case, continue baking until when you inserted again the oven thermometer, the thermometer shows at least 90 degrees Celsius. If you find that the top starts to turn brownish, you can lower the temperature by 10 degree Celsius. General rule of thumb is that if you are unsure, rather bake slightly longer than under cooked.

  • If you don’t have an oven thermometer, one way of testing is after about 45 minutes (which is a reasonable timing for this size of loaf), take out the loaf from the loaf tin and try to use your finger to knock the bottom of the loaf. If it is a hollow sound, your loaf is cooked, otherwise, the loaf is uncooked. Put it back into the loaf tin and continue baking for another 10-15 minutes until you are certain that the dough is cooked. Again, if the top layer has signs of getting burnt, lower the temperature slightly.

IMG_3687

Note that the LOAF IS NOT BURNT. The dark brown color is the color of the violet dough on the side of the loaf.

IMG_3655.JPG (2)


CONCLUSION

While too much food colouring is not advisable, I choose to believe the Government’s stand on permitted food colouring. As long as consumption is not too often, such colouring shall not post a/any serious health hazard to our body.

While I am making this loaf, the kids were schooling. When they were back, I asked them to close their eyes and show it to them, “wow” are their reactions! They can’t believe that I am baking this loaf. They have requested to eat a piece of the bread but rejected by me because dinner is to start in 10 minutes time. In their mind, the loaf will definitely much tastier! Once in a while, why not bake your kids something “extraordinary” and joined them for a rainbow breakfast! Trust me, it will definitely a “colourful” and “fruitful” breakfast!

Hope you like this post on Cranberries and Raisins Rainbow Loaf. Have a nice day ahead and cheers.

IMG_3657.JPG (2)

IMG_3653

I am submitting this to Welcome To All My Bloggy Friends and #Recipeoftheweek

8646468202_0880f459d1   Link up your recipe of the week

20130821-081325.jpg

20130821-081409.jpg