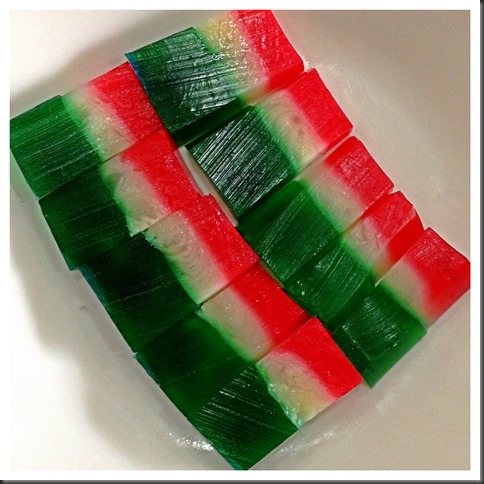
Agar Agar is not the same as Agak Agak… Agar Agar is Red Algae !!

IMG_5342 

INTRODUCTION

Agar Agar is a Malay word for red algae, apparently it has been accepted as an English word. It is hard for a lay man like me to explain agar agar, so  as usual, I will quote Wikipedia’s explanation of agar agar for reader’s understanding.

Per Wikipedia:

“The word “agar” comes from agar-agar, the Malay name for red algae (Gigartina, Gracilaria) from which the jelly is produced. It is also known as kanten, China grass, Japanese isinglass, Ceylon moss or Jaffna moss. 

Agar-agar is a natural vegetable gelatin counterpart. White and semi-translucent, it is sold in packages as washed and dried strips or in powdered form. It can be used to make jellies, puddings, and custards. For making jelly, it is boiled in water until the solids dissolve. Sweetener, flavouring, colouring, fruit or vegetables are then added and the liquid is poured into moulds to be served as desserts and vegetable aspics, or incorporated with other desserts, such as a jelly layer in a cake. “ (Source: http://en.wikipedia.org/wiki/Agar)

IMG_5320

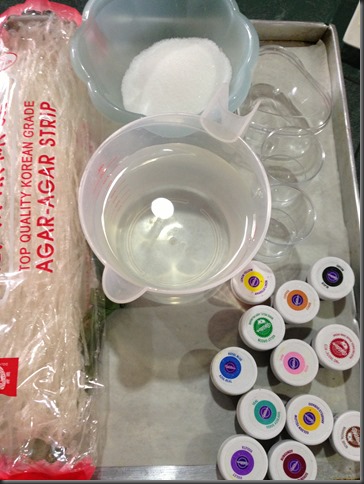
Agar agar is one type of traditional dessert commonly found in Singapore and Malaysia. It is easy to prepare and is a common item being served during Chinese New Year and other festivals. To make it requires no complicated kitchen utensils, just need to boil and mould. Traditionally, households used dried agar agar as shown in this illustration as the raw ingredient. However, in recent years, most households have started to use agar agar powder instead of dried agar agar.

IMG_5355

Traditionally, due to the lack of weighing scales, sophisticated kitchen utensils and written recipes, housewives usually prepare agar agar based on words of mouth using common kitchen items such as cups as the unit of measurement.

I was told that previously, the recipe is 1 cup of soaked agar agar will requires 1 cup of sugar and 1 cup of water. I liked this type of simple ratio recipe, however, when I tried out, it just turned out to be extremely sweet and tough.

Well, that type of recipe may not be acceptable nowadays since we have so many resources available. In olden days, the challenge to make a good agar agar is to get hold of the correct ratio of water to agar agar. The end product shall be slightly chewy and not to soft like the current jelly. In order to achieve such texture, housewives some times dried their agar agar under the sun. They believed that the less water content in the agar agar, the better it is. In fact, some house hold cut it into one bite size, dried it under the sun until it is very chewy, store in a container and eat it as a snacks or sweets!

IMG_5328

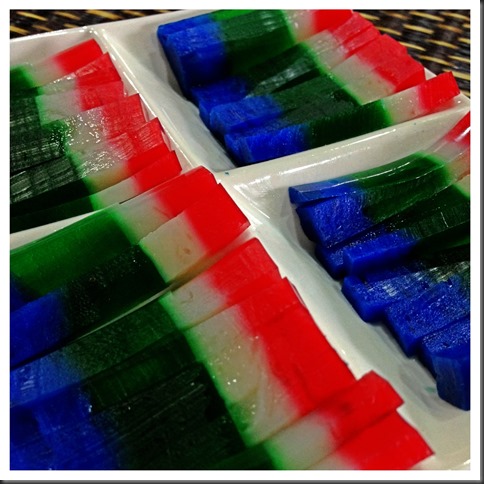
In recent years. preparation of agar agar is not entirely based on texture since all ingredients can be measure rather accurately. It is rather easy but the challenge had shifted to the colour combination and moulding. If you have the relevant mould, you can create your own design based on your creativities. One of the most trendy agar agar moulding will be agar agar moon cake where the agar agar were mould into a moon cake shape. Inside the agar agar moon cake, there is a yellow colour balls resembling the egg yolk.

Again that is deal with planning, making and moulding. It can be rather stressful if there are no prior planning on the colour selection and mould selection. Of course, it can be as simple as just a single colour one flat piece of agar agar. The taste will definitely be the same but of course it is less impressive to your guest.

This illustration will only provide you with the simplest layered agar agar procedures. You can chose your own colour and shape of your mould. I have use some heart shape mould and the colour is purely selected for this illustration only. At home, we will not go until this extent and usually have one to two colours plus 2-3 layers of agar agars.

IMG_5363


NATURAL COLOUR SELECTION

There are a lot of natural colour available and you can totally throw away the artificial colouring, if you wish. Suggested colours are:

  • White and milky – condense milk, coconut milk, fresh milk
  • Chocolate – instant coffee paste, chocolate  paste or powder
  • Red colour – red colour dragon fruits paste
  • Yellow – mango paste
  • Green – pandanus paste
  • Violet or blue – pea flowers
  • Purple –black currant drink
  • Red – strawberry paste
  • Dots in the agar agar –  dragon fruits

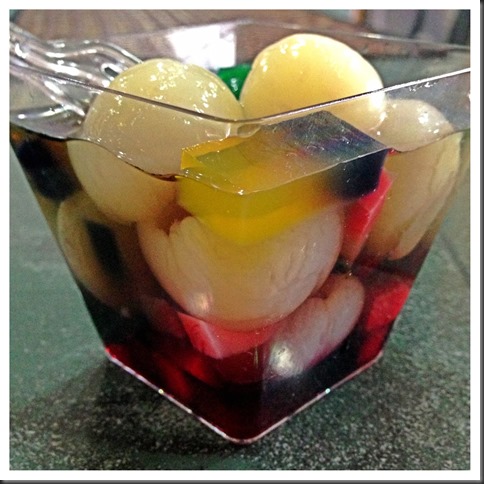
Besides the above colours, many varieties of cut fruits can also be included. For example, yam cubes with coconut milk is a good combination. Coffee with milk is another welcoming combination to make into agar agar. Canned Longan or lychee with black currant flavoured agar agar is also a presentable dessert. All this is very much depend on reader’s creativities to prepare one that is acceptable to the guest or family members.

IMG_5353


WHAT IS REQUIRED

IMG_5301

I have intentionally left out the quantities as it is best that you follow the instruction on the the package of agar agar that you bought. Be it dried agar agar strips as shown above or agar agar powders, they will have detail instructions on the quantity of water required. It is best that you follow these instruction as every brands of agar agar will requires different liquid to reach the desired textures.

  • 1 package of agar agar strip (about 38g)
  • Some water (refer package)

  • Some sugar (refer package)

  • Some permitted food colouring of your choice or the type of natural colouring ingredients as mentioned above.

  • Some moulds of your preference

  • Few leaves of Pandanus leaves – bundled (optional)

IMG_5346


STEPS OF PREPARATION

IMG_5371

  • Wash the dried agar agar by soaking in clean water for 1-2 minutes.

  • In a pot, put in the water as stated in the package and add dried agar agar. Use medium heat to bring the water to boil. Continue stirring until all the agar agar are dissolved.

  • Add in the required sugar into the agar agar solution and stirred until dissolve. Turn the heat to the minimal. You just need the heat to prevent the agar agar from solidifying while you do the layering. Alternatively, you can put your agar agar in a big basin of hot water.

IMG_5372

  • Take out some container of your choice, add in your preferred colouring and  pour into the mould.

  • Once done, put it in the freezer or chiller or under the fan and once it is set on the top, you can pour the second layer. How long will it take will depends on your room temperature, the concentration of your agar agar and the types of you container. For my today’s illustration, it is rather fast because the container is very small and my agar agar is quite concentrated.

  • Repeat the same for different layers until all the agar agar were used up.

  • Put in the fridge for another 10-15 minutes.
  • Remove from the mould, cut into your desired size and shape and put in your preferred serving plate.
  • Best served cold as a dessert.

IMG_5361


CONCLUSIONS

This is extremely simple. It is best that you based on what is stated in the package label to prepare the agar agar. Different brands will have different instructions.

Though this illustration is using traditional dried agar agar, you can use agar agar powder instead. The price for both dried agar agar and agar agar powder is rather economical and in my humble opinion, it is still a good choice of snacks or desserts. Variations are many and you have full flexibility to choose your desired flavour, colour and moulding. You guest will surely be impressed by your creativities.

Try this traditional Asian dessert and I am sure you wouldn’t regret preparing it. Hope you like the post today. Have a nice day and cheers.

IMG_5348

You Stingy Old Man, You Ruined My Mexican Coffee Buns–Polo Buns and Mexican Coffee Buns

IMG_2529

IMG_5798

INTRODUCTION

Please scroll down for the updated posts

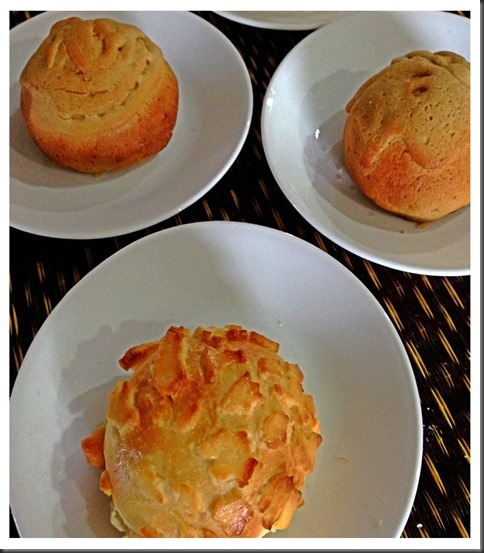
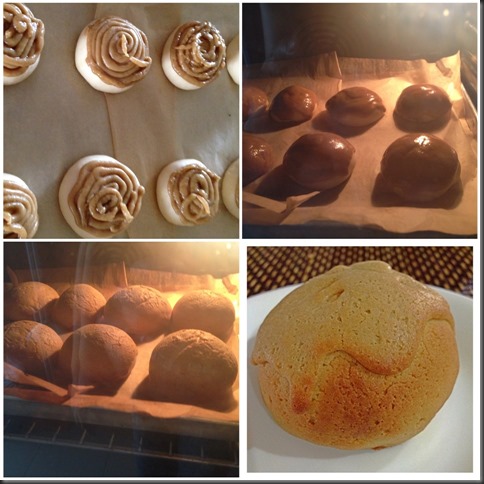
Guaishushu is seriously regretting for his “creativities” and “stinginess”. He made a batch of Polo buns and Mexican Coffee Buns. However, as the final proofing of his bun is less than his desired diameter, he was left with some coffee pastry dough. Instead of throwing it away, half way when he baked the buns, he just took out the buns and pumped in the left over coffee pastry dough thinking it will melt and become a coffee buns with double dose of crusty coffee toppings… And the end, he found that instead of making it more beautiful, he made a bunch of ugly buns… Well, he still decided to share the recipe here as readers can just follow the recipe and get some good quality buns…… Don’t be misled by Guaishushu’s pictures.

IMG_5192

POLO BUNS AND MEXICAN COFFEE BUNS

Polo bun or pineapple bun is a type of soft, sweet bun commonly found in Asia. The word “Polo” in Mandarin literally translated to pineapple. In another word, it is supposed to be a soft bun that have skin that resembles the skin of pineapples. Usually what is being sold in the market is with fillings such as barbecue pork. However, as I am on a vegetarian diet, I have opted to make it into a plain bun for breakfast. The buns were wrapped with a soft cookie liked dough on top of the buns, when it proved for the second time, the plain dough will start to make the soft cookie liked dough to break and those resembling the skin of a pineapple. Some have used a knife to cut into a pattern of a pineapple skin.

IMG_5812

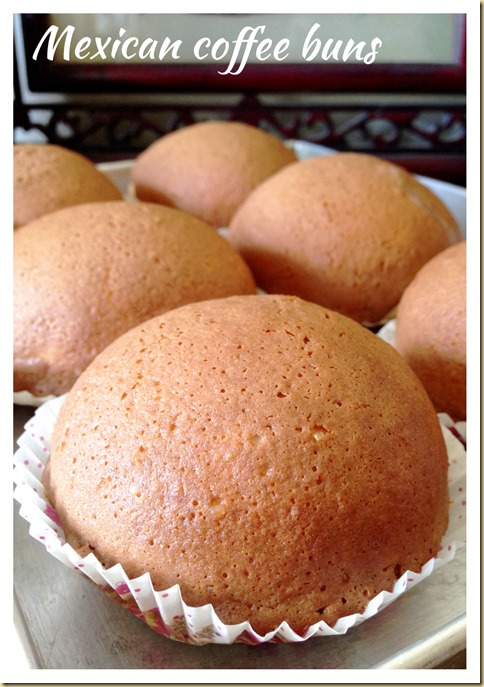
Mexican coffee buns is popularized by Rotiboy in Malaysia and it is a type of sweet bun with coffee flavoured crusty toppings. Usually, inside the buns, there is  a slice of butter which will melt when the buns are baked. Therefore the buns is full of buttery flavour.

THIS IS DEFINTELY A WORKABLE RECIPE AND IF YOU LOOK AT MY WORK IN PROGRESS PICTURES, YOU WILL SEE THE IT IS OKAY UNTIL THE VERY LAST MOMENT WHEN GUAISHUSHU IS GREEDY TO ADD ADDITIONAL COFFEE TOPPINGS.

IMG_5170


This post is a rather long post and have the following sections

Section A: Preparing the Buns

Section B: Preparing the Polo Buns Crusty Toppings

Section C: Preparing the Mexico Buns Crusty Toppings

Section D: Preparing Polo Buns for Baking

Section E: Preparing the Mexico Buns for Baking


SECTION A: PREPARING OF BUNS

What is required

IMG_5100

  • 500 g bread flour

  • 100 g castor sugar

  • Yeast one packet (about 11 grams)

  • 30 grams of butter (at room temperature)

  • Pinches of salt

  • 50 grams eggs (about 1 egg)

  • 240 grams of water


STEPS OF PREPARATION

IMG_5223

  • Mix all ingredients except softened butter and beat at slow speed for about 5 minutes.
  • Add the softened butter and continue kneading at medium high-speed for about 20-30 minutes or when the dough did not stick to the wall of your mixing bowl and do not break when you pull the dough.
  • In the flat surface dusted with normal or bread flour, take out the dough from the mixing bowl and slightly knead it using hand for 1-2 minutes and shape it into a ball.
  • lightly oil you mixing bowl and place the ball in the bowl. Cover with damp cloth or cling wrap (to prevent moisture loss).

  • Leave it to proof until almost double in size. This should be about 30-45 minutes depending on the day’s temperature.

IMG_5188


SECTION B: PREPARING THE POLO BUNS CRUSTY TOPPINGS

What is required

IMG_5118

  • 75 grams butter, melted

  • 110 grams of bread flour self raising flour, sifted

  • 50 grams of icing sugar, sifted

  • 25  40 grams of eggs, lightly beaten

  • 30 grams of milk powder
  • One egg yolk for egg washing
  • Some sugar for sprinkling


Steps of preparation

IMG_5111 

  • Melt the butter in an microwave oven for 1 minute.

  • Add in beaten eggs, sifted icing sugar, milk powder and sifted bread flours self raising flour. Mixed well until it form a soft dough.

IMG_5117

  • Divide the dough into 8 equal portions.

  • Shape in round shape and set aside for later use.


Section C: Preparing the Mexico Buns Crusty Toppings

IMG_5106

What is required

  • 100 grams of butter, melted

  • 100 grams of flour, sifted

  • 80 grams of icing sugar, sifted

  • 50 grams of eggs, lightly beaten

  • 2 tablespoons of unsweetened instant coffee dissolved in 2 tablespoons of hot water.

  • 8 pieces of 1 cm x 3cm x 0.2 cm cold cut butter (sizes is just for reference and you can just cut the butter in a small piece) – for usage in Section E. Store the butter in the fridge.


Steps of preparation

IMG_5124

  • Melt the butter in an microwave oven for 1 minute.

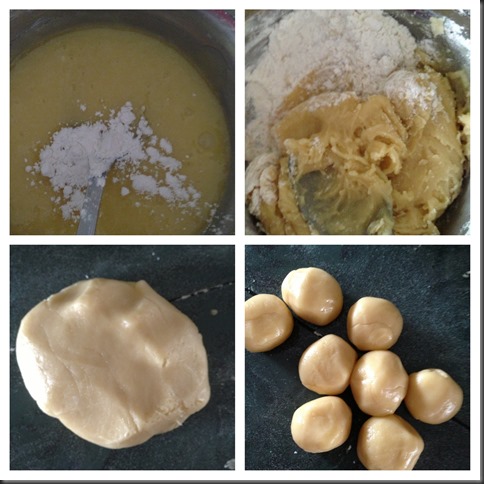
  • Add in beaten eggs, sifted icing sugar, instant coffee paste and sifted bread flours. Mixed well until it form a soft sticky dough and set aside.

Note that in the above illustration pictures, I only add in the instant coffee paste at a later stage.


SECTION D: PREPARING POLO BUNS FOR BAKING

* For newer detail instruction of preparing it from frozen dough, please scroll towards the end for the updated post

IMG_5224

  • Take the dough out, punch into the dough to let any trapped air escaped. Knead for one minute and divide into 2 portions. Set aside one portion for Mexico Coffee Buns in Section E.

  • Divide the dough equally into 8 portions and shape it into a round ball.

IMG_5225

  • Use a roller to flatten the “cookie liked dough” as prepared in Section B.

  • Use a brush to lightly brush some water on the plain dough so that it is easier for the cookie dough to cling on the plain dough.

  • Wrap around the plain dough and let it prove until double in size.

  • As the dough proves, you will see the cookies dough started to break. If you find you cookies dough have the tendency to drop from plain dough, spray or brush with additional water to let them stick together.

IMG_5226

  • When double in size, baked in the oven at 190 degree Celsius for about 15 minutes.

* For newer detail instruction of preparing it from frozen dough, please scroll towards the end for the updated post

IMG_5176


SECTION E: PREPARING MEXICO COFFEE BUNS FOR BAKING

IMG_5229

  • Lightly knead the other half of the dough as mentioned in Section D.

  • Divide the dough into 8 equal portions and shape into a sound ball.

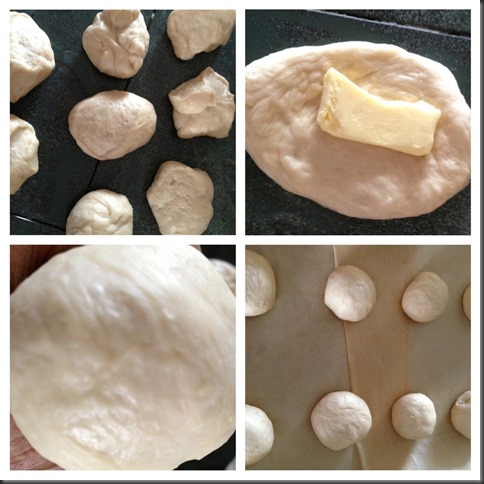
  • Use a roller to roll the ball into a flat dough, place a piece of cold butter on top of the dough. Use the dough to wrap a butter and make it into a round ball.

  • Put it in the baking tray and proved until double in size.

IMG_5227

  • Put the coffee soft dough into a piping bag. Cut a small hole in the bottom.

  • Pipe the coffee soft dough on top of the proved buns in the pattern as in the above images.

IMG_5228

  • After finished piping, bake in the oven for 190 degree Celsius for about 15 minutes.

IMG_5172


CONCLUSIONS

In this post, I have shared two types of common sweet buns. If you have some baking basics, it is definitely not a difficult bun to prepare. The crispy toppings of both buns are rather similar except the proportion of each ingredient is different. These toppings can actually be prepared in advance to shorten the preparation time. Remember that you can always wrapped barbecue pork in the Polo buns and you can refer Guaishushu’s Facebook Page post P1 – Roast Meat Bun (烧肉餐包).

IMG_2523

Sincerely, honestly, faithfully hope you like the post today and don’t get discourage by the ugly pictures today. Guaishushu’s promise to be less stingy (at least for photo taking purposes, ha-ha) in my coming illustrations..

Have a nice day and cheers….

IMG_5822


UPDATED ON 2 AUGUST 2014


IMG_2525


I have prepared some Mexican Buns on today and I have decided to take some picture and update the post.

IMG_2533

As the above dough recipes uses tangzhong is rather time consuming, I have decided to use another faster dough as in my Blueberry Sweet Bread. It is definitely a faster and easier straight dough method that yields a fluffier bread.. As for the toppings, it is the same as the recipe above.

IMG_2537


UPDATED POST ON 12 SEPTEMBER 2014

With the frozen dough that I have in the fridge, I have decided to prepare some polo buns for the breakfast.

IMG_5808

There are some changes to the recipe as indicated in “red” as above as I found that this recipe for the topping is better. In addition, I have used another way of preparing the buns.

IMG_5781

  • Pre-heat the oven to 190 degree Celsius.

  • Weigh the  topping and divide into 10 equal balls. Take one topping, shape it like a ball, place a dough ball on top of the crust ball, wrap the topping around the dough ball. Use a knife to cut some lines on on top of the toppings.

IMG_5796

  • Let the dough proof until double in size, egg wash with the egg yolk followed by sprinkling some sugar on top of the crust. Bake in the pre-heated oven for 12-15 minutes or when the breads turn golden brown.

IMG_5824

IMG_5818


  • For more recipes, you can refer to my RECIPE INDEX (updated as at 28 July 2014)  here and you can follow me at PINTEREST or visit the blog’s FACEBOOK PAGE to keep abreast of my future posts.  

IMG_2539

IMG_5804

Microwaved Mug Cakes, Another Quick Alternative to Baked and Steamed Cakes…

IMG_8967

Updated Post on 16-10-2014

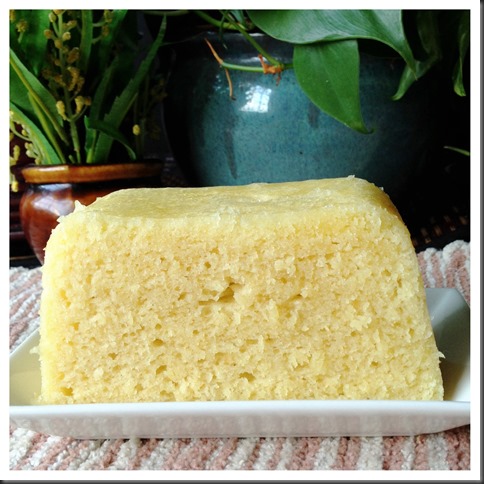
Last night, wife was asking what is for breakfast today? I told her I do not know and worst came to the worst, some biscuits.. Ha-ha. This morning, while I was cracking  my head what to prepare  muffins and scones that are fast and easy… It suddenly come across my mind to prepare some microwave butter cakes. It is very easy and moist and it took me about 15 minutes to prepare a 2 eggs cake- 10 minutes preparation and 5 minutes microwaving… I save my electricity, dishing, energy and time…

IMG_8969

The texture of microwave cake is always very moist and like the preparation of muffins, I gather the wet ingredients and dry ingredients, stir until well mixed and microwave…Happy trying.

IMG_8971


IMG_0395


IMG_8963

INTRODUCTION

This is another post in my simple pastry making series, a cup cake or mug, a cake baked in a cup. It is baked in a cup or a mug cake in the microwave oven. It is fast, utilizing about 5 minutes. No electrical beaters, just mix using your choice of utensils and you will be able to get a cake like above. Scale down all the ingredients, putting in a microwavable cup, you can even prepare one for your kids breakfast. This post will share with you a one man breakfast chocolate cake, a coffee log cake and a cheesy buttery log cake.


WHAT IS REQUIRED

Chocolate Cake
(1 man serving)
Coffee Log Cake
(6 inches log)
Cheesy Butter Cake
(6 inches log)
Container 1 microwavable cup of about 250 ml 1 microwavable cup of 600 ml 1 microwavable cup of 600 ml
Sugar 2 tbsp 80 g 80 g
Butter (melted) 2 tbsp 80 g 80 g
Cream cheese (room temperature) 80 g
Fresh milk 2-3 tbsp 80 g 120 g
Coffee liquid 80 g
Eggs 1 egg 80 g 80 g
Self raising flours 2 tbsp 160 g 160 g
Cocoa powder 2 tbsp
Sodium Bicarbonate (optional) 1/2 tsp 1/2 tsp
Microwavable time 3 minutes 5 minutes 5 minutes

IMG_8959


STEPS OF PREPARTION

The steps of preparation is the same be it for a small cup or a 3 inches diameter cup. The illustration below is for a small cup one man personal chocolate cake.

Chocolate cake (serving for one)

IMG_0391

  • In a 250ml microwavable cup (one normal coffee cup), put sugar, self raising flour and slightly stir it until well mixed.
  • Add fresh milk, melted butters and eggs and use a spoon stir it until well mixed or when colour is even and there are no lumps.
  • This step is rather important and make sure any flour stick in the bottom will be scraped up and mixed and there are no air in the mixture. Lightly tap your cup in the table to see if there is any air trapped in the mixture.

IMG_0392


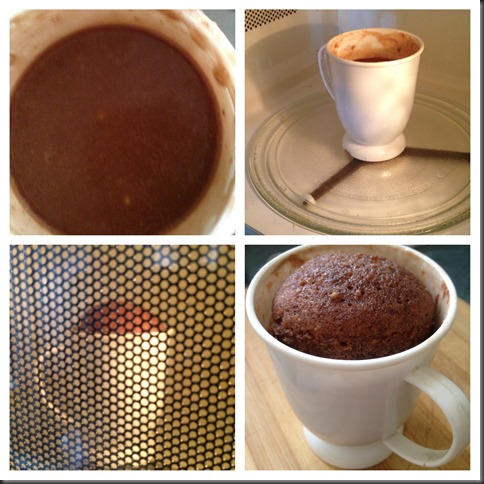
  • Place your cup in the microwave oven and heat it for 3 minutes under high power.
  • You will start to see the cake start to rise after 1 1/2 minutes and by the sides will start to contract. If your cup is smaller, you may see the batter started to rise even higher and possibly 1-2 cm above the cup level. That is ok since the cooked batter (now becoming cakes) are able to withstand the weight any uncooked batter that subsequently rise to the top.
  • Wait for 1-2 minutes before you take it out from the cup. Theoretically, it should not stick to  the sides or bottom of the cup if your batter are mixed thoroughly with no lumps of unmixed flour.
  • Be careful when you handle the cakes as it can be quite hot especially the inside of the cake.
  • If you can’t finish your cake and on your next serving, just heat up your cakes for 10-15 seconds and your cake will become soft again.

For the coffee log cake and cheesy butter cake, the steps of preparation is the same except the measurements as mentioned above and the incorporation of cheese in the above batter. The follow steps will apply for both cakes.

Coffee Log Cakes and Cheesy Butter Cakes

IMG_0394

  • In a 600ml microwavable cup, put sugar, sifted self raising flour, sodium bicarbonate and slightly stir it until well mixed. You can also melt the butter in the microwave using the same cup for about 1 minute.
  • For coffee log cake, have 80 g of hot water and add 2-3 table spoons of instant coffee powder until it is fully dissolved. You can also use hot milk instead. Add melted butters, coffee liquids, butters and eggs and use a spoon to sir it until well mixed or when colour is even and there are no more lumps. This is the batter of coffee log cake.
  • For cheesy butter cake, after you melted the butter, put the cream cheese into the hot melted butter and stir until almost well mixed. Add fresh milks and eggs and use a spoon to stir it until well mixed or when colour is even and there are no more lumps. This the batter mixture of the cheesy butter cake.
  • Again, this step is rather important and make sure to scrap any flours on the sides and bottom of the microwavable cup, mixed and ensure that there are no air in the mixture. Lightly tap your cup on the table to see if there is any air trapped in the mixture.


  • Place your cup in the microwave oven and heat it for 5 minutes under high power.
  • You will start to see the cake start to rise after 3 minutes and by the sides will start to contract. If your cup is smaller, you may see the batter started to rise even higher and possibly a few cm above the cup level (as in the picture). That is ok since the cooked batter (now becoming cakes) are able to withstand the weight of any uncooked batter that subsequently rise to the top.
  • Wait for 1-2 minutes before you take it out from the cup. Theoretically, it should not stick to  the sides or bottom of the cup if your batter are mixed thoroughly with no lumps of unmixed flour.

IMG_8957

IMG_0400  Cheesy Butter Cake

 IMG_0404Coffee Log Cake

Serving suggestions

  • Best served when hot with glass of tea or coffee.
  • Reheat in microwave for 10-15 seconds if necessary.
  • Add some cream cheese or fresh cream if desired.

IMG_8961


CONCLUSIONS

  • This post introduced the use of microwave to prepare a cake, if you do not want be your cake in the cup or mug size, you can used other microwavable kitchen utensils of your liking.  Most microwaves nowadays have a detail function for each cooking methods, select baking functions if available. Otherwise, use the high power function.
  • The use of microwave in the “baking” of a cake have cut short its preparation time considerably. Making a cake within 5 minutes were unthinkable in the olden times. It is obviously a good alternative to the traditional baking and steaming of preparing a cake,
  • The texture of the cake is unique as it is soft and moist. That make the cake easy to cut into any sizes desired.
  • It is an good alternative as a traditional tea cake but offer advantages of quick and fast preparation as compared to traditional tea cakes.
  • There are many possibility of using this simple preparation methods to “invent” cakes that you want.. Try to explore, may be banana cakes, carrot cakes, blueberry muffins…… and the list is never ending. The point to note is that you can use the traditional recipes but the batter must be well mixed and make sure no air is trapped in your batter!


Lastly, take a cup and a spoon, walk towards the kitchen, put in 2 tbsp of flours, chocolate powder (milo/horlicks), sugar, melted butter (cooking oil acceptable), fresh milks and 1 egg, Stir well, put it in the microwave and tell me what it look like.

Hope you LIKE it and have a nice day.

IMG_0397

IMG_8965


  • For more recipes, you can refer to my RECIPE INDEX (updated as at 15 October 2014)  here and you can follow me at PINTEREST or visit the blog’s FACEBOOK PAGE to keep abreast of my future posts.  

IMG_8973