Oolong Tea Huat Kuih (茶香发糕)

IMG_2675

INTRODUCTION

2 years ago, I humbly set up this blog without much expectation and I am happy that the blog is growing steadily in these two years in terms of number of readers and readership statistics. As at 30 April 2015, total readership was 3,240,426 hits.. much well above my expectations.. I would like to take this opportunity to thank readers for your full support and I struggled to provide more simpler and easier recipes for all ..
IMG_2685

Last year when the blog celebrating the first anniversary, I have shared a pandan huat kuih recipe which is rather well received. So today, I thought of designing another huat kuih recipe to share with readers. I hope that this recipe will benefit those Buddhist reader who are looking for a pure vegetarian huat kuih (meaning no egg and no butter recipe).

IMG_2695

I am struggling what type of huat kuih should I design and I settled at Chinese tea – Oolong tea flavoured huat kuih. Why Oolong tea, the tea is selected for its light fragrance and peoples used to offer oolong tea to the deities.. I have decided to shelf off the idea of using other current trendy flavour like chocolate, cheese or even ribena as I do not think such flavour exists during the time of the deities.. Ha-ha.

IMG_2719

If you are not a fan of Chinese tea, you can always change to earl grey tea or Japanese matcha tea flavour.. As for Chinese tea, you can use tea like pu-er, jasmine, loong jing or like this illustration, oolong tea.

IMG_2687

I am generally please with this adventure. It is a beautiful and rather healthy snack with minimum oil. It is light and soft cake. It goes well with some Chinese tea or even coffee or tea.

IMG_2681


WHAT IS REQUIRED

Servings: Prepare 6 huat kuih

IMG_26601

  • 250 grams of self raising flour (自发面粉)
  • 150 grams of castor sugar (白砂糖)
  • 1 teaspoon of double acting baking powder or baking powder (双重发粉或发粉)
  • 250 grams or ml of concentrated oolong tea (浓缩乌龙茶)
  • 50 grams of cooking oil (食用油)
  • 1 teaspoon of oolong tea powder (乌龙茶粉) – optional

* As per the concentrated oolong tea, you will need 2-3 tablespoons of dry oolong tea and steep in hot water for at least 15 minutes. Use a spoon to press the juices out. As for the oolong tea powder, you can use a pastel and mortal to grind the tea leaves. It will enhance the flavour but the colour may be darker. You can use other tea such as jasmine, loong jing, earl grey or matcha too.

IMG_2689


 STEPS OF PREPARATION

  • Get ready a steamer with water capable of steaming the Kuih for at least 20 minutes.

PicMonkey Collage1

  • In a  big mixing bowl, sift the self raising flour and double acting baking powder (and tea powder, if any). Make a well in the centre. Add the sugar, oolong tea and cooking oil gradually. Use a hand mixer and whisk until well mixed.

  • Transfer it to some cupcake cups and fill the cups with the batter until at least 95% full. Steam in the steamer under high heat for 15-20 minutes or until a skewer inserted in the centre come out clean. It is best that the cupcakes cups be pre-steamed before filling of the batter. You shall use high heat in the entire process of steaming. Best served hot as a snack.

IMG_2683


CONCLUSION

Hope this recipe will help readers who are looking for a pure vegetarian huat kuih recipe. Do use your preferred tea to come out one which suit your taste buds.

IMG_2679

Hope you like the post today. Cheers and have a nice day.

IMG_2693


IMG_2677


Kuih Lopes or Kue Lupis (三角椰丝糯米糕)

IMG_2498

INTRODUCTION

If you have never taste this kuih, imagine you are eating a Chinese alkaline dumpling in different shape. Yes, the recipe is exactly the same except it was wrapped in banana leaves and in triangular shape.

IMG_2547

This is not a kuih that I am very familiar as it was not that common in East Malaysia. Apparently, the Singapore Chinese seems to know this Malay kuih very well. It was also very common in Indonesia with the name as Kuih Lupis , not lapis but lupis..

IMG_2466

It was usually served with shredded coconut and gula melaka syrup. Just like some Peranakan community like to eat Chang Abu (alkaline dumpling) with gula melaka.

IMG_2480

Preparation is rather easy if you are using this recipe by precooking the rice. Precooking the rice have cut short the preparation time and facilitate the wrapping . It also enhance the chances of success. If you have the alkaline dumpling recipe, you can use the same recipe too.

IMG_2502


WHAT IS REQUIRED

Servings: About 8 pieces

IMG_2451

Steamed shredded coconut

  • 150 grams of grated coconut
  • Pinches of salt
  • 3-4 pandan leaves

IMG_2440

Gula Melaka Syrup

  • 150 grams of gula Melaka
  • 25 grams of brown sugar
  • 3-4 pandan leaves
  • 20 grams of water

IMG_2438

Glutinous Rice Cake

  • 2 cups of glutinous rice
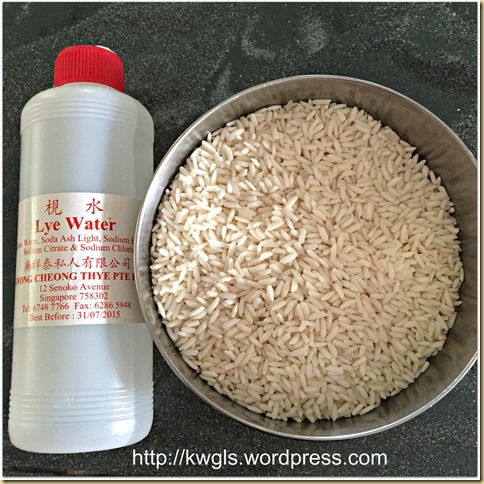
  • 1 tablespoon of lye water
  • 2 cups of water
  • 8 banana leaves with the dimension of 10cm x 40 cm

IMG_2494


STEPS OF PREPARATION

PicMonkey Collage1

  • In a steamer, place the grated coconut, 1/4 teaspoon of salt and the pandan leaves. Steam in the steamer for about 10-15 minutes or until the pandan leaves are soft.

  • Put all the ingredients for gula melaka syrup in a pan, boil under medium heat until it melts and slightly thickens to the consistency you like.

PicMonkey Collage2

  • Clean the glutinous rice, add water with about 2 cm above the glutinous rice. Add the lye or kansui . Let it soaks for at least 1 hour. After one hour, drained and transfer to the rice cooker. Add 2 cups of water and select “sticky rice” function and let it cook for one cycle. If your rice cooker do not have this function, you can use the normal rice cooking function and cook for 1.5 cycle or steam over the stove until soft.

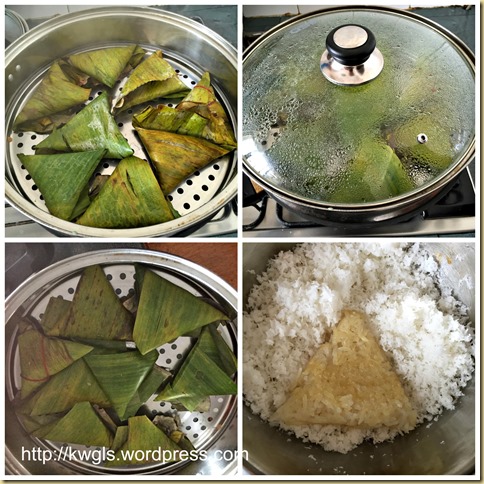
  • Take out a piece of the rectangular banana leaves, fold into a corn shape, put 1-2 tablespoons of the cooked glutinous rice . Press down to let the rice conform to the shape of the triangular banana leaves. Fold the end towards the middle and seal it with some rubber band or a tooth pick.

PicMonkey Collage3

  • Steam the rice cake in the steamer for additional 10 minutes under high heat. Once completely cooled, open the banana leaves and placed it on top of the grated coconut. Best served with gula melaka syrup and additional grated coconut.

IMG_2492


CONCLUSION

This is an easy recipe and I hope readers to give it a try. As to the step of preparation, you can prepare the glutinous rice cake first followed by the coconut or gula melaka syrup whichever is more convenience to you.

IMG_2468

Hope you like the post today. Cheers and have a nice day.

IMG_2496


IMG_2476


Bitter Gourd Braised Meat (苦瓜酿肉)

IMG_3079

INTRODUCTION

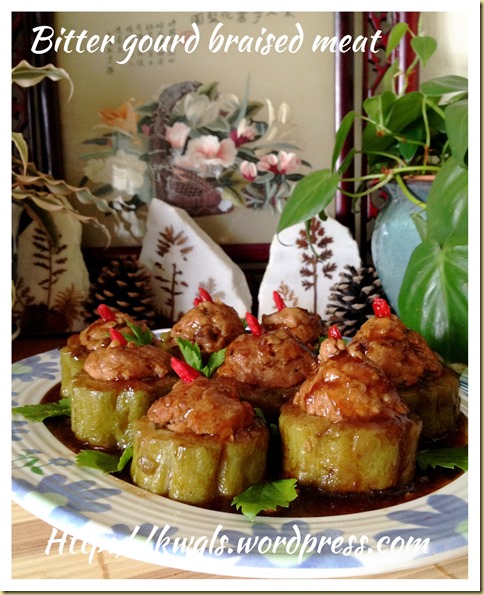
This is a simple household recipe and I believed most households will have their unique recipes. My wife likes this very much and my niece always offered to prepare for me when she is in Singapore…

IMG_3077

I grew up eating this.. Nothing to shout about and it is not a tedious assignment. If not because of the illustration, I will not prepare it this way.. When I was young, we prepared this and cook it as soup , just this a pot of water, boiled into some simple yet delicious soup.

IMG_3087

However, for picture taking purposes, it will definitely not looking good. The bitter gourd will look very mushy and colour will be unattractive. Since vegetable mixed rice store always have this dish and usually served with fermented black beans (豆豉), i have therefore decided to prepare the same way also.

IMG_3103

There are too much variations in this recipe and please tailor to suit your family taste buds. The same method of preparation can also be used for another vegetable: luffa. As for the meat, you can add salted fish, or even water chestnuts to give some crunch bite. If you like crunchier bitter gourd, you can braise or steam shorter. If you like it mushy, you will need a much longer time. The only challenge is not to let the meat slipped out of the bitter gourd. 

IMG_3083


WHAT IS REQUIRED

IMG_3055

  • 1 medium to big size bitter gourd
  • 500 grams of minced meat
  • 1 tablespoon of corn starch
  • 2 cm long of ginger
  • 5 shitake mushrooms, soaked and sliced thinly
  • 1 tablespoon of winter vegetable (optional)
  • Dashes of white pepper
  • PInches of salt
  • Sugar to taste
  • 1 tablespoon of oyster sauce
  • 1 tablespoon of light soya sauce
  • 1 tablespoon of Chinese cooking wine
  • 1 tablespoon of chopped spring onion

Braising Sauce

  • 1 tablespoon fermented black bean (豆豉)
  • 1 tablespoon of oyster sauce
  • Dashes of white pepper
  • 1 tablespoon of minced garlic

IMG_3150


STEPS OF PREPARARATION

PicMonkey Collage11

  • Pound the ginger to extract the juice. Add it to the minced meat. Add all the other ingredients into the minced meat. Stir until well mixed. Let it marinate for about 1 hour. You can also consider to add salted fish and water chestnuts. But you will have to adjust the seasoning accordingly.

PicMonkey Collage2

  • Cut the bitter gourd into your desired height (Suggest about 3-4 cm height).. Either use the finger or a knife to scratch out the centre. If you do not like bitterness, try to get rid the white membrane as much as possible. The bitterness actually comes from this white membrane. Blanch in a pot of hot water with pinches of salt for about 5 minutes. The main purpose of this step can be omitted if you like bitterness. Put some meat into the cavity and make sure that the meat covered the holes by at least 1/2 cm. This is to prevent the meat slipped out the bitter gourd.  Steam the bitter gourd in a steamer for about 10-15 minutes or until the shape is firmed before proceed to the next step.

PicMonkey Collage3

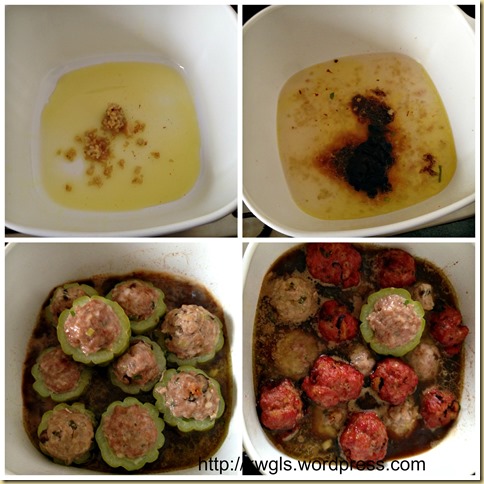
  • In another pot, put 1 tablespoon of oil, sauté the minced garlic until fragrant. Add 1 cup of water followed by the fermented black beans and oyster sauce. Put in the bitter gourd. Add adequate water just enough to cover the bitter gourd. Bring to boil. Once it boils, reduce the heat and let it simmer for 15-20 minutes or until the bitter gourd reach the desired texture. Adjust the sauce with additional seasonings, salt and etc. if required. For more flavourful bitter gourd, let it rest in the pot for at least 2-3 hours before serving. Best serve as a dish in a typical Chinese set meal.

IMG_3085


CONCLUSION

This post belong to simple household dishes aimed to assist new house chefs who do not have a chance to learn this traditional dish at home. Variations are many, The concept have been shared and please feel free to add or minus the ingredients to suit your family taste buds. Remember, if you do not like it to be bitter, clear away the white membrane as much as possible and blanch longer in hot water. In the event your have minced meat left, you can just deep fried it and add together to the bitter gourd and braise together.

IMG_3148

Hope you like the post today. Cheers and have a nice day.

IMG_3081


IMG_3101

Singapore Stir Fry Flat Rice Noodles or Char Kway Tiao (炒粿条面)

IMG_2988

INTRODUCTION

My noodles series will not be complete without the common fried flat rice noodles or char kway tiao.. I believed all household will have its own recipe of fried kway tiao and what I am sharing today is the Singapore hawker centre version. I can’t claim that this is authentic but taste is close and in fact, variations are many too…

IMG_2960

I have argued with wife about one of the main ingredients, cockles. I said that it is a must have ingredients but my wife said it is not necessary the case nowadays. Many stores have not used cockles due to the current health concern of associating Hepatitis A with the consumption of cockles. I have wanted to add this for this illustration but I cannot get hold of it in the market. Wife further convinced me not to put this as kids will not appreciate this seafood. Therefore, I will leave it for reader to decide whether or not it is a must to have cockles for this noodle dish.

IMG_2970

Though the name is char kway tiao, in Singapore hawker centre, it is rather standard that it also comes with yellow noodles. Don’t ask me why, it seems that it is a standard. I have ever requested many times to different hawkers that I wanted only kway tiao, the hawker always rejected my request… I am  always puzzled that why they need to insist in this type of combination. Is it not the way of stir frying this dish the same?

IMG_2958

I came from Sarawak and our Char kway tiao do not really have any standard, but it is very much drier than Singapore and West Malaysia version. Here in Singapore, it is very “moist” and at time it is hard to eat with a pair of chopstick. I do not know if the “moistness” was from lots of oil used or they have added some water or too much eggs.. For this recipe, I have added 1-2 tablespoons of chicken stock it to make it moister like those sold in the hawker centre.

IMG_2989

Unsure if the hawker centre still uses lard but traditionally, almost all the noodle dishes uses lard to enhance its fragrance. For purposes of this illustration, I have  purposely prepared some lard and lard cubes to go with the dish. If you are interested in how to prepare lard cubes, you can refer to this post: Teochew Mee Pok And Fish Ball Noodles (潮州肉脞面 ,潮州鱼圆面)

IMG_2978


WHAT IS REQUIRED

Servings: 4-5 adult servings

IMG_2944

  • 250 grams of flat rice noodles or kway tiao
  • 150 grams of yellow noodles
  • 100 grams of fresh prawns
  • 50 grams of cockles (optional)
  • 50 grams of fish cake, sliced thinly
  • 3 Chinese sausages, sliced thinly
  • Handful of bean sprouts
  • Some Cai xin or Chinese garlic chives
  • 2 tablespoons of lard cubes (optional)
  • 1 tablespoon of minced garlic
  • 3-4 tablespoons of lard of cooking oil
  • 3-4 eggs

Seasonings

  • 5 tablespoons of light soya sauce
  • 2 tablespoons of fish sauce
  • 2 tablespoons of oyster sauce
  • 2 tablespoons of sweet caramelized sticky dark soya sauce
  • 2 tablespoons of chicken stock or plain water
  • 1 tablespoon of sugar
  • Dashes of white pepper

IMG_2974


STEPS OF PREPARATION

PicMonkey Collage1

  • Mix all the seasoning ingredients, stir until well mixed and set aside. The pre-mixing is optional if you are experienced enough to pour the sauces directly to the hot wok. Seasoning is very subjective and depends on individual taste buds. Feel free to add and minus the seasoning but the ratio shall be like the above suggested. To play safe, you can add these sauces gradually during the process of stir frying.

  • In a wok with the cooking oil and lard, sauté the minced garlic over high heat until slightly brownish. Add the fish cakes and prawns and stir fry for about 1 minute. Add the kway tiao and yellow noodles, followed by chives or cai xin stir fry until well mixed.

PicMonkey Collage2

  • Push the char kway tiao to one side of the wok, had a bit more oil, crack the eggs and make it resemble scrambled egg and cook  until the egg is half set (still a bit runny but colour turns whitish). Stir until well mixed. Add the pre-mixed sauces, dashes of white pepper, beansprouts, sliced Chinese sausage. Stir fry until well mixed. Best served hot as a noodle dish.

IMG_2982

Notes

  • In general, no water shall be used for stir frying kway tiao or noodles. But it your noodles are too dry, feel free to add 1-2 tablespoons of water to facilitate the stir frying.

IMG_2980


CONCLUSION

Home prepared hawker noodle dishes is not difficult. However, at time, the taste cannot be compared with what the hawker have prepared because of the kitchen gadgets and they are preparing in big scales. Now matter how big is our heat in home stoves, it will not be able to compared those big stoves used by the hawkers. Do prepare to let go certain expectations but it will definitely brings a sense of achievement to be able to prepare these dishes at home.

IMG_2968

This recipe was included in Page 41-42 of the “One Pot Noodle E-book”. For more One Pot Noodle Dishes, you can have a copy of Easy One Pot Noodles  – A step by step guide” that was packed with 30 recipes, 60 pages at a reasonable convenience fee of USD5.00. The recipes covered various recipes from curry laksa, prawn noodles to fish head beehoon and etc. Of course not forgetting the well like Economy Bee hoon and Mee Rebus . You can purchase by clicking the link above.You can either pay using Pay Pal or Credit card account. Please ensure that you have an PDF reader like Acrobat or iBooks in your mobile phone or iPad if you intended to read it in your ipad or mobile phone. Should there be any problems of purchasing, feel free to contact me at kengls@singnet.com.sg and separate arrangement can be made.

11830082_901659993239429_972864730_n

Hope you like the post today. Cheers and have a nice day.

Hope you like the post today. Cheers and have a nice day.

IMG_2986


IMG_2984


Braised Pork Knuckles Rice Vermicelli (罐头蹄膀炒米粉)

IMG_2902

INTRODUCTION

When I was young, canned meat was for those less well to do and can’t afford to eat fresh meat as it was relatively cheaper. In addition, canned food was important during the war period. It is food reserved for period of emergency declared by the government.

IMG_2919

However, in recent years, due to the improved of People’s Republic of China’s economy and the strengthening of RMB against USD, the price of canned meat imported canned meat had increased tremendously. It is definitely no more a cheap dish as compared to fresh meat.

IMG_2906

This is a household noodle dish that brings fond memories. While most households are able to stew their pork knuckles, however, it is difficult to replicate the taste or flavour of the canned pork knuckle or stewed pork. I seldom cooked this dish as it is a rather sinful indulgence.

IMG_2923

Since I have not had it for many years, I have tried to replicate what my late mom had served us many years ago. In fact, in Singapore, I am aware that there are a few hawker stores that sell this type of fried rice vermicelli. One of them is in Maxwell market.

IMG_2914

In this illustration, I have used canned pork knuckles imported from China and you can also use canned stewed pork and it is equally delicious. Another thing to highlight is traditionally, the dish is cooked with shredded cabbage. However, since I did not have cabbage with me and I have lots of bean sprouts, I have substituted the cabbage with bean sprouts.

IMG_2900


WHAT IS REQUIRED

Servings: 4-5 adult servings

IMG_8262

  • 250 grams of rice vermicelli, soaked in cold water
  • 100 grams of bean sprouts or shredded cabbage
  • 1-2 canned of pork knuckles or stewed pork
  • 2 big onions cut into big slices
  • Some shimeji mushrooms (optional)
  • Some spring onion cut into big pieces

IMG_2917


STEPS OF PREPARATION

IMG_8267

  • In a big frying pan, add 2 tablespoons of cooking oil and sauté the onion until fragrant. Add in the pork knuckles, Shimeji mushrooms, one can of water (use the pork knuckles can). Bring to boil under high heat.

IMG_8272

  • When boiled, add in additional seasonings if desired (suggested: white pepper powder, salt, light soya sauce and some dark soya sauce).  – Add in rice vermicelli, let it simmer for 2-3 minutes. Add in bean sprouts and spring onions, let it simmer for another 2 minutes. Off the heat and let it rest in the frying pan for about 5 minutes before serving.

IMG_8279

Note:

  • For this dish, if you want it to be flavourful, you have to be generous with your canned trotters. 100 grams of bee hoon to 1 canned trotters or stewed pork should be enough. As too much canned trotters may not be good, to make it flavourful, you have to add water and some seasoning to your taste. Dark soya sauce is for colour and I personally like to add a teaspoon of black vinegar to enhance the taste. White pepper can also be added but all these are optional as the dish are supposed to be flavoured by the tasty canned gravy,


CONCLUSION

This noodle dish recipe was shared about 1.5 years ago in my Facebook page. The recipe was formally migrated to the blog. It will be subsequently compiled into one pot  noodle dishes E-book due to be released soon.

IMG_2912

Hope you like the post today. Cheers and have a nice day.

IMG_2927


IMG_2904


Kuih Talam , Kuih Talam Tepong Pandan (绿白双层香兰糕)

IMG_2864

INTRODUCTION

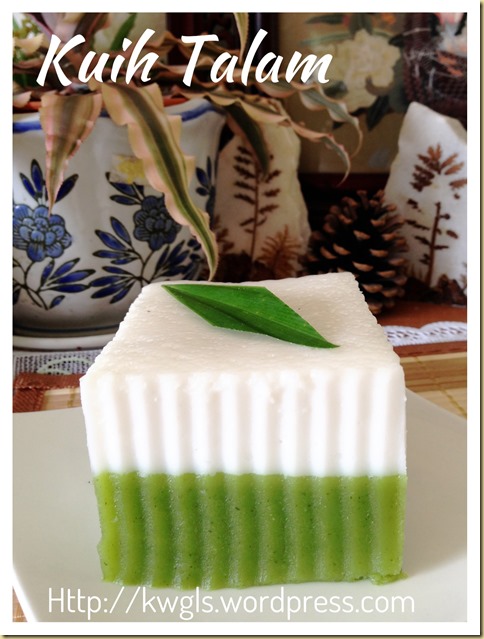
If you goggle images of Kuih Talam, the images that was presented may not necessary a green and white colour kuih talam. It can be brown and white, it can be savoury like talam berlauk; it can be talam ube etc. etc. etc.. I just discovered that the Malay word talam in essence means trays. Therefore Kuih talam literally translated as any kuih that was steamed in a tray and such definitions include kuih lapis, kuih seri muka and etc.…

IMG_2888

As per Malay Wikipedia under category of Malay kuih:

Kuih talam bukanlah jenis kuih yang khusus, tetapi biasanya merujuk kepada cara pembuatan jenis kuih yang dibuat di dalam bekas talam. Ia merangkumi beberapa jenis kuih seperti Bengkang ubi, kuih lapis, Kuih Seri Muka dan pelbagai lagi. Biasanya kuih talam ini tidak memiliki bentuk khusus kerana ia mengikuti bentuk talam, samaada bulat, segi empat sama atau segi empat tepat. Selepas kuih masak, barulah ia dipotong mengikut saiz hidangan. Secara kasarnya, saiz hidangan bergantung pada yang memotongnya.” (Source: http://ms.wikipedia.org/wiki/Kuih_talam)

IMG_2898

Now I am confused as to the exact name of this kuih talam which was made of various flour, coconut milk and pandan juices. Well, never mind, for the purpose of this post, I will follow suit the generic name: Kuih Talam and widely used by Malaysian and Singaporean.

IMG_2868

This is not a kuih that I am familiar  with but I believed it was not available in Sarawak when I was young. I am unsure about the situation in Sarawak now and I only get to know this kuih when I studied in Kuala Lumpur and in Singapore.

IMG_2884

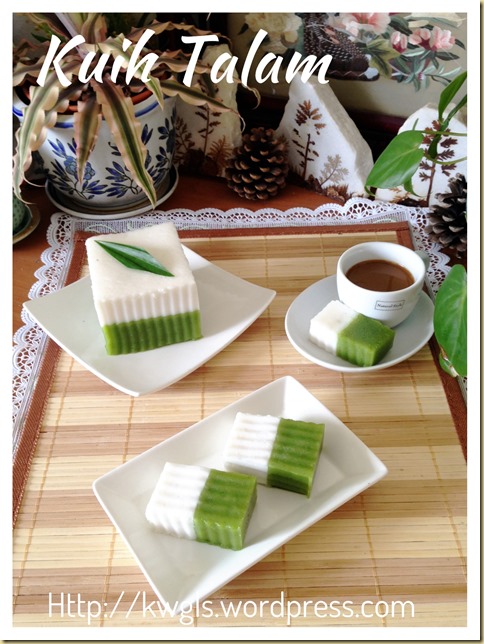
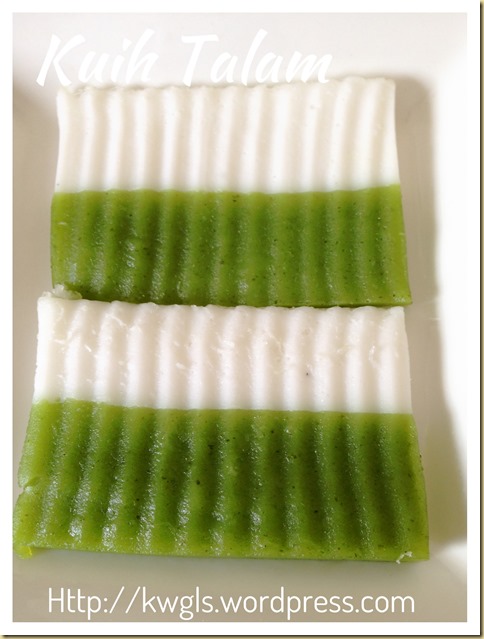
The kuih was made of two layers. At the bottom is a green layer which is made from pandan juices and with a denser texture. On top is the white layer which is softer, with strong coconut milk aroma and slightly salty. The combination of these two layers made it a very delicious piece of kuih. Mung bean flour is used to hold the structure and alkaline water is used to provide some springy texture of the green layer.

IMG_2890

This is a simplified recipe to suit the current busy lifestyle . Though simplified, I am pleased with the taste and texture of the kuih.. I will definitely prepare again in the near future.

IMG_2880


WHAT IS REQUIRED

Recipe adapted from: Nonya Kueh, Seashore Publications, July 2012 Page 36 Kueh Talam

Servings: A 8” x 4” x 3 “ tray of Kuih Talam

IMG_2824

Green Layer

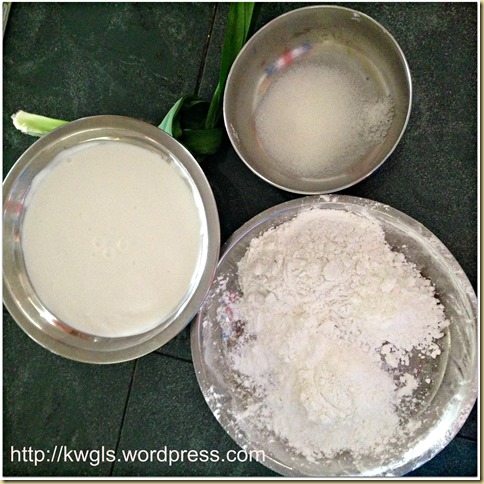
  • 400 grams of thick coconut milk (椰奶)
  • 180 grams of white sugar (白糖)
  • 60 grams of tapioca or sago flour (木薯粉)
  • 30 grams of rice flour (粘米粉)
  • 30 grams of mung bean or hoen kuih flour or green pea flour(绿豆粉)
  • 10 pieces of pandan leaves (香兰叶)
  • 2-3 drops of green pandan flavouring (optional) (青色食用色数)
  • 1/2 teaspoon of alkaline or lye water or kansui (碱水)

IMG_2834

  • 450 grams or ml of thick coconut milk (椰奶)
  • 25 grams of tapioca or sago flour (木薯粉)
  • 25 grams of rice flour (粘米粉)
  • 25 grams of mung bean or hoen kuih flour or green pea flour(绿豆粉)
  • 1 tablespoon spoon of sugar (白糖)
  • 1/2 teaspoon of salt (盐巴)
  • 5 pieces of pandan leaves (香兰叶)

IMG_2870


STEPS OF PREPARATION

  • Lightly greased your desired steamer tray.

PicMonkey Collage1

  • Put all the ingredients in a blender and blend until fine. Sift into a non stick pan. Heat the batter under low heat. Constant stirring is required to avoid lumps forming too fast.

PicMonkey Collage2

  • Stir until the batter starts to coat the sides of the pan and wooden spoon but still in liquid form. In this process, you will feel that the batter is getting stickier to stir. Off the heat and transfer the sticky liquid batter to the greased tin. Steam under high heat for about 10-15 minutes or until the green layer is set. The cooked green layer shall have a darker shade of green and the top surface shall be dry.

PicMonkey Collage3

  • Put all the white layer ingredients in the non stick pan. Stir until well mixed. Put the pandan and cook under low heat until the white layers slightly thickens but still in liquid form. Throw away the pandan leaves. Transfer to the steamed green layer. Steamed at high heat for another 10-15 minutes or until the white layer have set. Use a skewer to pierce on the centre to ensure that white layer is cooked. Cooled completely before unmoulding and cut into desired pieces.

IMG_2892

Notes:

  • If you like this shade of green colouring, you will have to add some pandan green colouring.

  • Constant stirring is very important in the step of pre-cooking the batter. The liquid can turn solid rather fast. Close supervision is required.  If you wish, you can use double boil method to let the boiling water steamed the liquid batter.  If the batter become lumpy too fast, you are advised not to proceed. Otherwise your cake with have uneven, wavy layers.

  • This recipe yields the same height of green and white layer. If you want a shorter white layer like what is sold commercially, you can consider reducing  the white layer ingredients by half. It will also faster to steam.

  • For steaming of the second layer, make sure that the middle is totally cooked. The centre of the cake can be uncooked though both sides, top and bottom are cooked. Skewer test is a must. If you withdraw your skewer, some white floury substance  sticks to the skewer, it means the centre is not cooked.

  • Steaming time is for your reference and  It very much depends on your steamer tray and your steamer.

  • To avoid water condensation dropping into your cake, you can either cover it with a piece of cloth or clingy wrap or aluminium foil during the steaming. However, it will take a much longer time for the cake to set.

IMG_2874


CONCLUSION

I am happy with this attempt. The texture is slightly springy for the bottom layer and it is not an overly sweet kuih.  If you are adventurous enough, the basic recipe is there, you can always toy with colour and flavour of the kuih.

IMG_2894

Hope you like the post today. Cheers and have a nice day.

IMG_2866


IMG_2878


A Healthier Traditional Butter Cake–Madeira Cake (马德拉牛油蛋糕)

IMG_2770

INTRODUCTION

If you do not accept the fact that a delicious cake cracks, this post is not for you.. There is nothing to be shy, embarrassed, anxious or rejected if the cake come out from your oven cracked.. Most of the traditional cakes cracked and it does not equate to not delicious.

IMG_2736

There are many factors that may cause a cake to crack, among them are: oven temperature, more flour to butter ratio, the size of baking tin, the ingredients and the recipe problems. But cracked cake can be healthier because the usage of butter is much lower.. Traditionally, most simple butter cake have much less butter than flour. Unlike the current flat top butter cake, butter is much more than flour those resulting cakes that are oilier. This was commonly misunderstood as “moist and soothing”.

IMG_2776

I have decided to locate a famous traditional butter cake recipe that uses less butter and try them out. I have chosen the madeira cake and I was utterly shocked that the butter content is very much less than the flour. The butter to flour ratio is on 66% meaning for 100 grams of flour used, only 66 grams of butter was used. With this low ratio, i am even more convinced to try out the recipe and see if it will suit the current taste buds.

IMG_2768

The cake may be very slightly drier and denser as compared to the current trendy flat top butter cakes. However, texture is fine and it is totally acceptable to me. Why asked for cake that uses so much butter to sooth your throat? That can be rather unhealthy and a drier teacake is traditionally supposed to be eaten with a cup of tea and coffee. Well, I will leave  it for reader to decide.

IMG_2782

For this illustration, I have also decided to prepare some lemon icing to go with the cake. As for the cake tin, since I do not have the suggested cake tin, I have decided to use a 5” x 5 “ cake tin instead. But this is not advisable as the cake though will be taller but chances of crack are higher.

IMG_2784

As per Wikipedia:

“The cake has a firm yet light texture. It is eaten with tea or (occasionally) for breakfast and is traditionally flavoured with lemon.Dating back to an original recipe in the 18th or 19th century,Madeira cake is similar to a pound cake or yellow cake. It is sometimes mistakenly thought to originate from the Madeira Islands; however, that is not the case as it was instead named after Madeira wine, a Portuguese wine from the islands, which was popular in England at the time and was often served with the cake. “ (Source: http://en.wikipedia.org/wiki/Madeira_cake)

IMG_2774


WHAT IS REQUIRED

Recipe adopted from: The Essential Baking Cookbook Page 59., Murdoch Books 2000

Servings: A 20 x 10 x 7 cm (8 x 4 x 2.75 inches)

IMG_2716

  • 185 grams of butter, softened at room temperature
  • 185 grams of white castor sugar
  • 155 grams of self raising flour
  • 125 grams of plain flour/cake flour/top flour
  • 3 eggs lightly beaten
  • 2 teaspoons of finely grated lemon or orange
  • 2 tablespoons of milk

Lemon Glaze (optional)

  • 1/2 cup of icing sugar
  • 1/2 teaspoon of lemon juice

IMG_2766


STEPS OF PREAPRATION

  • Preheat the oven to 160 degree Celsius

  • Lightly grease an 8” x 4” baking tin preferably with a detachable base. Alternatively, line the baking tin with parchment paper.. (Note that as I do not have this cake tin, I have used 5” x 5” baking tin which is not advisable as it will worsen the crack)

PicMonkey Collage1

  • Cream the butter and sugar until light and fluffy, add in eggs, lemon/orange zest and use slow speed to “mix” until well combined. Eggs should be added one by one and scrap the bottom of the bowl to ensure no unmixed egg settled at the bottom of the mixing bowl.

  • Sift in 1/3 of the self raising flour, milk and use the spatula to quickly fold in the flour.. Continue with the remaining 2/3 until all the flour  and fresh milk are added.

PicMonkey Collage2

  • Transfer to the baking tin, level and bake in the oven (at the lowest shelf) at 160 degree Celsius at 40-50 minutes or until a skewer inserted comes out clean. The baking time is for your reference and depends very much of the size of baking tin. Skewer test is still the final test. Transfer to a rack for cooling.

  • For lemon glaze, stir the icing sugar and lemon juice until well combined resembling a paste and drizzle over the cool cake. If the glaze is too dry, add lemon juice DROP by DROP. If the glaze is too wet, add additional icing sugar TEASPOON by TEASPOON. Cut only when completely cooled.

IMG_2778


CONCLUSION

This traditional recipe used very little butter but the taste is still great. Don’t worry if your cake cracks. Is it not health is more important than the look of the cake?

IMG_2772

Hope you like the post today. Cheers and have a nice day.

IMG_2764


IMG_2786

Cream of Mushroom Soup (蘑菇汤)

IMG_21771

INTRODUCTION

I think most Asian families will know of this famous cream of mushroom soup. It is commonly sold in the canned form at supermarket. Most children will like this soup because it is very creamy..

IMG_21831

My kids love this soup too and always requested us to buy when they saw it at the supermarket. I promised that I will prepare for them using fresh mushroom and that taste will not be compromised.

IMG_21851

I am unsure but I believed that homemade mushroom soup definitely are healthier as we can adjust the creaminess of the cream by using less creams. We can add more mushrooms to enhance the taste.. However, it will not be as economical as what is sold in the supermarket since fresh mushrooms are rather costly in Singapore..Am I deterring you from  trying to prepare this? I hope not and I am sure healthy living is more important than anything else.

IMG_21971

“Cream of mushroom soup is a simple type of soup where a basic roux is thinned with cream or milk and then mushrooms and/or mushroom broth are added. It is well known in North America as a common type of condensed canned soup. Cream of mushroom soup is often used as a base ingredient in casseroles and comfort foods. This use is similar to that of a mushroom flavored gravy. Soups made with cream and mushrooms are much older than the canned variety. Ancient Italian (Salsa colla) and French (Béchamel) cream sauces, and soups based on them have been made for many hundreds of years. In America, the Campbell Soup Company began producing its well known “Cream of Mushroom Soup” in 1934, the same year that it introduced “Chicken with Noodles“.” (Source: http://en.wikipedia.org/wiki/Cream_of_mushroom_soup)

IMG_21791


WHAT IS REQUIRED

Servings : 4-5 adult servings

IMG_21611

  • 500 grams of Portobello mushrooms *
  • 300 grams of Swiss brown mushrooms or fresh button mushrooms *
  • 2 tablespoons of butter
  • 1 big onion – cut into small pieces
  • 1 cup of heavy or double cream
  • 1 cup of plain flour
  • Dashes of black pepper
  • Some chopped parsley or dried parsley
  • 5 cups of chicken stock or 5 cups of plain water with 1-2 chicken stock cubes

* Type of mushrooms can vary based on availability and individual preference. Other possible mushrooms are fresh shitake mushrooms, cerimi mushrooms and etc..Quantity can be easily adjusted too. A bit more or less are acceptable.

IMG_21931


STEPS OF PEPARATIONS

PicMonkey Collage1

  • Cut the mushrooms and onion into small pieces.

  • In a pot, put the butter followed by the chopped onion. Sauté after fragrant. Unlike Chinese cooking, there is no need to sauté until brownish. As long as aroma penetrate the house, it is considered as adequate. Add the sliced mushroom.

PicMonkey Collage2

  • Stir fry for 1-2 minutes until the flavour are incorporated. Add the chicken stock, bring to boil and let it simmer under medium heat for about 10 minutes. Transfer the soup to a blender. Blend until as find as possible. Transfer the blended soup back to the pot, add in the chopped parsley and 1 cup of cream. Cook under low to medium heat until it boils.

  • Put about1.5 cups of water to the 1 cup of plain flour and stir until well mix. Add gradually to the mushroom soup until the desired consistency you are looking for. YOU MAY OR MAY NOT NEED TO USE ALL THE FLOUR SOLUTION.  In the event that it become overly sticky, just add some water to dilute it. Stir well, add pinches of salt, dashes of black pepper . Off the heat and best served hot with some American biscuits or breads.

IMG_21811


CONCLUSION

This soup is very easy to prepare and recipe is very flexible. All quantities stated is a starting point for you to lay your hand to try preparing it. A bit more or less is acceptable. You can basically used any type of fresh mushrooms and feel free to explore one that suit your taste buds.

IMG_21951

Hope you like the post today. Cheers and have a nice day.

IMG_21911


IMG_21991


Teochew Huat Kuih or Ka Kuih (潮州发糕,潮州酵糕,米糕, 松糕)

IMG_3409

Updated post on 4-5-2015

Today I have experiment with more flour and the results is very satisfactory, the recipe is therefore updated.

IMG_2596

INTRODUCTION

I have a confession to made. I have many huat kuih recipes but so far none suits my taste bud though many readers are happy with the recipe. If you are interested in these recipes, just google “Kenneth Goh Huat and it should provide you with a number of huat kuih recipes.

PicMonkey Collage10

This is because most of my huat kuih recipes are using wheat flour for the preparation and though very beautiful, it is not the type of huat kuih that I grew up with. Being raised in Sarawak, our huat kuih basically are made from rice flour and yeast. Though I have a recipe of rice flour huat kuih using ENO and baking powder, but the taste and texture is very different..

IMG_2621

I have always wanted to prepare a huat kuih that was made using rice flour and yeast like what my late mum had prepared. I remember she soaked the rice overnight, asked my brothers to grind it and proof using overnight yeasted dough from bakery shop. The above picture is  how her huat kuih should looked like but the one in the picture was bought by my mother in law  in Sarawak this Chinese New Year.

IMG_2592

In Singapore, I have tasted a version of Teochew huat kuih or Ka kuih which is flat top and usually offered in the temple (as in the above picture). The taste and texture and the ingredients are exactly the same like what my late mum used to prepare. I missed this type of huat kuih and this afternoon, after talking to a member in my Facebook Group, I have decided to try my luck to prepare it. .

IMG_3405

I have found one recipe in the internet that uses yeast and rice flour and look quite similar (at least the texture) to the one I have tasted. But the recipe provided are without exact quantity but “some rice flour, some sugar, some yeast and some water”. Since they are no other recipe that I can refer to, based on the method that she had shared, I have decided to use my estimation to prepare the rice cake.

IMG_2606

I am happy with the outcome. At least the texture is springy. It was not as beautifully as what is sold but I believed it is because of my steamer heat distribution. I have decided to share this recipe as a record of traditional recipe and I hope that readers can give it a try and feedback to me.

IMG_2614


WHAT IS REQUIRED

Recipe adapted from: 大米发糕 – 美食家 – 美食天下

Servings : Prepare a 9” round big Teochew Huat Kuih

IMG_2575

Yeast starter

  • 11 grams or 1 packet of instant yeast
  • 100 grams of plain flour
  • 100 grams of lukewarm water

IMG_2578

  • 500 grams of rice flour
  • 150 grams of white sugar
  • 500 grams of plain water

IMG_2610


STEPS OF PREAPRATION

  • Lightly greased your preferred baking tin.

PicMonkey Collage1

  • In  a bowl, mix all the ingredients of yeast starter (lukewarm water, yeast and plain flour). Stir until well mixed. Set aside at a warm place for proofing.

  • In pan, put in the rice flour, sugar and water. Stir until well mix. Place on top of a stove, cook under low heat until the rice flour slightly thickens. Constant stirring is required and thickening of the batter can occur rather fast. Once it thickens, set aside for it to cool until 25-30 degrees or it would not hurt your hand when you touch the sticky batter.

  • By now, the yeast should be frothy with  a lot of bubbles. If not bubbles are noted, do not proceed as your yeast may be dead. You will need to get some new yeast and do the dough starter again.

PicMonkey Collage2

  • Once the thicken rice flour solution is lukewarm, pour the starter dough into the rice flour solution. Stir until well combined. Transfer the rice flour solution to the grease tin. Let it proof until about double in size which took about 30-45 minutes depend on the day’s temperature.

  • Get ready a steamer capable of steaming at least 30 minutes and bring the water to boil. Transfer the proofed rice flour solution to the steamer and steam at high heat for at least 20-25 minutes or when a skewer inserts into the centre of the cake comes out clean. Steaming shall be at high heat throughout the whole duration.

IMG_3413

Note:

  • In this illustration, I have used a 9” baking tin to steam which is not ideal as the centre are less easy to cook. It is suggested that you use two 6 inches bamboo baskets for the steaming.

  • Timing of steaming will depend on your baking tin or baskets. The thinner is your batter, the shorter will be the steaming time.

  • Over proofing Huat kuih will be sour in taste.

IMG_2608


CONCLUSION

With this recipe, I will continue to explore the Sarawak style of flower rice flour huat kuih. Though I know not many readers will try this recipe, but I blog because of my passion for traditional recipe and I hope it will benefit those who are interested in the recipe. If you are unsure of the end product, it is a kuih of strong rice and yeast fragrance and with a very springy texture. You can eat it plain, pan fry it or even spread with butter .

IMG_2612

Hope you like the post today. Cheers and have a nice day.

IMG_3401


IMG_2618


Salted Fish/Mei Cai Steamed Meat (咸鱼/梅菜蒸肉饼)

IMG_2494

INTRODUCTION

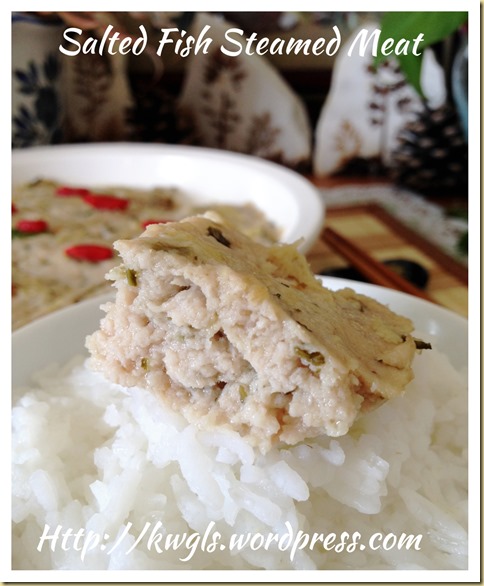
This is a rather classical type of Cantonese household dishes though it was also sold in classy restaurant.. Most Chinese granny will know how to prepare this dish that goes well with porridge or white rice. In this recipe, I had used both  mei cai and salted fish. However, you can choose either one or both.

IMG_2480

I do not have a picture of mei cai that I used to show you. But it can be either be salty or sweet type of mei cai and both of which, you can easily get it in wet market. Whatever type being used, you will need to soak the mei cai for at least 1/2 hours, get rid of the excess salt or sugar used for the preservation and add back seasoning. The main purpose of this preserved vegetable is to provide some unique flavour to the dish.


Source of picture: http://baike.baidu.com/view/1275980.htm

As per Wikipedia:

“Meigan cai (mei-kan tsai; simplified Chinese: 梅干菜; traditional Chinese: 霉乾菜; pinyin: méigān cài; Wade–Giles: mei2-kan1 ts’ai4; literally: “molded dried vegetable”; or mei cai (mei tsai; simplified Chinese: 梅菜; traditional Chinese: 霉菜; pinyin: méi cài; Wade–Giles:mei2 ts’ai4) is a type of dry pickled Chinese mustard of the Hakka people from Huizhou, Guangdong province, China. Meigan cai is also used in the cuisine of Shaoxing (绍兴), Zhejiang province, China. The pickle consists of a whole head of various varieties of Chinese mustards and cabbages (芥菜、油菜、白菜) that has undergone an elaborate process consisting of drying, steaming, and salting. The vegetables are harvested, trimmed before the Qingming Festival, and sun-dried until limp. It is then salted or brined, kneaded until the juices are exuded, and left to ferment in large clay urns for 15 to 20 days. The vegetable is then repeatedly steamed and dried until reddish brown in colour and highly fragrant. This pickled vegetable is used to flavor stewed dishes, in particular Meigan cai cooked with meat (梅菜扣肉/梅干菜烧肉)) or for Meigancaibaozi (梅菜菜包). Meigan cai was formerly a tribute item to the imperial palace in the Qing Dynasty.” (Source: http://en.wikipedia.org/wiki/Meigan_cai)

IMG_2502

Another important ingredient of this recipe is salted fish and you can easily get it from the market. Salted fish can either be the softer, easily breakable moister type or the hard and dry type of salted fish. The first type (mei xiang) is preferred but the hard and dry type (shi rou) can also be steamed before it is used.

“Cantonese Salted Fish (simplified Chinese: 广东咸鱼; traditional Chinese: 廣東鹹魚; piyin: Guǎngdōngxiányú; also known as “Salted-fish, Chinese style”) is a traditional Chinesefood originated from the Guangdong province. It is a fish preserved or cured with salt, and a staple diet in Southern China. It historically earned the nickname of the “poor man’s food”, as its extreme saltiness way is useful in adding variety to the simpler rice-based dinners. More recently it has become a popular cuisine in its own right. Cantonese salted fishes can be divided into two styles: méi xiāng (梅香) and shí ròu(實肉). For méi xiāng (梅香) salted fish, fishes with thicker bodies like jiaoyu (鮫魚)、mayau (馬友)are preferred. It takes 7–8 days for méi xiāng (梅香) salted fish to ferment, then season with salt and dry in the sun. And they are usually chopped tiny and used as a topping.Furthermore, shí ròu(實肉) salted fish do not need fermentation, they are prepared by seasoning followed by direct drying by the sun. Fishes with thinner bodies such as Ilisha elongata (鰽白) are usually used to prepare shí ròu(實肉) salted fish. Unlike méi xiāng (梅香) salted fish, they can be served directly by frying or steaming. “ (Source: http://en.wikipedia.org/wiki/Cantonese_salted_fish)

IMG_2510

Preparation of this dish is very easy at home. However, to be as soft as what the restaurant is selling will very much depends on the type of meat you used and starches are needed to smoothen the meat. Pardon me to say, soothing sand smooth steamed minced meat in the eating outlets are  actually prepared from higher fat content pork belly minced meat. In order to further smoothen the texture, corn starch is used and additional oil may be needed.

IMG_2498

For this illustration, I have torn down significantly the mei cai and salted fish used because of my kids. However, it was properly adjusted in the ingredients list. You can used either mei cai or salted fish for the recipes. If you want to use both of these, your quantity of each of these two will have to be reduced by at least half.

IMG_2504


STEPS OF PREPARATION

Servings: 3-4 adult servings

IMG_24711

  • 300 grams of minced meat (pork belly preferred)
  • 30 grams of salted fish  (50 grams if mei cai is not used)
  • 50 grams of mei cai , soaked (100 grams if salted fish is not used)
  • 2 tablespoons of corn starch
  • 1 tablespoon of cooking oil
  • 1 tablespoon of sesame oil
  • 1 tablespoon of Chinese cooking wine
  • 1 tablespoon of minced ginger
  • 1 teaspoon of light soya sauce
  • Pinches of salt (remember salted fish will flavour the dish)
  • Dashes of white pepper

IMG_2508


STEPS OF PREPARATION

PicMonkey Collage1

  • Lightly grease a plate suitable for steaming and get ready a pot of water suitable for steaming at least 15 minutes.

  • Put all the ingredients into a food processor. Blend until well mixed and as sticky as possible.  Transfer the minced meat into the greased plate. Press until firm and level it. Steamed under high heat for about 7-10 minutes or when a skewer inserted into the centre comes out clean.

IMG_2492

Note

  • If you do not have a food processor, you can use hand to manually mixed the ingredients.

  • Water chestnuts can be used to improve the texture of the minced meat.

  • Timing of steaming will depends on how thick is your minced meat. For 7-10 minutes, it is about 2-3 cm thick.

IMG_2496


CONCLUSION

There is no such a need to have both mei cai and salted fish. You can just used either one. Remember that if you want smooth and soothing steamed minced pork, pork belly will have to be used.  Do give it a try and let me know if this suits your taste buds.

IMG_2500

Hope you like the post today. Cheers and have an nice day.

IMG_2506


IMG_2490